You can also connect your Android phone with your PC or laptop via data cable. On the other hand, if you want to share files between two Android phones, then you can use third-party apps such as SHAREit. SHAREit provides high-speed wireless connectivity with the help of WiFi direct technology.
There is another hidden method to transfer files on Android which very few people know. We are talking about FTP or File Transfer Protocol. Using the FTP service, you can connect your Android phone with your PC (Windows or Mac) or any other device (even with iPhone).
Like SHAREit, FTP also provides wireless connectivity, so you don’t need to connect your phone with any data cable. In this tutorial, we have shared everything you need to know about FTP like how you can setup the FTP server and use it to share files on your Android phone. Let’s get started!
Table of Contents
What is FTP and how it works
FTP stands for File Transfer Protocol. It is a type of network protocol which s used for the transfer of files in the client-server based architectural model. Let’s try to understand it with an example of a website which is based on this model.
The client refers to the website owner. On the other hand, the server refers to the storage location where the website data is saved. The FTP helps the client to access the server on its computer and transfer (i.e. upload or download) the data between them.
We will also implement the same model in this guide where your phone will act as a server and the other device will act as a client. The client will be able to download the files that are saved on your Android phone (or server).
How to use FTP on Android
The process of creating an FTP server on Android and then connecting both devices to share files between them is quite complex. We have made it very simple by dividing it into 4 steps. Here’s the complete guide –
1. Connect both devices on the same network
First of all, you have to connect both devices on the same network. For that, you can use the hotspot connection. Simply, turn on the hotspot on your Android phone (or the device from which you want to share files).
Go to the Settings > Connections > Mobile Hotspot and toggle the button to turn it on. Alternatively, you can enable the hotspot from the notification panel. Make sure that your device visibility is also turned on.
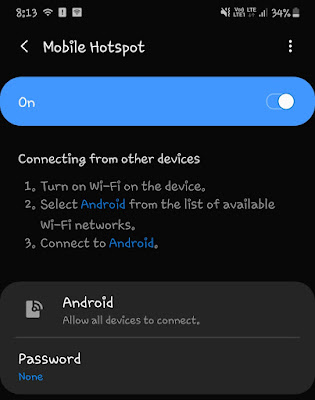
Next, you have to connect the other device with this hotspot connection. Simply, turn on the WiFi on that device and click on the hotspot name to connect. You may be asked to enter the password if the connection is password-protected.
2. Setup FTP server on your Android phone
Once you have connected both devices on the same network, the next step is to create an FTP server on your Android phone. You can use an app named WiFi FTP Server for this task. This app is available on Google Play Store for free.
Open the app once you have installed it. After that, tap the Start button to activate the FTP server on your phone. You will see the server information there such as Server URL, Userid, Password, Anonymous access, and root folder location.
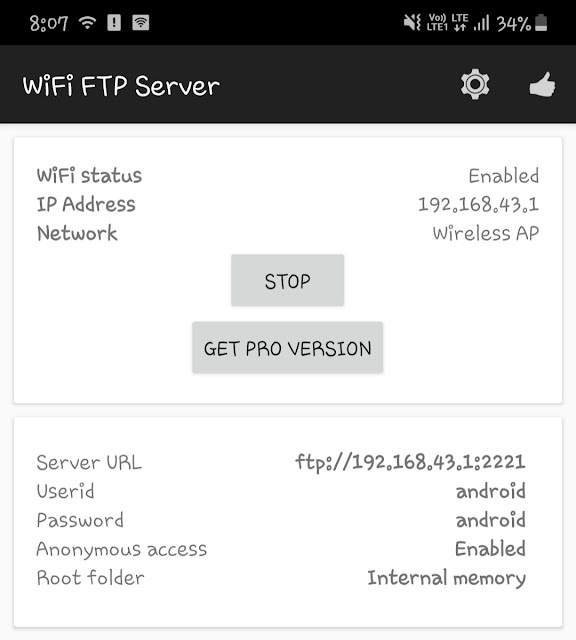
The default userid and password is ‘android‘ for both. You can change it from the settings if you want. For that, click the settings gear icon at the top-right corner of the screen. You can also change the port number, root folder, read-only access and other settings there.
3. Connect client device to the FTP server
Now your FTP server is ready. You just need to connect it with the client device (your PC, laptop, iPhone, or any other Android phone from which you want to access the server). There are various ways you can do it.
One of the easiest methods is by using the web browser. You can use Google Chrome. Simply, enter the Server URL that you have noted from the WiFi FTP Server app in the URL tab. The web page will load the directory (root folder) of the server as shown in the below picture.
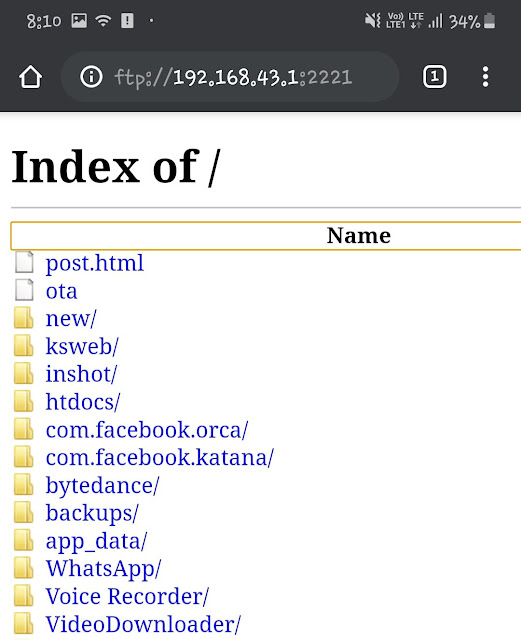
Now find and click the file you want to download. It will start downloading in the background like you download any other file from the internet. The drawback of using the web browser is that it doesn’t provide user-friendly interface and there is no way to upload files on the server.
Another option you can use to access the FTP server is by using the file manager app which supports FTP connection. One such example is File Commander. Here’s how to use it –
First, open the File Commander app and go to its menu (click three parallel lines). After that, click the “FTP” option and then tap the + button at the top-right corner of the screen. Now you have to enter the FTP server information such as server URL, port number, userid, and password.
You can get these information from the WiFi FTP Server app. Here’s how it will look after filling the information –
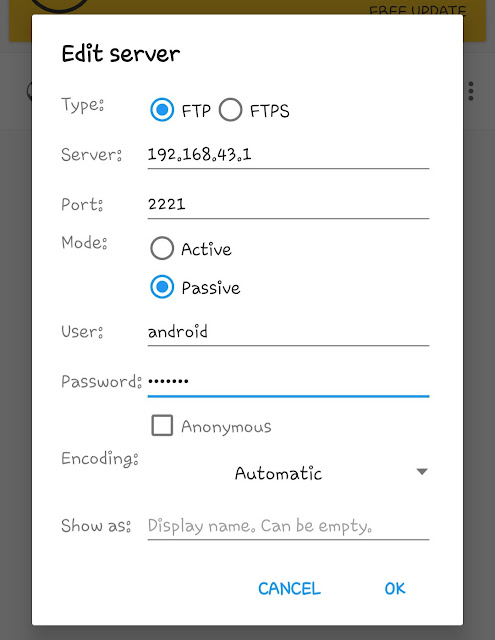
Please note that you have to enter the server IP address and port number separately as shown below. Also, don’t add ftp:// at the starting as it is added by the File Commander app by default.
If you are using your PC or laptop, then you can use FileZilla application and follow the same procedure to connect your FTP server with it. FileZilla is a cross-platform FTP client which supports Windows, Mac OS, Linux and more.
4. Transfer files between devices
Once you have connected the FTP server (your Android phone) with the client (your PC, laptop, iPhone, or any other device that you are using), it’s pretty simple to share the files between them. Just use the copy and paste action. As simple as that!
- Must read: How to scan and remove virus on Android
So that’s you can setup an FTP server on your Android phone and use it to share files wirelessly. We hope you liked our guide. If you are facing any problem in this tutorial, feel free to share it in the comment section below. We will be sure to help you. At last, don’t forget to share this tutorial with your friends.


