The Gutenberg block editor on WordPress gives you so many features to visually create your content with different kind of blocks. It is very easy to use because of the drag and drop system that allow users to create rich content without getting their hand’s dirty writing code. However, there is one issue that you might also faced with the list block on Gutenberg which is related to adding the image inside list.

Let’s suppose you are writing some steps with list block and you want to insert images for each step. If you add an image block directly, it will break the numbering of your list. The next list will start over again in the sequence. This type of formatting is definitely not good for readers and from SEO perspective as well.
So basically the problem is that you are not allowed to insert image block inside list block due to some formatting issues. And even if you do so by editing the HTML code, it will break your blocks. In this tutorial, we have come up with three different methods that will help you fix this issue with the Gutenberg block editor on WordPress. Now let’s see how these methods work one-by-one.
Table of Contents
1. Add inline image inside list block on WordPress
In this method, we will use an inline image option which is available in the list block on WordPress. This is one of the easiest methods as you don’t have copy and paste any code manually. The image will be added inside the <li> tag of the list by itself. However, the drawback here is that you have to add the alt text and adjust the size of the image manually. This step-by-step guide shows you how to use this method –
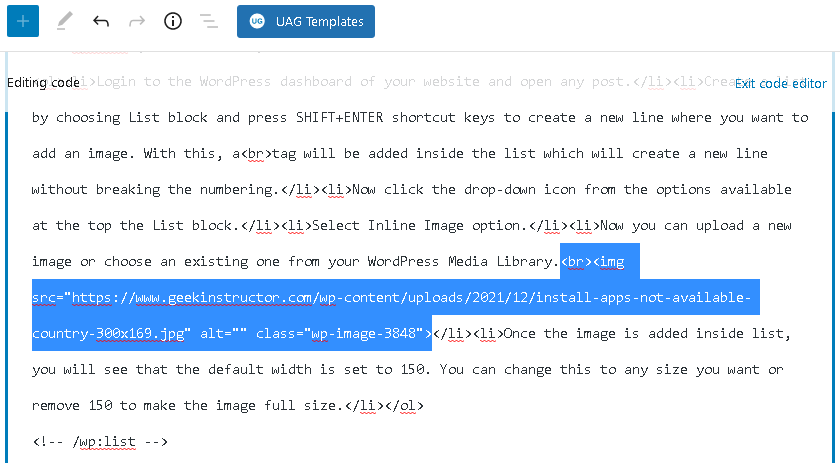
- Login to the WordPress dashboard of your website and open any post.
- Create a list by choosing List block and press SHIFT+ENTER shortcut keys to create a new line where you want to add an image. With this, a <br> tag will be added inside the list which will create a new line without breaking the numbering.
- Now click the drop-down icon from the options available at the top the List block.
- Select Inline Image option.

- Now you can upload a new image or choose an existing one from your WordPress Media Library.
- Once the image is added inside list, you will see that the default width is set to 150. You can change this to any size you want or remove 150 to make the image full size.
With this method, you won’t be able to add alt text to the images directly because that is possible only if the images are added as a separate block. You may already know that adding alt text is very important from the SEO perspective so you should not miss any image without alt text. There is a simple workaround that can be used and here’s how it goes:
You can switch list to the HTML view and then add alt attribute in <img> tag manually. For this, click the three dots icon at the top of the List block and then choose Edit as HTML option from the drop-down menu. This will show you the HTML code of the List block. Now find the place where you have added an image and write alt=“explain image here” inside its <img> tag. Once this is done, you can switch back to the edit the List block visually.
2. Manually copy the image code inside list block
The second method is to upload the image as a new block first, switch to the Code Editor next and then then manually copy the <img> tag inside List block. As you will be adding the image as block here, so you can directly add alt text to it using the Block settings panel. Here are the simple steps that shows you how to execute this methods properly –
- Open the post editor on your WordPress website and create a new list using the List block.
- After that, add a new Image block and upload the image from your device or choose an already uploaded one from your WordPress Media Library. Once the image is added in your post, you can add alt text to it from the Block settings.
- Now click three dots at the top-right corner on the post editor and then choose Code Editor from the drop-down menu. This will switch your editor to the HTML format view.
- Find the place where you have added the image block and copy the complete <img> tag from it. You will find it inside <figure>. Make sure that you don’t copy <figure> tag otherwise it will make your blocks to break due to formatting issues. Once you have copied the <img> tag, delete the image block by removing all its code.

- Next, head over to the List block and find the text where you want to place your image. Simply write <br> after the text (right before the closing </li>) and then paste the <img> tag that you have copied from the image block. Please note that you need to add <br> to create a new line after the text. The final code will look something like this:
- Once you have made all these changes, switch back the post editor to Visual View and you will see that the image has been successfully added inside your List block.
3. Continue list after adding image block
This method is quite different from the previous methods. The basic idea is to add the image block after the list and then create a new list block to continue with the rest of the points that you want to mention. But the problem here is that when you add an image block, it breaks the numbering of your list. This can be fixed by using the start value option which will start your next list from the same number that you left with the previous one.
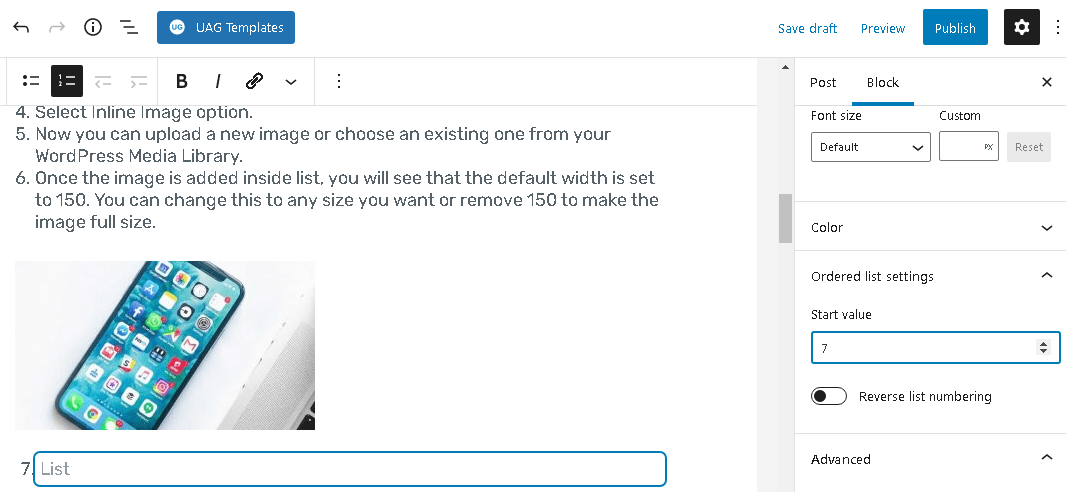
After adding the image block, simply create a new list. In the block settings panel on the right side, you will see an option named start value under Ordered List settings. Just enter the number from where you want to continue the numbering of your new list and that’s it. The good thing about this method is that you don’t have to do any changes in the HTML code manually. For your better understanding, here we have showed you a simple dummy example of how the final code will look like on your web page:
<!--first list block-->
<ol>
<li>Point 1</li>
<li>Point 2</li>
<li>Point 3</li>
</ol>
<!--image block will be added here-->
<figure><img/></figure>
<!--second list block-->
<ol>
<li value="4">Point 4</li>
<li>Point 5</li>
<li>Point 6</li>
</ol>
As you can notice in the second list block, there is value=”4″ attribute added in the first <li> tag. This is what makes the new list continue from the number of your choice that you can set in the start value option.
Conclusion – Which method is best
So these are some methods which can help you to add image inside List block on your WordPress post. We personally recommend you to use any of the first two methods because they are more SEO friendly and well optimized in formatting as compared to the third method where you have to create a new list every time you want to add an image. So that’s pretty much everything you need to know about this topic. If you have any question in your mind, feel free to share it in the comments below.