What most people normally do on social media is they post their photos directly without coming up with a creative idea to represent the whole story or event for which they are posting. Let’s suppose you were in a wedding last night and you have selected bunch of pictures that you want to share on your social media. Now if you post all photos separately, chances are many people will miss to see them all.

In such cases, you can create a short slideshow video by combining all photos together along with transitions, effects, text, emojis, and background music. Isn’t that a good idea? Now you might be thinking that making a slideshow video would take so much time and you also need to learn video editing for that. Well, it’s not true. You can create such type of videos even if you are a non-techie person.
If you have an iPhone or iPad, you are quite lucky as the iOS has several built-in methods that can help you to make an attractive video slideshow or memory movie of your photos for free. You can do all this without using any third-party video editing app and it will hardly take few seconds. In this tutorial, we have shared 4 different methods which includes using the Photos, Clips, and iMovie apps. Let’s get started!
Table of Contents
1. Making memory movie from albums
The Photos app on iOS has a feature which lets you make a beautiful memory movie from the albums or photos and videos that you have clicked on a particular date or month. You will get the movie created within a second. iOS will automatically arrange the photos, apply transitions, add background music and make everything sync very well. The best part is you don’t need any video editing app to edit it further as you can manage photos, change music, apply filter, edit title and do other changes from within the Photos app.
Let’s see how to make a memory movie or video slideshow on iOS with custom music by creating an album –
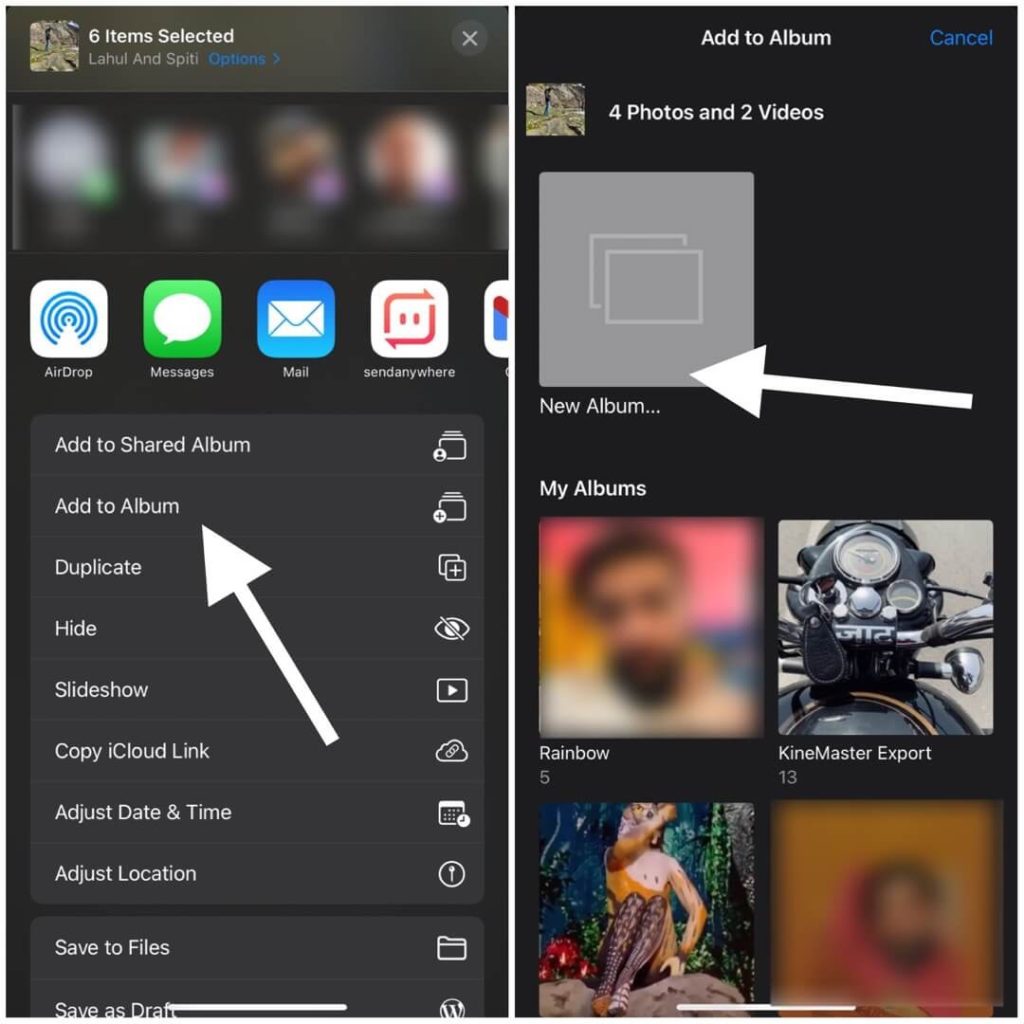
Step 1: Creating a new album
- Open the Photos app on your iPhone or iPad.
- Click the Select option at the top right corner. This will enable the selection mode.
- Now select the photos and videos whose slideshow video you want to create.

- Tap the share icon (it’s a small box will an arrow coming out of the top). You will find this at the bottom left corner on the screen.
- Now choose Add to Album option and then click the New Album to create a new one. You will be asked to enter a name for it. This name will also appear as the title for your slideshow video so choose it accordingly.
Step 2: Creating the slideshow video
- Once you have successfully created your new album, go to the Albums tab and open it from the My Albums section.
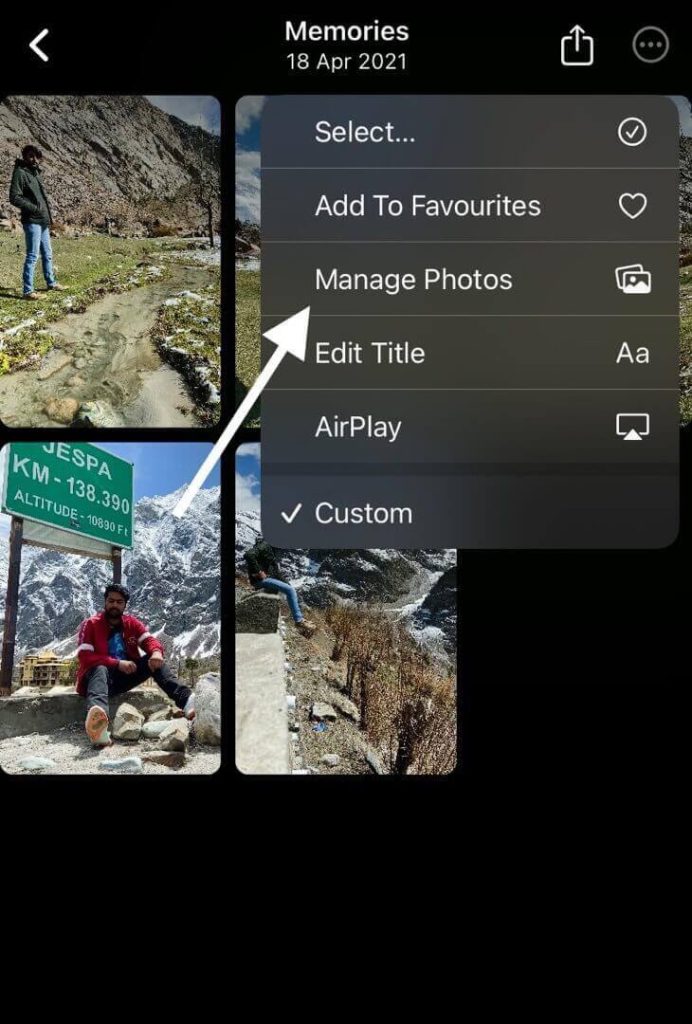
- Click the three dots in the upper right corner and then choose “Play Memory Movie” option from the menu that pops up on your screen.
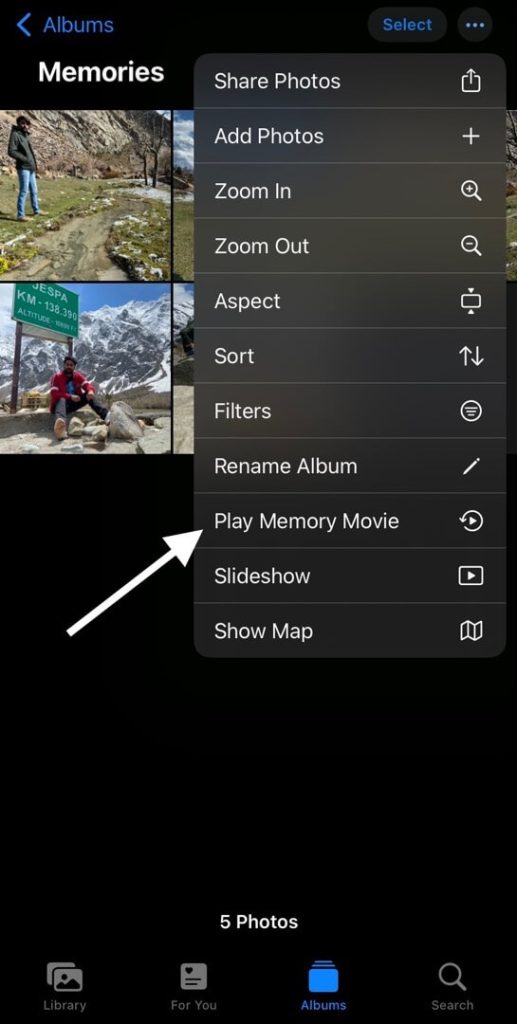
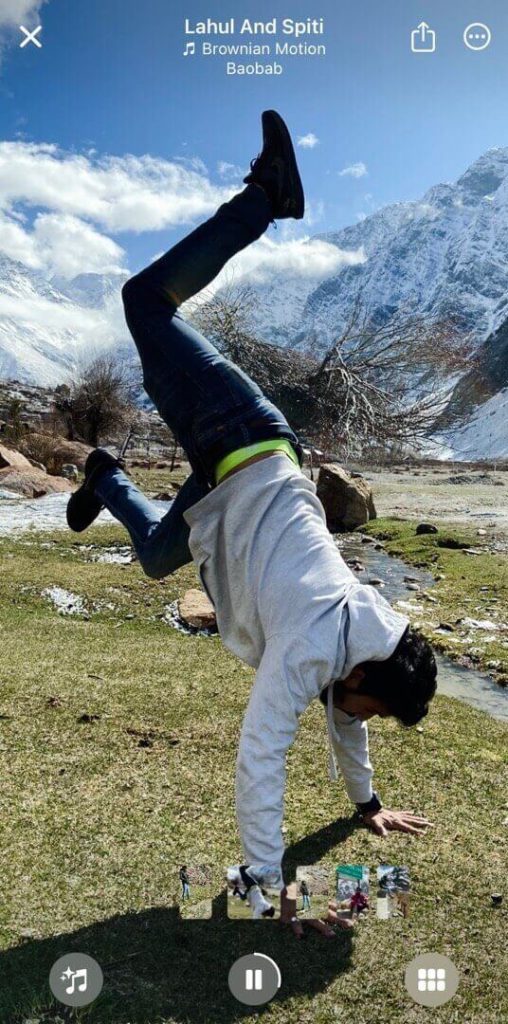
- Depending on the number of photos and videos you have saved in the album, it will take a while to create your slideshow video. Once it is done, you will see the preview of your memory movie. If you are satisfied with the results, you can directly export it or you can choose to edit it further.
Step 3: Editing the music
By clicking on the music icon at the bottom left corner, you can change the background music. There are so many soundtracks available for free. You can also use songs from Apple Music. But unfortunately, there isn’t any feature to import music from the Files app. From the same screen, you can also change Memory Looks by applying a filter on your photos and videos.
Step 4: Editing the title
There is a three dots option at the top right corner. If you click on that, a small menu will open where you will see various options one of which is Edit Title. With this, you can change the title text of the slideshow video that appears at the starting.
Step 5: Managing photos
By default, the photos are arranged in the order they appear on the album. There is an option to rearrange or delete them. For this, click the Manage Photo option from the menu and then deselect the photos and videos you don’t want to add to your memory movie. Another way to do this is by tapping on the grid icon at the bottom right corner on the preview screen. From there you can select the photos and delete them. With the long press action, you will see Make Key Photo option. This allows you to make a specific photo appear at the starting of the slideshow.
Step 6: Exporting your slideshow video
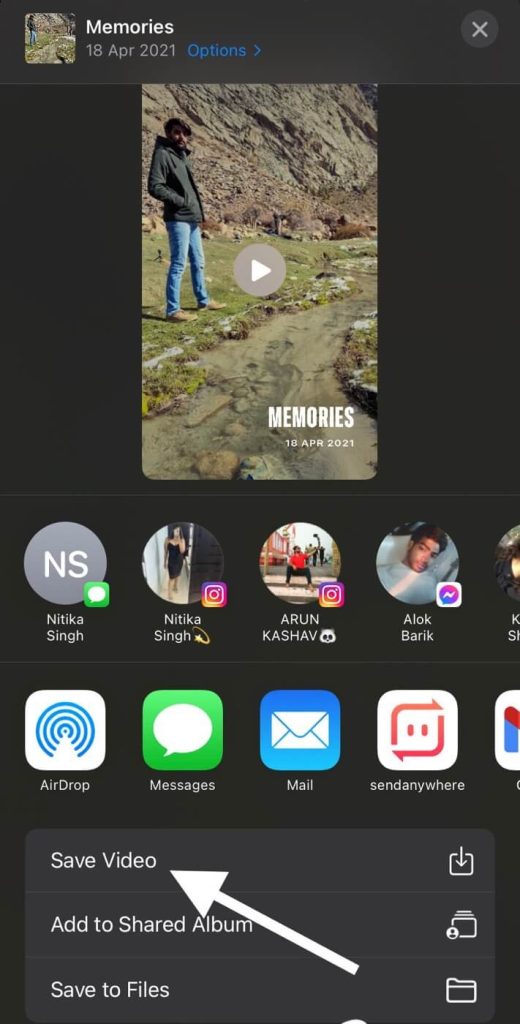
Finally, you can export your video by clicking on the share icon in the upper right corner. It’s the same icon with a small box and an arrow pointing upward. Once you click that, you will see options to share your slideshow video on various apps directly such as Instagram, WhatsApp, Facebook, etc. Apart from that, you can also save it to the Photos or Files.
So these above steps allows you to make a slideshow video of selective photos by creating a new album. Now let’s suppose you have clicked pictures of an event that just happened yesterday and you want to make its memory movie. In such case, you can skip the step of creating an album. The photos in Days and Months can be directly made into slideshow video. Simply, open the Photos app on your iPhone/iPad, choose the Days or Months in the Library tab. After that, find the date or month for which you want to create a slideshow video and then click the three dots on it. This will show you an option named Play Memory Movie.
2. Making slideshow of photos
Another way you can make slideshow video of your pictures on iPhone or iPad is by using the Slideshow feature on the Photos app. However, the drawback of this method is that it doesn’t allow you to save or export the video. You can only watch it within the app. There is a workaround which you can use here and it’s by screen recording the video with the built-in screen recorder on iOS. Let’s see how to do this all –
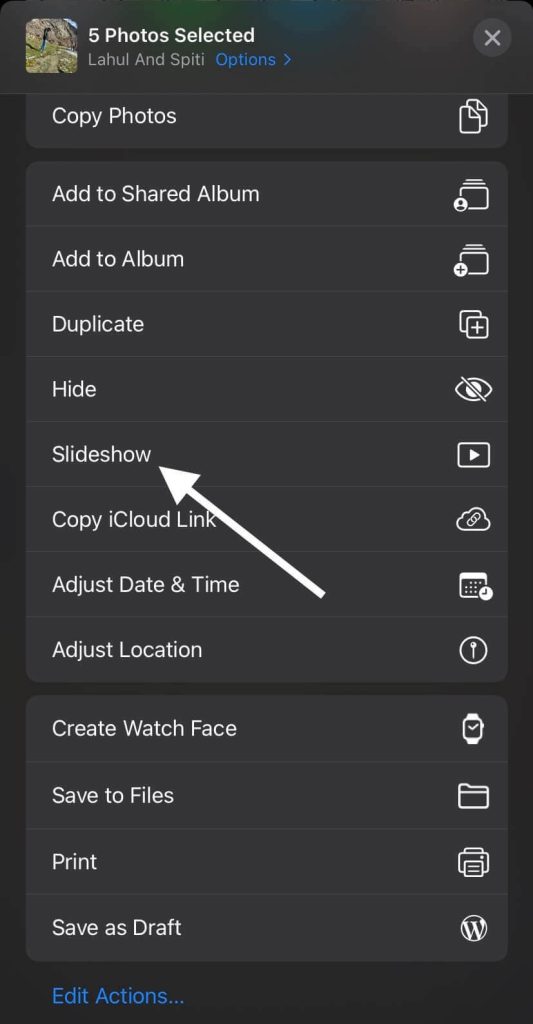
Again, open the Photos app and go to the Library. Choose All Photos from the bottom and then select the photos and videos you want to add to your slideshow. Next, click on the share icon and scroll up the pop up window to expand. There you will find Slideshow option. Tap on it and then see your photos converted into a beautiful slideshow video. You can tap the Options at the bottom right corner to edit your slideshow.
Under the Slideshow Options, you will see Theme, Music, Repeat, and speed adjust slider. You can choose from 5 different themes which gives unique format to your video. Similarly, there are 5 music available for each consecutive theme. You can also choose Music Library to add songs from Apple Music or iTunes Store. The next is Repeat toogle button that enables the repetition of photos. And at last, you can use the slider to adjust how fast you want the pictures to be changed.
Now comes the next part which is to save to slideshow video. As we have already mentioned, we will be using screen recorder for this task. You can simply turn it on from the Control Center on your iPhone or iPad. If it’s not there, then go to Settings > Control Center and add it from the More Control to Included Controls. When the screen recording is on, tap on the video to hide the upper and lower headers. Keep recording until the video gets finished and then stop it. You can find the recorded video on the Photos app.
3. Using Clips app
In this third method, we will be using another in-built iOS app named Clips. Most of the people ignore this app like it never existed. You might be one of the them and it’s also possible that you never opened it on your iPhone until now. Well, if you are looking for a simple video editor or slideshow marker app that can make your videos as quickly as possible, then Clips is all what you need.
Why you should use this app over previous methods is because it gives you more control and editing tools such as custom text, background music, animoji, filters, stickers, emoji, and more. So let’s start by launching the Clips app on your iPhone. You can find it on your home screen or App Library. Otherwise, use the search feature or ask Siri to open it. Once the app is launched, you will see Camera tab by default.
Go to Library and select the first photo that you want to add to your slideshow video. Use the pinch and zoom method to adjust its size. Now you have to press and hold the record button until you want to show that photo. Add all your photos and videos this way. From the timeline at the bottom, you can choose to edit individual clips by adding live title and effects.

There are other tools also such as trim, split, duplicate, mute, etc. To add background music to your slideshow video, click the music icon at the top right corner. You will find different kinds of music under Soundtracks. Another option is to add songs from the My Music which will take you to the Apple Music and iTunes Store. Once the editing is done, you can finally export your video by clicking on the share icon and then chosing Save Video option next.
4. Using iMovie app
Last but not the least, you can use the iMovie app on your iPhone to make video slideshow. For those who don’t know, iMovie is the native video editing app of iOS that comes pre-installed on iPhone and iPad. Why iMovie is worth mentioning in this tutorial is because you can edit your videos with this app as you want and also add background songs from the Files app which previous methods doesn’t allow. However, you need basic knowledge of video editing to use iMovie.
iOS has made sure that even beginner level or newbies can also edit videos with iMovie easily. To get started, first open the app on your iPhone or iPad and create a new project by tapping on the + button. Now two options will pop up on your screen named Movie and Trailer. As for making slideshow video, we will be using Movie. In the next step, you can select the photos and videos you want to add to your project. Tap the Create Movie option and this will take you to the editing screen.
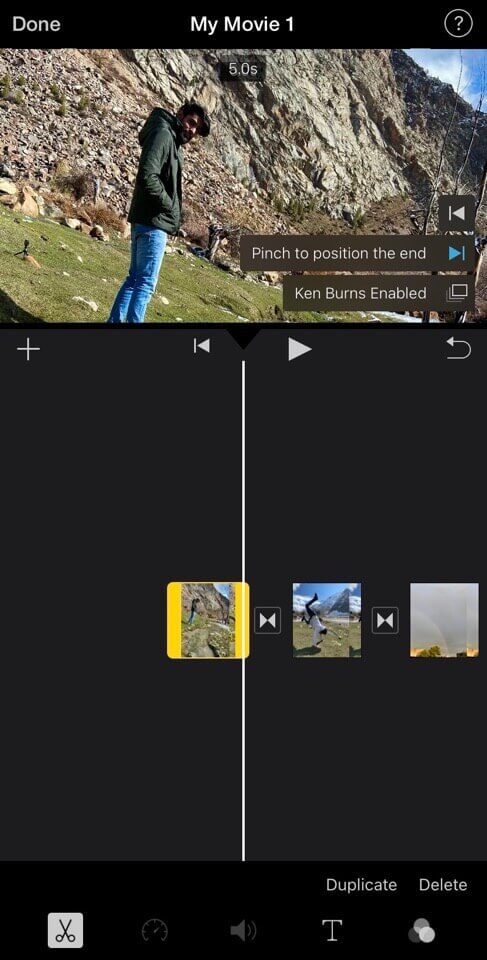
We won’t explain the detailed editing here as you can do that yourself easily after being familiar with the interface. Trim or expand the size of photos, add transition effect between two clips, add text, apply filter, and do other editing as you want. By tapping on the + plus button, you can add more photos, give voice over, and add background music from Files. Click the Settings gear icon to open the Project Settings page and from there you can apply theme. Finally, export your video once you finish the editing part. That’s it!
Conclusion
So these are some methods which you can use to make a beautiful slideshow video or memory movie of your photos on iPhone or iPad using the built-in apps. You can use any of them based on your choice. The first method is so far the best as it takes only few seconds and doesn’t require to do any task manually. If you need more customization, then we recommend you to go with the Clips app.
On the other hand, iMovie is for those who want to edit their videos manually and add background music or song from the Files. There are still more methods which includes using the third-party video editing apps but you don’t need to use them as these methods are enough to make any kind of slideshow video you want. Let us know which one is your favorite. You can ask your personal queries in the comments below.