Blurry images will directly affect the user experience on your website. As images will lose their details, they will not be able to serve the purpose for which you have added them. If you are concerned about the performance of your website, you can try other ways to optimize your blog images without affecting their quality.
Now in this tutorial, we have shared two simple methods that can help you to fix this issue of blurry images on Blogger. You can easily make your blog images look clear and sharper as they were originally before uploading.
Table of Contents
Set images to original quality on Blogger
Blogger provides an option to change the quality of the image. If you don’t want to resize and compress your images, you can set them to original quality. Here’s a step-by-step guide –
- Go to Blogger.com and login to your blog dashboard.
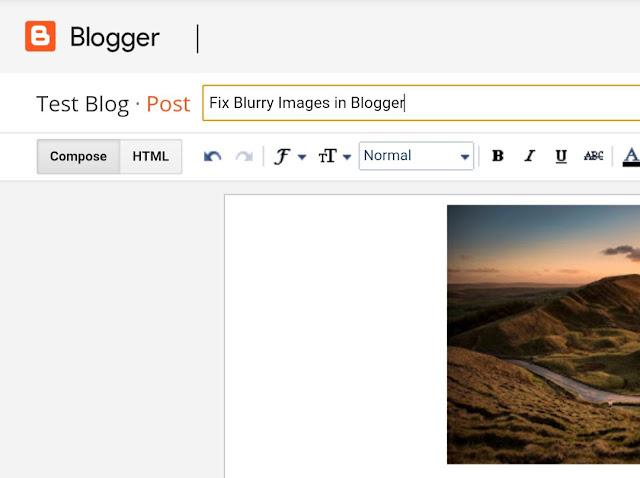
- Now open the post in which you are facing the blur image issue.
- Click on the image.
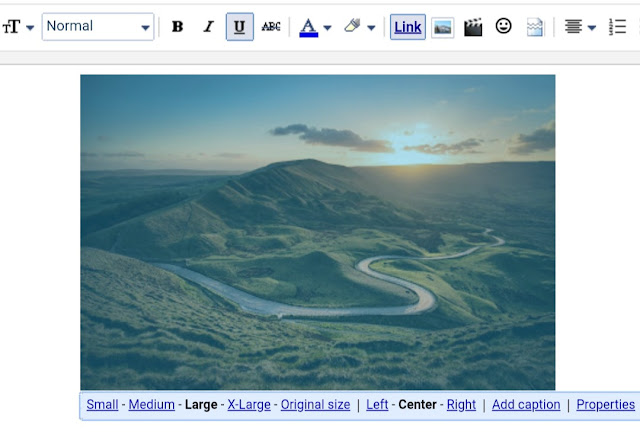
- Just below the image, you will see different options to set its size/quality such as Small, Large, Medium, X-Large and Original Size. Here you have to click on the Original Size option. That’s it.

This will resize your image to its original resolution and set it to maximum quality. The image will not look blurry now, however, if its resolution is very high, it may not fit in the post width.
Change image quality on Blogger manually
If you don’t want to change the resolution of the image that Blogger has set by itself, then you can use this alternative method. Here we will change the quality of the image by editing its URL.
All the images that you upload on Blogger are hosted on the subdomain of blogspot.com. By making small changes in the URL of the image, you can directly change its quality and resolution. Simply follow these steps –
- Login to your Blogger Dashboard again.
- Open the post and switch to the HTML view by clicking on the HTML button below the post title.

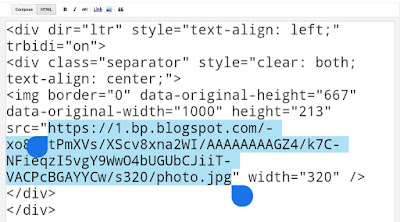
- Now find the URL of the image whose blur quality you want to fix. You will find it in the img HTML tag of the image. The URL will look something like this –
https://4.bp.blogspot.com/-C1XF6336dpY/WVs1zmzwBxI/AAAAAAAAECU/QUWoArv7yV8QNKMCB9O1-6hOKTmnBssCACK4BGAYYCw/s320/image.jpg
- In the image URL, you will see something like s320 as in the above example. This attribute sets the quality of the image. Here the number after s represents the width (or resolution/quality) of the image.
- You have to change this s attribute to s1600, which will set the image to its original quality. Here’s an example –
https://4.bp.blogspot.com/-C1XF6336dpY/WVs1zmzwBxI/AAAAAAAAECU/QUWoArv7yV8QNKMCB9O1-6hOKTmnBssCACK4BGAYYCw/s1600/image.jpg
Once you have done this, your image will not look blurry. You have to follow these steps for every image whose quality you want to improve.
Important Tip: If you want to resize the image manually (in case if it is smaller in size), you can change the height and width attribute in its img HTML tag.
- Also read: How to SEO optimize images on Blogger
Still getting the same problem?
If you are getting the same blurry images even after trying the above methods, then there might be some problem in your Blogger template. Some templates have a JavaScript code in them which can forcefully set the default quality for all your post images.
If you know about Blogger template coding, you can find that code by yourself, otherwise, contact your template developer. If nothing works, you can try to change your Blogger template. Make sure to take a backup of your Blogger template before doing that.
So these are some methods that can help you to fix the issue of blurry images on Blogger. We hope you find this tutorial helpful. If you know any other better solution, please share it with us in the comment section below.