There are a number of domain registration services available on the internet. GoDaddy is the most popular one in this list which offers domain names at a reasonable price. If you just bought a new domain from GoDaddy, you can connect it with your Blogger blog by adding some CNAME and A Records in the DNS settings on your domain.
It sounds a little complicated, but it is actually very simple. Here we have discussed how you can easily setup custom domain on your Blogger website with GoDaddy. This tutorial will be helpful even if you are using any other domain registration service. Let’s get started!
Table of Contents
How to add custom domain in Blogger
As already mentioned, to setup your custom domain on Blogger, you need to add the CNAME and A Records in the DNS settings of your domain. These settings are used to map the custom domain to your Blogger blog.
Blogger will provide all these settings when you add a custom domain on your blog. Follow this step-by-step guide –
- First, login to your Blogger account and go to your blog dashboard.
- Click Settings option from the sidebar menu and then you will be moved to the Basic Settings.

- Under Publishing, click the “Setup third-party url for your blog” link next to the Blog Address option.

- Now enter your custom domain URL and tap the “Save” button.

- When you click the Save button, Blogger will show an error message. This error occurs because Blogger can’t verify that you are the owner of that domain.

It will provide you two CNAME records that you have to add in the DNS settings on your domain. So copy those CNAMEs and save them in a notepad or any other text editor application.
- Also read: How to add custom permalink URLs in Blogger
Add CNAME and A Records in GoDaddy
In the next part, you have to add the CNAME and A Records of your Blogger blog on GoDaddy to map your custom domain. Here’s a step-by-step guide –
- Login to your GoDaddy account and go to My Products.
- Click the DNS button next to the domain name that you have purchased to setup with your Blogger blog.

- If you find any default A Record in the Records section, delete it first by tapping the edit (pencil) icon next to it.

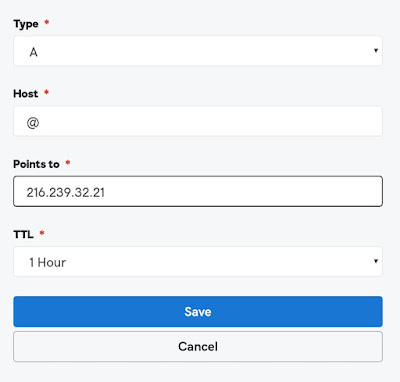
- Now you to add four new A Records in the DNS settings. Simply, tap the ADD button and then select A Type.

Add @ in the Host field. The TTL setting should be set to 1 hour which is the default value.
- Add these IP addresses in the Points To field of the A Records one-by-one –
- 216.239.32.21
- 216.239.34.21
- 216.239.36.21
- 216.239.38.21
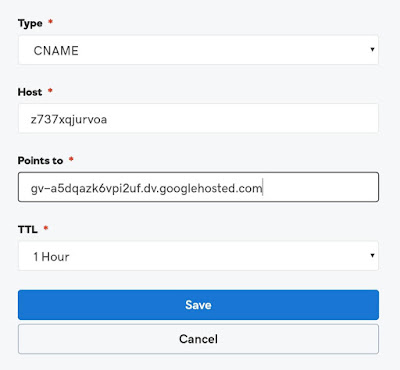
- Next, you have to add two CNAME records. Simply, tap the ADD button, select CNAME Type and then add the values of HOST and Points To that you have copied previously from the error in Blogger

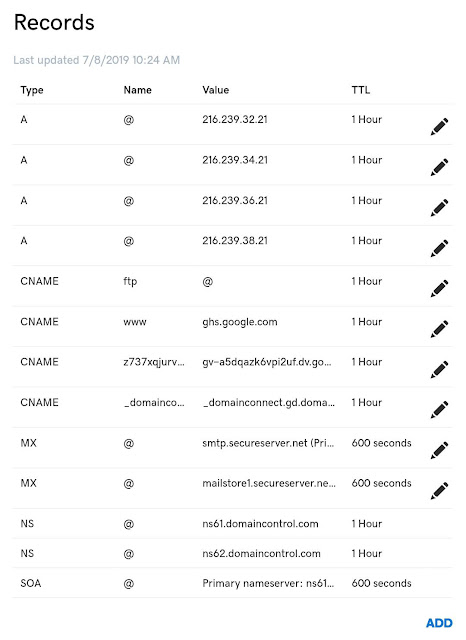
After adding these CNAMEs and A Records in your DNS settings, it will look something like this –

- Finally, go back to your Blogger settings and tap the “Save” button again. If everything is ok, you won’t get any error this time.
Now you have successfully setup custom domain on your Blogger blog with GoDaddy. Go and check out your new website. It may take some to reflect the changes all over your website.
Redirect non-www to www version
At last, you can also enable the redirection from the non-www version of your website to the www version. Simply, go to Settings > Basic and tap the edit link next to your custom domain. Now tick mark the button to enable the redirection from non-www to www.
We hope you find this tutorial to setup custom domain on your Blogger blog with GoDaddy. You might be interested to read another tutorial on how to enable HTTPS on your Blogger website. If you are facing any problem in the above steps, feel free to share it in the comment section.