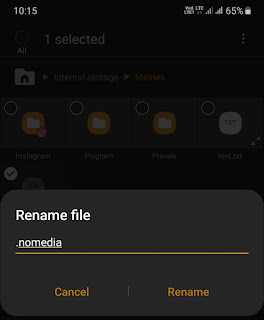
If any folder contains a nomedia file, then all files within that folder get hidden. For example, if there are some photos, they will not appear in the gallery and other multimedia player apps. So basically, nomedia file tells the apps not to index the folder (and its content) in their file explorer.
Sometimes you may need to create a nomedia file on your Android phone to hide your private folders/files. It’s pretty simple! In fact, there are several ways you can create a nomedia file. Here we shared all methods in detail. Let’s quickly jump to the first method.
Table of Contents
1. Use an existing file
You can easily create nomedia file from any existing file on your phone, simply by renaming it. For this task, you will need a file manager app. Either you can use your phone’s built-in file manager or download any third-party app from Google Play Store. Follow this step-by-step guide –
- Launch the built-in file manager on your Android phone. If you don’t want to use it, then we will recommend you to download Astro File Manager.
- Now find any file on your phone which has a very small size (text file, for example) and copy it to the folder/directory where you want to create a nomedia file.
- Next, select the file that you have just copied to the folder and then click the “Rename” option. This option is available under the menu (three dots) in some file managers.
- Remove everything from the file name and add “.nomedia” as shown in the below picture. Make sure to add a dot symbol at the starting. Finally, click the Rename option to save the changes and you’ve done it.

Please note that if the “Show hidden files” feature is disabled in your file manager, then nomedia file will not appear in the folder/directory after you rename the file. We have described later how you can enable this feature.
2. Copy already created nomedia file
There are so many nomedia files that are already saved on your phone. Even WhatsApp has nomedia file in its Media folder. Instead of creating a new nomedia file from scratch, you can use any existing one.
By default, the nomedia files are hidden on your phone. You can unhide them by enabling the “Show hidden files” feature in the file manager app. Simply, follow these steps –
- First, open the file manager app, tap the menu button (three dots at the top-right or top-left corner) and then click the Settings option.

- Now enable the “Show hidden files” button.
- Next, go to /WhatsApp/Media/WhatsApp Voice Notes directory.

- Here you will find a nomedia file. Simply, copy it and then paste it anywhere you want to hide your files. That’s it.
3. Use third-party app
There is a free app available on Google Play Store named Nomedia. If you find it a little bit tricky to create a nomedia file manually, then you can use this app. First, download and install the Nomedia app on your Android phone.
As you open the app, you will be asked to allow storage access. After that, you will see a list of folders. Simply, find the folder in which you want to create a nomedia file and then toggle the button next to it. As simple as that!

4. Use computer/PC to create nomedia file
You can also create nomedia file from your computer/laptop and then copy it to your Android phone. Here’s how you can do it –
- Open Notepad on your computer/laptop.
- Click the File option at the top-left corner of the screen and then click the Save option.
- Now a pop-up window will open. In the File name field, remove everything and add .nomedia. Also, select the location where you want to save the nomedia file and then tap the Save button.
- After that, connect your Android phone to your computer/laptop via USB. Then, copy and paste the nomedia file in the folder that you want to hide.
So these are some methods to create nomedia file on your Android phone quickly. Let us know which method you are going to try for yourself. If you are facing any problem in the above steps, then share it in the comment section. Stay connected with us for more interesting tutorials!


