In today’s world where everyone of us are so intricately connected one way or the other, even minor necessities are fulfilled by way of the Internet. A plethora of gadgets and the shared connection between them have given rise to the normalization of using Internet on a daily basis. While most people have become tech savvy and prefer portable use, your computer can become a portable hotspot to share its connection with other devices around.
If you’re a Windows 10 user, you’ll be happy to know that its hotspot is one of the easiest and glitch-free hotspot’s to use. Rarely does it ever give any issues, but in the rare cases that it does, we have come up with eight easy ways to fix them in a jiffy. Read on to find out how to fix your mobile hotspot on your Windows 10/11 system in the event of it not working properly.
Table of Contents
Fix #1: Troubleshoot your Network Adapter
Troubleshooting your network adapter should be the number one go-to option in the event of your mobile hotspot not working properly. It’s quick and solves the issue in a matter of minutes.
- Go to Settings and navigate to Update & Security below.
- Click on Troubleshoot on the left-hand menu on your screen.
- You’ll see a list of options to troubleshoot here, but you need to click on Network Adapter by going to Additional troubleshooters and tap on the ‘Run the troubleshooter’ tab below.
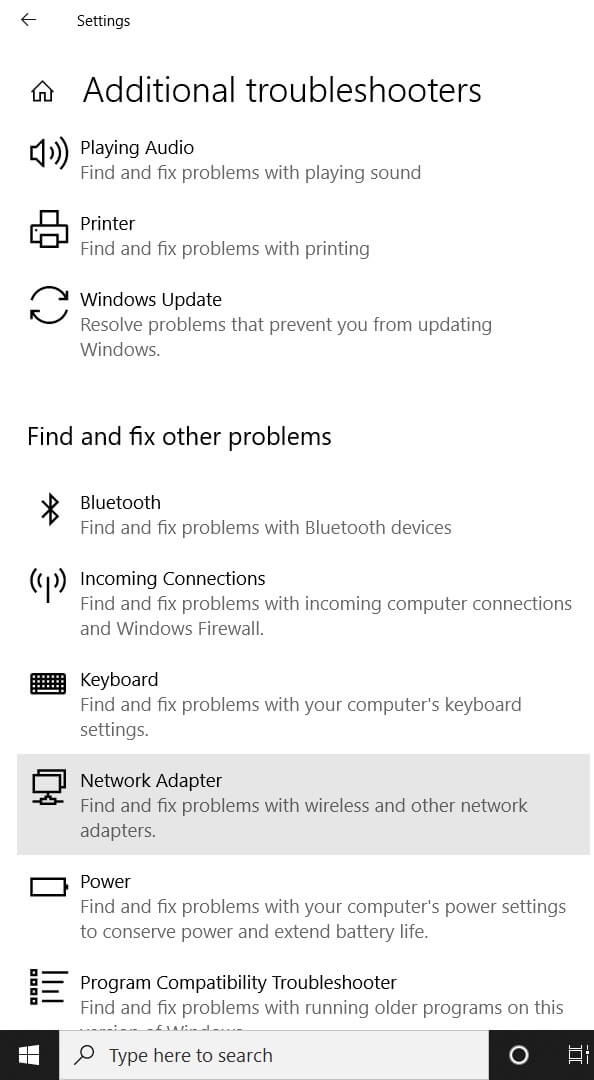
- Once done, the system will automatically solve the issue and update with a message confirming that your hotspot has been restored to previous working conditions. If this does not work, below are some other ways to try out.
Fix #2: Update your Network Driver
The following method is a rather long-winded one and should be used if the first method does not work out. Your network driver might be outdated and is in need of an update and hence if automatic updates are switched off,you can follow the below steps to update it to fix your hotspot.
- Type Device Manager from the Search Bar below and expand Network Adapters.
- You’ll see the names of many adapters here but your adapter should be Intel ® Dual Band Wireless-AC 3160/3165 etc.
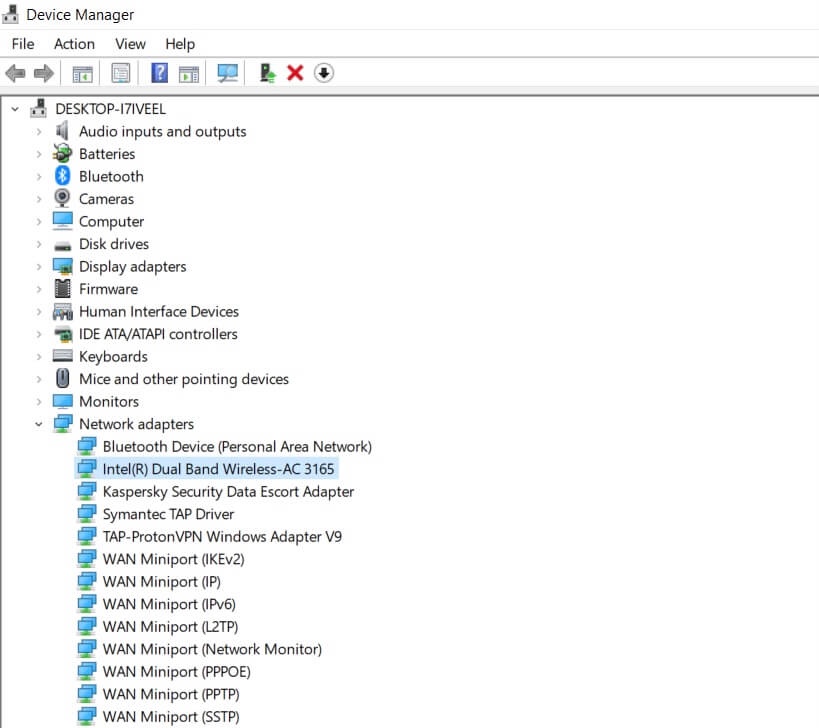
- Right-click on the adapter and select Update Driver here.
- Click on ‘Browse my computer for driver software’ after getting the prompt for the search for your drivers.
- In the list of compatible hardware shown on your screen now, you should select Intel ® Dual Band Wireless-AC 3160/3165 (Microsoft) which should be the option listed below.

- Click on Next to install the driver and wait for it to finish.
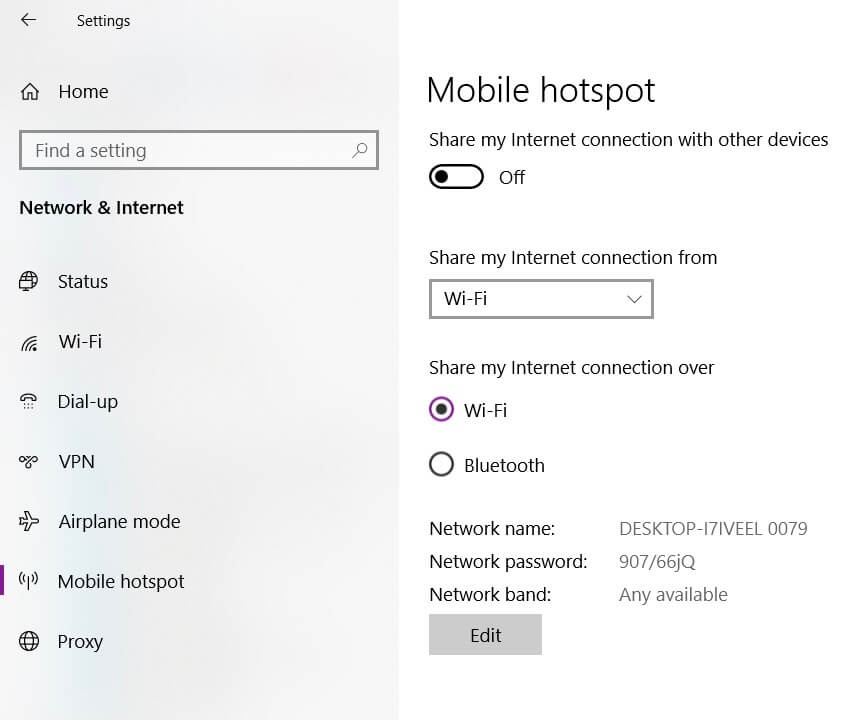
Your Wi-Fi will automatically disconnect after the driver is installed, so you’ll need to reconnect it. Go to Settings and select Network & Internet. Here you will see that your connection is disabled. From the Wi-Fi logo below on your taskbar, select your connection and click on Connect. Now go to Mobile Hotspot on the left-hand menu under Network & Internet and turn on the toggle for your hotspot.
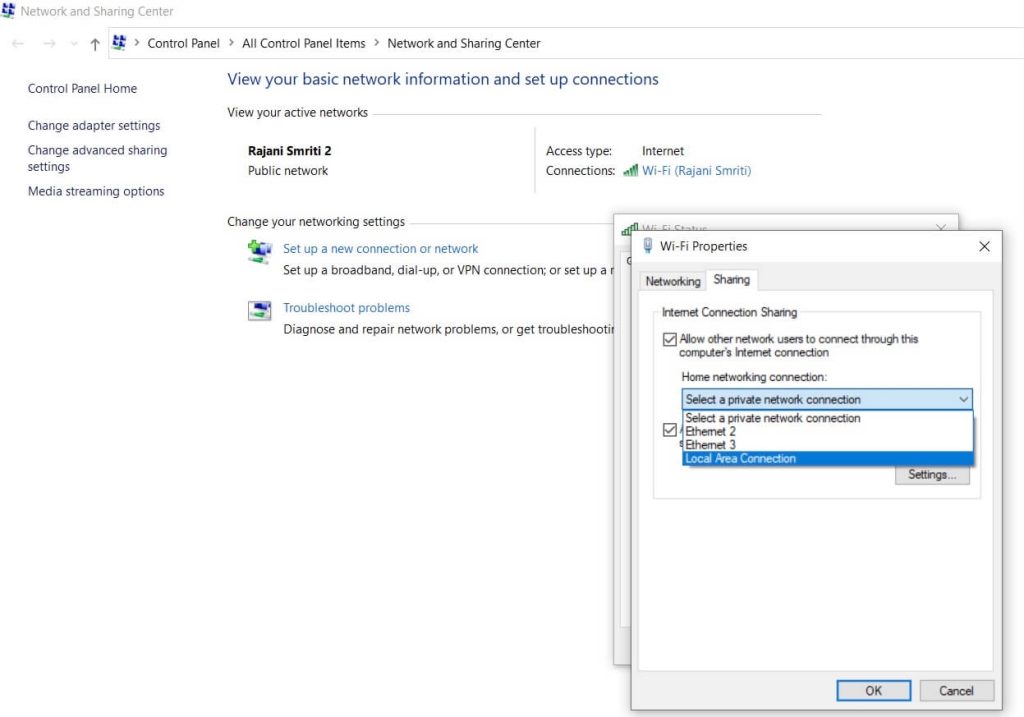
On your right-hand menu, you will see the option for Network and Sharing Centre. Open that and you’ll see the list of your available networks. Click on your current connected network and open up Properties.
Under the Sharing tab, you’ll see that the option for ‘Allow other network users to connect through the computer’s Internet connection’ is unchecked. Check that option to get a prompt for which you need to mark Yes on that option.
Under Home Networking connection, select your Local Area Connection (LAN) and click on OK.
Your mobile hotspot should be all good to go now. Check for any discrepancies after this method.
Fix #3: Uninstall your virtual adapter
To find out if any hidden virtual adapters apart from the main one is causing any blockages to your hotspot’s connection, follow the below steps:
- Go to Device Manager and under the View tab above, select ‘Show hidden devices’.
- Now expand Network Adapters and you’ll be able to see some adapters by the name of ‘Microsoft Wi-Fi direct virtual adapter’.
- Uninstall any adapter which has this name followed by a number like ‘#2’, ‘#3’, ‘#4’, ‘#5’ etc. DO NOT uninstall the adapter without any number next to it.

- After uninstalling those numbered adapters, reconnect to your wi-fi and turn on your mobile hotspot to resolve this issue.
Fix #4: Diagnose your Startup type
This is a relatively easy method to follow but it can also be effective in fixing mobile hotspot not working on Windows 10 issue.
- Search for Services on the Search Bar and open the app.
- Under Services, search for Windows Mobile Hotspot Service and double click on it.
- Under Startup type, select Automatic and click on Apply below.
- Then click on OK to close the tab.
Fix #5: Run commands on Command Prompt (CMD)
This is an advanced method, so I recommend going through all of the methods before wracking your brains for this one. More often than not, this method will solve your hotspot issues if all methods don’t work out. Follow the below instructions very carefully to resolve it:
Search for CMD on your Search Bar and right-click to Run as administrator. You’ll need to write three codes here which are given as follows –
netsh wlan show driversnetsh wlan set hostednetwork mode-allow ssid=(*network name) key=(*password)Note: You’ll find the above network name and password under the Mobile Hotspot page after going to Settings and navigating to Network & Internet.
netsh wlan start hostednetwork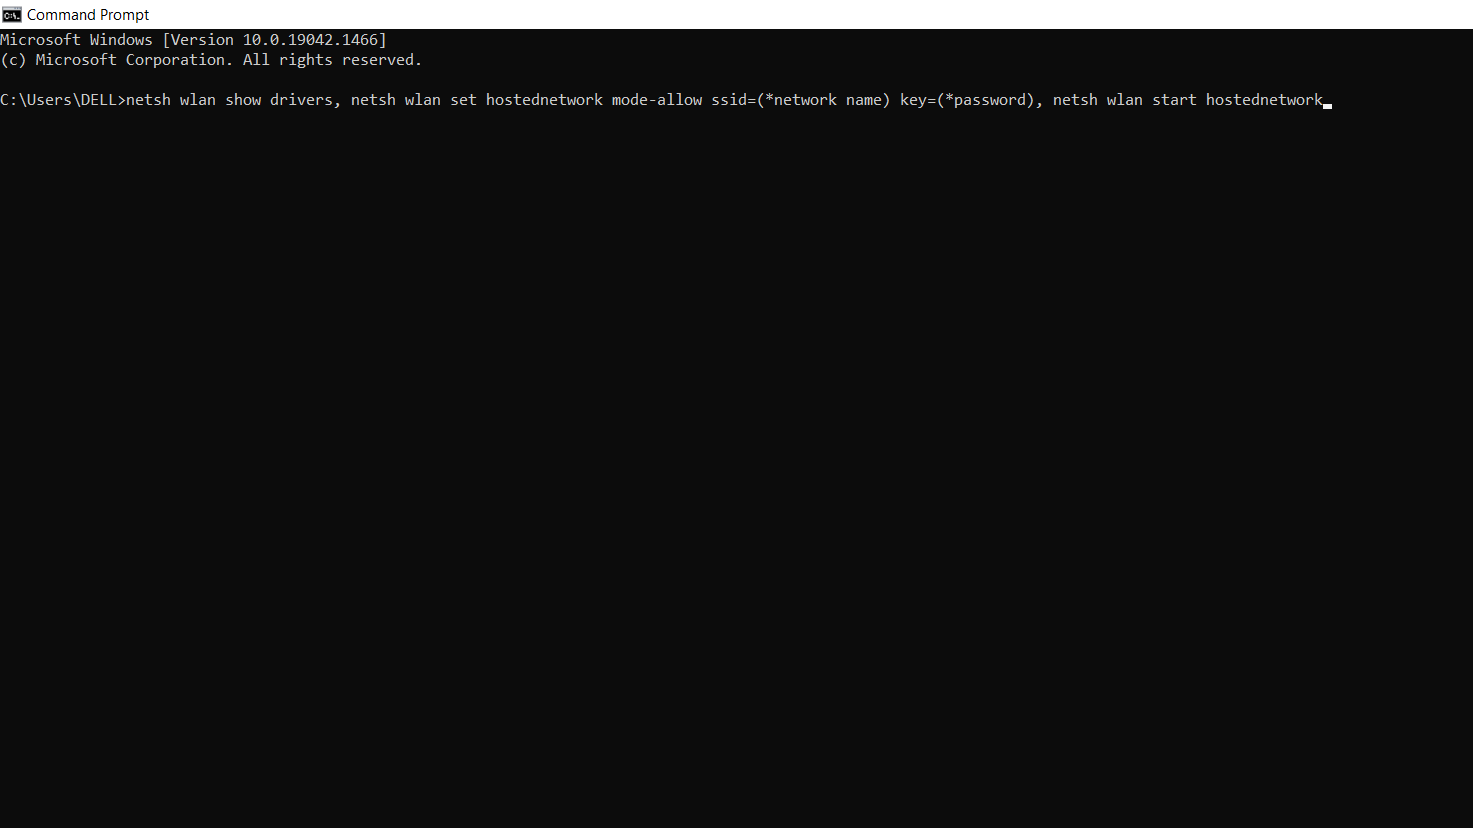
Write all these three codes on your command prompt one after another manually and press the Enter button on your keyboard to execute them one after the other.
After these codes are executed successfully, close the CMD and your mobile hotspot issue would have been automatically resolved on your Windows 10 PC.
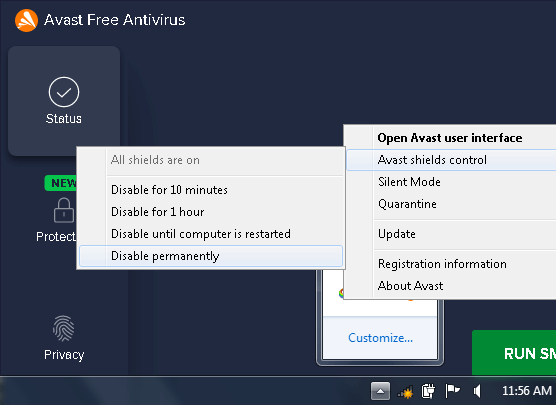
Fix #6: Turn off your Firewall and Anti-Virus
If the above extensive methods don’t work, you’ll probably know that the issue is with your firewall and/or anti-virus. They can temporarily block your mobile hotspot. If it starts working after turning them off, you’ll need to change your anti-virus software to one which works with the hotspot. If it doesn’t work, turn both on to keep your system protected.
Fix #7: Disable your Bluetooth
Disabling your Windows Bluetooth sometimes does the trick, as your Bluetooth may interfere with your hotspot connection at times. It’s quite easy to disable Bluetooth on Windows 10. From the Settings, go to Devices. Under Devices heading, navigate to Bluetooth and other devices and then turn off the toggle button. That’s it.
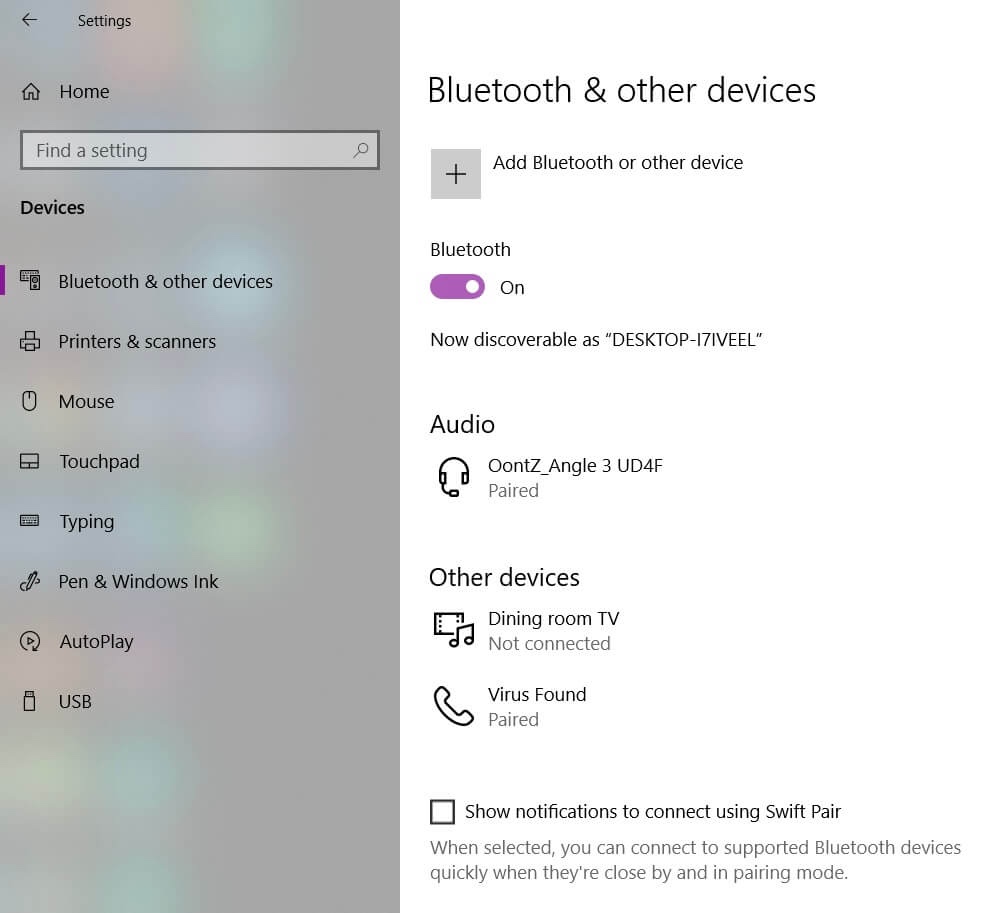
Your hotspot should be working fine after turning off the Bluetooth on your Windows 10 PC/laptop.
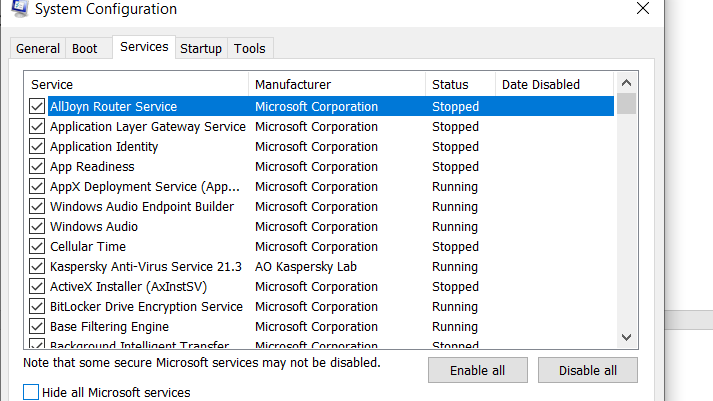
Fix #8: Perform a Clean Boot
Here’s how you will be able to perform a clean boot after startup:
- Open Run by pressing the Win + R keys.
- Type in ‘msconfig’ and click on OK.
- Locate the Services tab above and select ‘Hide all Microsoft services’ box. Click on ‘Disable all’ after that.
- Now go to the Startup tab next to Services and click on ‘Open Task Manager’.
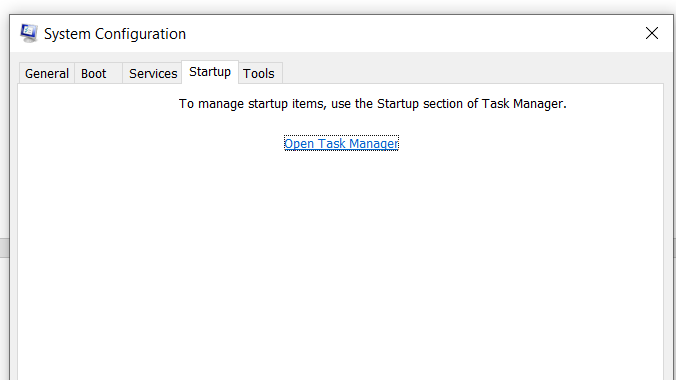
- Click on each program and select Disable. Do this for all apps in the tab.
- Now close the Task Manager tab, return to the System Configuration window and click on OK.
- Reboot your system now and after startup again, your mobile hotspot would be working fine on your Windows 10 PC/laptop.
Fix #9: Delete Hosted Network Configuration
You can reset the settings of Microsoft Wi-Fi direct virtual adapter correctly by deleting a configuration setting from the Registry Editor (regedit). This will bring the functioning of your hotspot to normality. This is how you’ll do it:
- Open up start and type in ‘regedit‘.
- Right-click on ‘regedit’ and choose option ‘Run as administrator‘.
- Now navigate to the following registry key: HKEY_LOCAL_MACHINE\SYSTEM\CurrentControlSet\Services\WlanSvc\Parameters\HostedNetworkSettings\
- Delete the key: HostedNetworkSettings from the options.
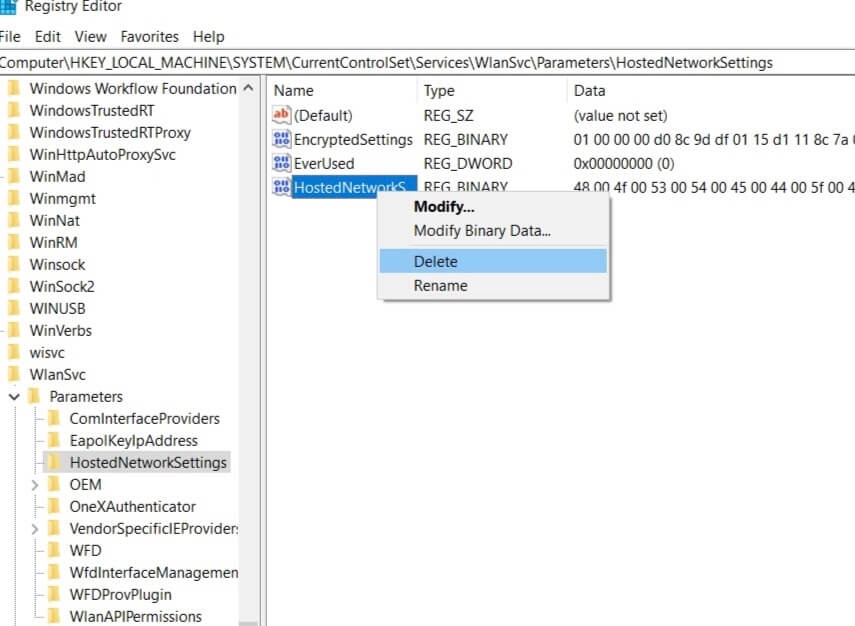
Reboot your system for changes to take effect. Hopefully, this will fix the mobile hotspot connection problem on your Windows 10/11 based PC.
Fix #10: Check internet connection
If you are getting network signals on your PC but you are still unable to access the Internet, then it might be possible that there is some problem with your Internet connection. Make sure that your internet is working fine on your smartphone from which you are sharing the mobile hotspot to your PC. Try resetting the network settings on both devices and reconnect them again. This is the last resort left to do for you to fix this problem.
Note: If mobile hotspot isn’t working even after trying every single thing then you can try another way to share your phone’s internet connection via USB tethering feature. You can read more about this in our detailed guide.
Video tutorial
Conclusion
The mobile hotspot on your Windows 10 is probably the most convenient feature to get things done on-the-go. It is an invaluable source of wherewithal in terms of portability and digital convenience, but if it can’t function properly, it is an absolute waste of resources. The above extensive list of solutions to fix your hotspot should cover all the gaps of its malfunctioning, and get you back to working with this feature in no time. Feel free to leave your comments as to your feedback to these solutions and check out our website for more information on related articles.