Gearing up for that important presentation for your global investors on your virtual meeting client only to find out that your laptop/desktop camera app just stopped functioning while everything else is okay by the side?
Well more often than not, you have a few missing drivers after that recent update which you approved, or it is highly likely your current privacy settings or anti-virus software is blocking access to your Camera app.
There’s no need to worry however as we have given you an in-depth illustration of the common Camera problems on Windows 10 and how to fix the Camera issue on the platform. Read on to find out more.
Table of Contents
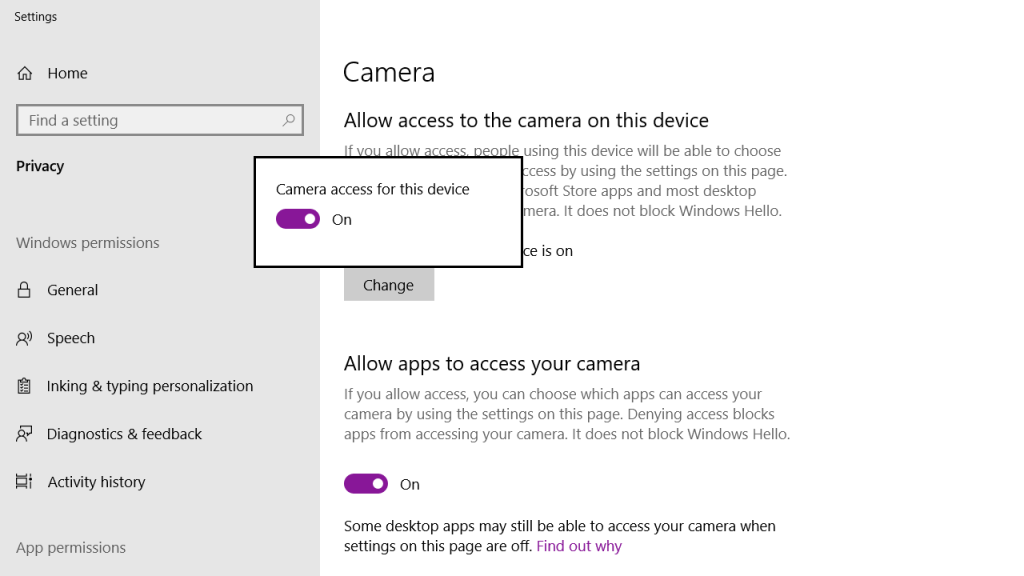
Fix #1: Allow Camera access in Settings
Search for Camera Settings on the Search Bar below and navigate to the ‘Change’ option below the option ‘Camera access for this device is on’, and allow access to your Camera from there. Also make sure all the apps have access to the Camera by turning on the Camera feature for all apps as you scroll down.
This is a very quick fix and resolves the issue within seconds. Your computer by default will already have given permission to access the Camera app for all apps, but you can go ahead and double-check if that’s not the case.
Fix #2: Update Camera Driver
If you have recently received update requests and have been stalling for a while, you’ll likely need to update your PC/laptop driver. Below are some easy steps to do this.
- Open Device Manager and navigate to Imaging Devices.
- Click to expand it and then right-click on laptop camera or integrated webcam driver (whichever option is available).
- Now select Update Driver Software.

- The most feasible option now would be to search automatically for any updated driver software. Select that.
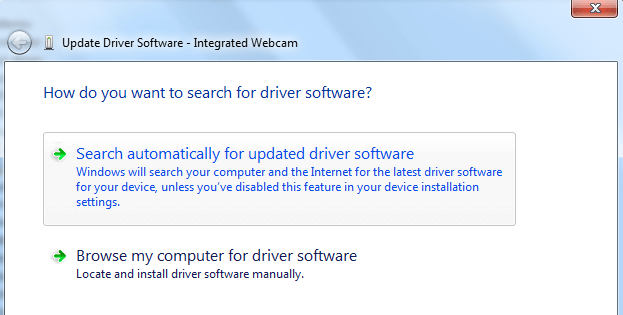
- You’ll get a prompt asking you to ‘Let me pick from a list of device drivers on my computer’.
- Choose USB Video Device here.
- All you need to do now is follow the on-screen instructions to update your camera driver.
- After you’re done, restart your PC/laptop for the changes to take effect.
Fix #3: Troubleshoot your hardware
If you’ve recently installed a new device or hardware, then you’ll possibly need to troubleshoot your hardware to fix this issue on your Camera app. There are other apps which are likely being affected due to this change, so you’ll hit two birds with one stone or even more, after you’ve resolved it.
This step usually fixes the hardware in question along with all the apps affected with it.
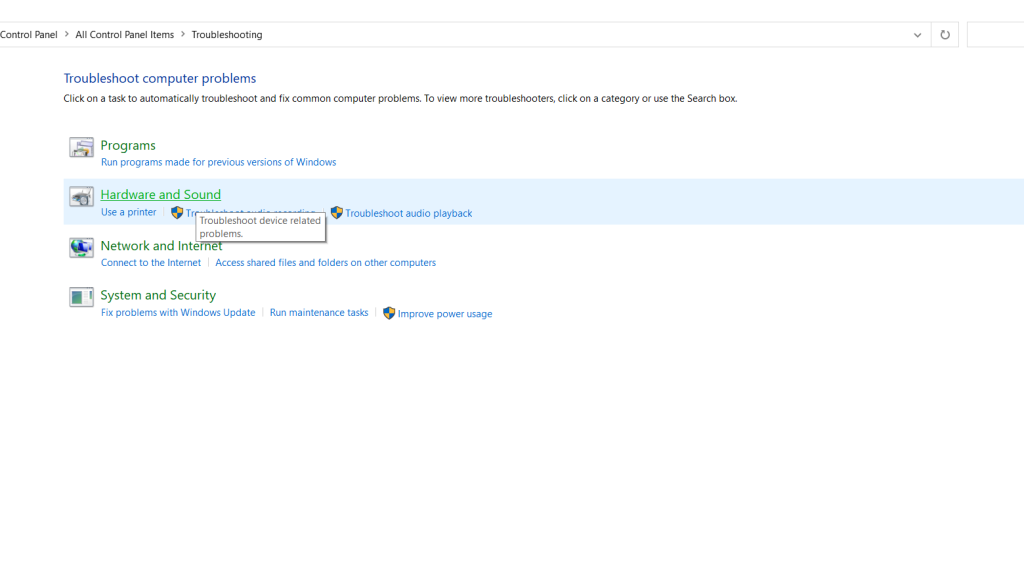
- Go to Control Panel by searching for it on the Search Bar.
- Once there, go to the Troubleshooting section by scrolling down on your screen.
- On the Troubleshooting page, you need to click on Hardware & Sound and the computer will automatically solve all issues.
- Check the Camera app now. It would have likely been resolved.
Fix #4: Reinstall your camera driver from Device Manager
A lot of times, your camera driver might get corrupted due to foreign files being downloaded onto the system. In that case, you need to reinstall your camera driver. This can be done from the Device Manager tool on Windows. Here’s a step-by-step guide for doing this:
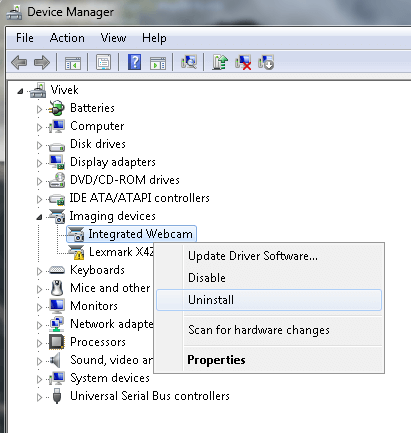
- Go to Device Manager and navigate to Imaging Devices as illustrated in the previous steps.
- Expand Imaging Devices and right-click on laptop camera or integrated web-cam (whichever is available).
- Choose Uninstall and restart your PC/laptop.
- You will notice that your system has automatically installed the camera driver after reboot. You can now check by opening the Camera app and see it it’s functioning.
Fix #5: Install camera driver in compatibility mode
Check to see if you have the latest camera driver installed from your manufacturer’s website. If not, go to the official website and see if any available downloads are showing. In this method, we will be installing the camera driver manually using the compatibility mode feature on Windows. The compatibility mode basically fixes any compatibility issues with the driver if there is any. Here are the steps you need to follow:
- After downloading the relevant camera driver on your Windows PC, save it to your most frequented disk.
- Click on Properties by right-clicking on the set up file.
- Go to the Compatibility tab there.
- Now check the box next to ‘Run this program in compatibility mode’.
- You will see a host of names showing your operating systems now. Select the correct OS from the list and click on Install.
- The driver will install automatically. Restart your system if the app is working now.
Fix #6: Roll back your driver
This is a slightly complicated method and should be used only if the above methods don’t work out. So basically what you have to do is to roll back to the previous version of your camera driver from the Device Manager. Here’s what you need to do:
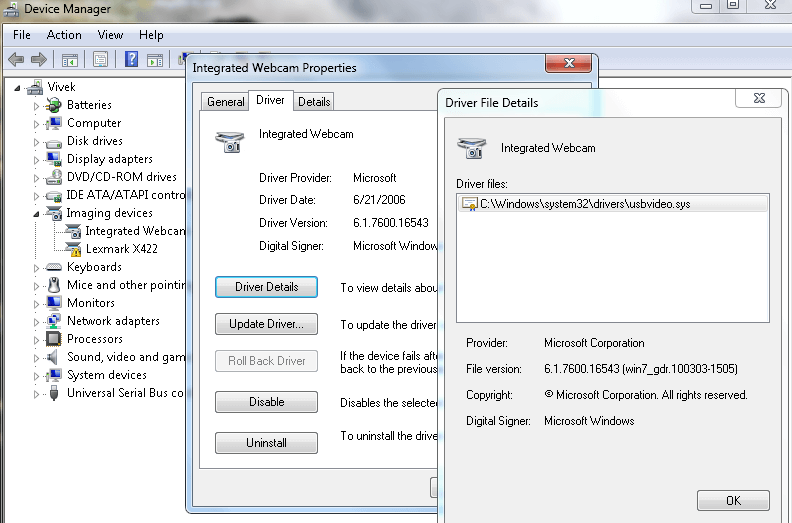
- Go to Device Manager and select Imaging Devices.
- Expand the list and select your webcam from the list.
- Choose Properties and locate the Driver tab here.
- Select the Driver details button.
Here’s where it gets interesting. If you find a file by the name of ‘stream.sys’, your webcam needs to be replaced as this shows that it was designed prior to the advent of Windows 7.
If you don’t find this file, you’ll need to roll back your webcam using the following steps:
Go to Device Manager > Imaging Devices > Right-click to go to Properties > Locate the Driver tab and select ‘Roll back driver’ to do the same.
You’ll need to reboot your computer once this is done. Open your webcam/Camera app now to see if it’s working again.
Fix #7: Create a new profile in Accounts
If your existing admin account has been corrupted due to some reason, you need to create a separate profile to see if the Camera app is working. Here’s how you can do it:
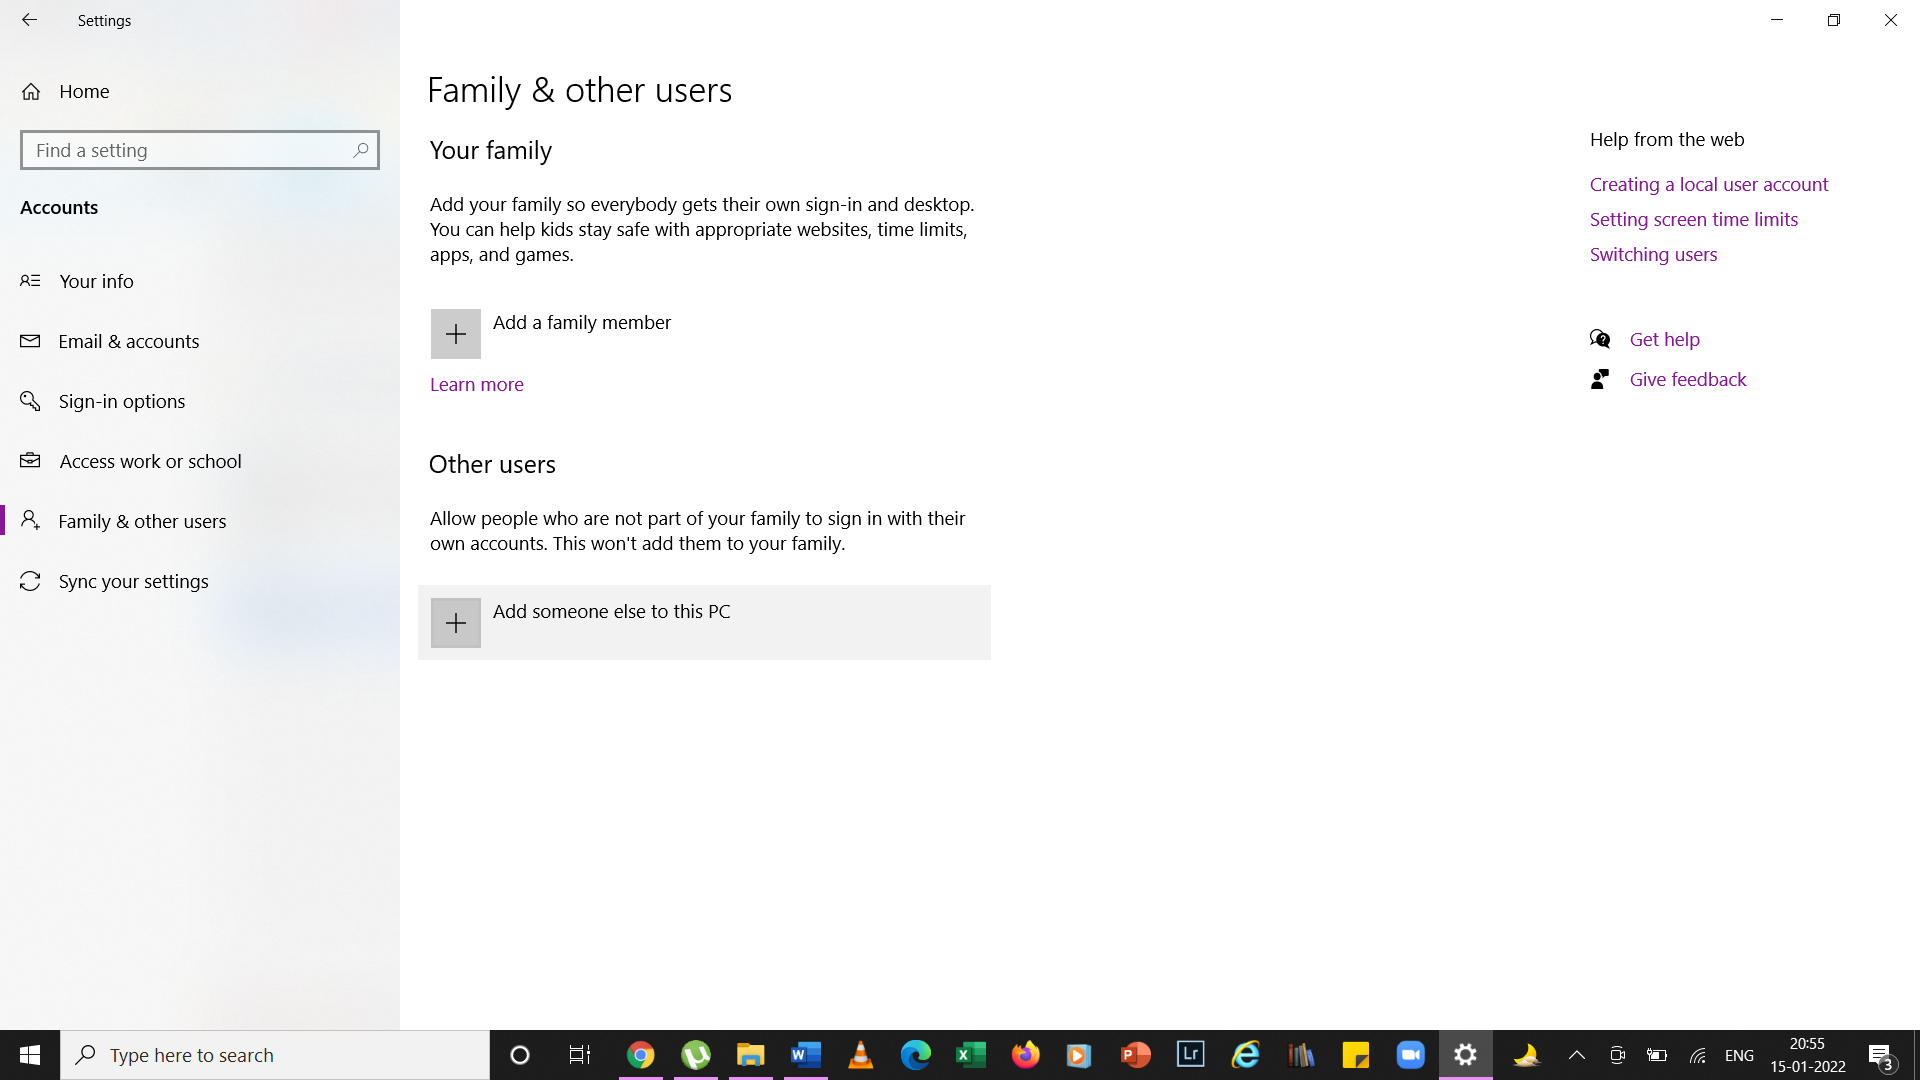
- Go to Settings and click on Accounts.
- Click on ‘Add someone else to this PC’ on Other Users after navigating to ‘Family and other users’ on the left-hand menu.
- Fill in all the necessary details required to create a new account and Change the User type in the end to ‘Administrator’ to access all privileges.
- Reboot for changes to take effect and login through the new account now.
If the camera app is working fine now, it’s possible that your old admin account was corrupted due to some file or virus. Here’s a quick fix to resolve the issue with your old corrupted account:
On your new account, use it to bring your old account to the same level as your new one. Click on Apply or Ok. Now use your old account to be raised to its previous admin level.
Do this procedure a few times as this will help remove any corrupt files from your old account. Finally, leave your old account as Administrator.
This should fix the Camera app in the old account. If not, migrate to your newly formed account and continue using the app there.
Fix #8: Check your Anti-Virus
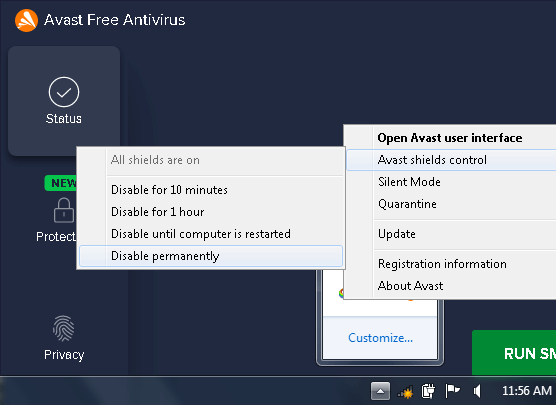
Disable your anti-virus software to check if the issue persists if the above solutions don’t work out for you. It can happen that your anti-virus software is blocking your Camera app from working or is stopping your outdated webcam driver from functioning properly.
Fix #9: Reset your Camera app
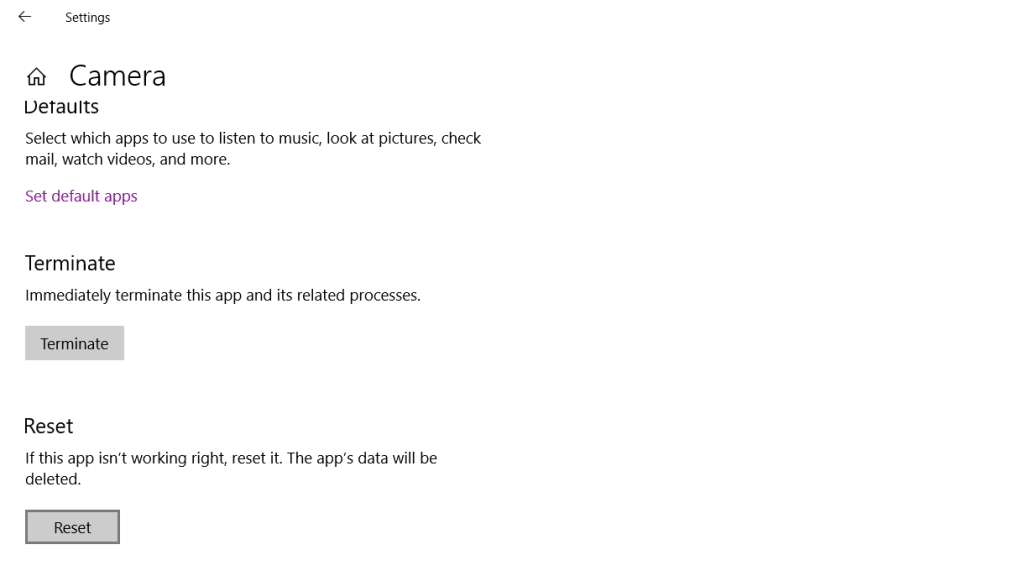
If all the above methods fail, you can reset the Camera app to default settings and see if it fixes the problem. If resetting doesn’t solve the issue, you can further look at reinstalling the app altogether. Here’s how you will reset the app:
- From Start, go to Settings and navigate to the Apps section.
- Go to Apps & features now.
- Now scroll down and you’ll find the Camera app in the list
- Click the Advanced options under the app selection.
- Click the Reset button under the reset section to make the default settings appear while running the app.
Video tutorial
Conclusion
So these are some methods that can help you to fix ‘Camera app not working’ issue on your Windows 10/11 PC. If you have tried all of the above steps and still can’t find a speedy resolution to your Windows Camera app woes, then feel free to leave a comment below with your name and detailed problem with the app. We sincerely hope you find a solution in the above exhaustive list of solutions provided. Check out our website for more related articles like this.
![Fix Mobile Hotspot Not Working on Windows 10/11 [Solved]](https://www.geekinstructor.com/wp-content/uploads/2022/01/fix-mobile-hotspot-not-working-windows-10-300x169.jpg)
