Placing ads at the right place can increase CTR (click-through rate) and CPC (cost per click) of the ads. Ultimately, this will result in generating more revenue from your site. You also have to optimize the user experience of your site and make ads responsive across various devices/screens.
As Blogger doesn’t support plugins unlike WordPress, so it’s a quite tedious task to place AdSense ads on your website/blog. You have to manually add the ad code wherever you want to show the ads.
In this tutorial, we have discussed 10 places where AdSense ads will perform well on your Blogger website/blog. We have also discussed how to add AdSense ad code and optimize ads for better user experience. Let’s get started!
Table of Contents
1. In the sidebar section
The first place where you can add AdSense ads is in the sidebar section of your website. These ads will appear above the fold area on desktop i.e. users will be able to see the ads without scrolling the screen.
Here’s how you can add AdSense ads in the sidebar of your Blogger website –
Login to your Blogger Dashboard, go to Layout and click “Add a Gadget” option in the sidebar section. Now a pop-up window will open. Here you have to click on the “HTML/JavaScript” option. After this, paste your AdSense ad code and then tap the “Save” button.
Recommended ad units & sizes: 300×250 (also known as medium rectangle), 336×280 (also known as large rectangle), and 300×600 (also known as half page). You can also place link ad units and matched content in the sidebar section.
2. Below the post title
Below the post title is another good place to show AdSense ads on your Blogger website/blog. These ads will perform very well as they are very close to the content and above the fold area on both desktop and mobile devices.
To show AdSense ads below the post title, you have to add AdSense ad code in your Blogger template. Before that, you have to encode your AdSense ad code from HTML to XML coding. You can use our online HTML to XML parser tool for this task.
After this, login to your Blogger dashboard and go to Template > Edit HTML. Now tap anywhere in the template editor and search for the following code using CTRL+F shortcut key –
<data:post.body/>
Now paste the below code right before it and replace <!–your AdSense code here–> with the parsed AdSense ad code that you have created earlier. Finally, tap the “Save theme” button. That’s it.
<b:if cond='data:blog.pageType == "item"'> <div style='clear: both; text-align: center; margin: 10px;'> <!--your AdSense code here--> </div></b:if>
As you can see in the above code, we have used Blogger conditional tags so that ads will appear on your posts only (index pages).
Recommended ad units and sizes: We recommend you to use responsive ads below the post title as they will automatically adjust their size to fit the available space. Other ads that you can place are 300×250, 360×280, 728×90, and link ad units.
3. Above the blog posts
You could also place AdSense ads above the posts on your Blogger website/blog. As these ads will also appear above the fold area, so they will get a good amount of impressions and increase your revenue.
Like the above method, you have to place an AdSense ad code in your Blogger template to show ads above the blog posts. First, convert your AdSense ad code using our HTML to XML parser tool.
After this, go to your Blogger template and search for the following code –
<div id='main-wrapper'>
Paste the AdSense ad code you have converter earlier right after the above code.
Recommended ad units and ad sizes: Responsive ads, 300×250, 360×280, 728×90 (also known as leaderboard). We recommend you to use either responsive ads or fixed 728×90 ad size above the blog posts as they will perform well on mobile devices also.
4. In the header section
If your Blogger template has space available to in the header section of your website/blog, then you can also add AdSense ads there. Go to the Layout section in your Blogger Dashboard and check if there is an option to add a gadget in the header section.
You could directly add AdSense ad code in the HTML/JavaScript widget. If your Blogger template doesn’t have any option to add a gadget in the header section, then you have added AdSense ad code manually. Search for the following code in your Blogger template –
<div id='header-wrapper'>
Right after this code, add the parsed AdSense ad code.
Recommend ad units and ad sizes: You can place responsive ads or 728×90 leaderboard ad unit in the header section.
5. In the footer section
You can also add AdSense ads in the footer section of your Blogger website/blog, however, as these ads are at the bottom of the page, they may not visible to some users who don’t scroll down.
To add AdSense ads in the footer section, login to your Blogger Dashboard and go to the Layout section. Now create a new HTML/Javascript widget in the footer section and add your AdSense ad code in it.
You can also add AdSense ads in the footer section of your website/blog manually. Simply, find the following piece of code in your Blogger template and paste your encoded AdSense ad code right after it –
<div id='footer-wrapper'>
Recommended ad units and ad sizes: Responsive ads, 728×90 leaderboard, or link ad unit.
6. At the end of the post
One of the best places to add AdSense ads in Blogger is at the end of the post. These ads will appear once the visitor has finished reading your blog post and that’s why they will perform very good.
To add AdSense ads at the end of the post, go to your Blogger template and search for this code –
<div class="post-footer">
Now right after <div class=”post-footer”>, place the following code and replace <!–your Adsense ads here–> with your parsed AdSense ad code.
<b:if cond='data:blog.pageType == "item"'> <div style='clear: both; text-align: center; margin: 10px;'> <!--your AdSense code here--> </div></b:if>
We have used Blogger conditional tags to show ads on your blog posts only (index pages).
Recommended ad units and ad sizes: 336×280 (large rectangle), 300×250 (medium rectangle), or responsive ads. You can also place matched content and link ads along with text/display ads.
7. Between post and comments
To place AdSense ads between post and comments in Blogger, go to your Blogger template and find this code –
</b:includable>
<b:includable id='postQuickEdit' var='post'>
Now paste the following code right before it and make sure to add your encoded AdSense ad code inside the Blogger conditional tags.
<b:if cond='data:blog.pageType == "item"'> <!--your Adsense code here --> </b:if>
Recommended ad units and ad sizes: 336×280 (large rectangle), 300×250 (medium rectangle) or 728×90 (leaderboard) ads.
8. In-between post content
Placing an ads in-between post content will give high CTR (click-through rate) and CPC (cost per click). Blogger doesn’t have any plugin which can help you to place AdSense ads in-between post content, so you have to add them manually by editing each post.
Recommend ad units and ad sizes: 336×280 (large rectangle), 300×250 (medium rectangle) and link ads.
Alternatively, we recommend you to use AdSense Auto ads. Auto ads will automatically place ads in-between post content and various other places on your website. Below we have discussed how to implement AdSense auto ads in Blogger.
9. Place in-feed and in-article ads
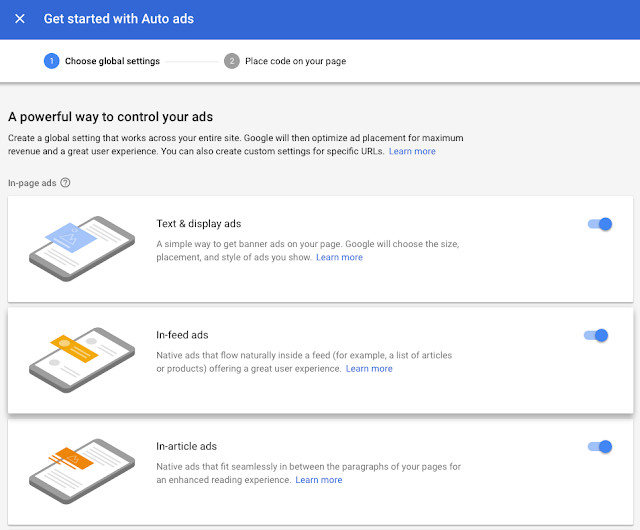
AdSense Auto ads also consist of in-feed and in-article ads. These are the native ads that will automatically appear in between your blog feed and post content. Here’s how you can add AdSense auto ads in Blogger –
Login to your AdSense account and go to the Ads tab from the navigation menu. On the “Auto ads” page, click “Get Started” button and then enable the ad formats that you want to use in Auto ads. After this, tap the “Save” button and then copy the ad code.

Now go to your Blogger template and find </head> tag. Right above </head> tag, paste the AdSense ad code you have copied earlier.
10. Place vignette & anchor ads
Vignette and anchor ads, which were formerly named as page-level ads, are now merged in AdSense Auto ads. These ads will appear on mobile devices only.
Anchor ads will stick to the edge of the user’s screen (either on the top or bottom). On the other hand, vignette ads are full-screen ads that will appear between page loads on your site.
We have already discussed how to add AdSense Auto ads on your Blogger website/blog. Make sure that you have enabled vignette and anchor ads in AdSense Auto ads.
FAQ
1. How many ad units you can place?
Earlier, AdSense publishers aren’t allowed to place more than 3 ads on a single page. Now, this restriction has been removed and you can place as many ad units you want. For better user experience, we recommend you use ads according to the length of the content on your site.
2. Why the ads aren’t working?
If AdSense ads aren’t working, please check if you have placed the ad code properly.
Note: There might be more than one occurrence of the code that you have searched in your Blogger template to place AdSense ads. If the ads don’t work, try to place the ad code with other occurrences of the code.
There are a few other reasons why Google AdSense will show blank space instead of ads on your website.
3. How to align AdSense ads in the center?
In our previous tutorial, we have already discussed how to align AdSense ads in the center. Simply, place your AdSense ad code inside this <div> container –
<div style="clear: both; text-align: center; margin: 10px;">
<!--Your AdSense code here-->
</div>
As you can see in the above code, we have also added margin space around AdSense ads.
4. How to make ads mobile responsive?
You can responsive ad units which will automatically adjust their size on desktop and mobile devices. You can also adjust their size manually on various screens using CSS media queries. We also recommend you to make your site layout responsive across various devices and screens.
So these are some best places where you can add AdSense ads in your Blogger website/blog. If you are facing any problem or you want to ask something related to this tutorial, feel free to share it in the comment section below.