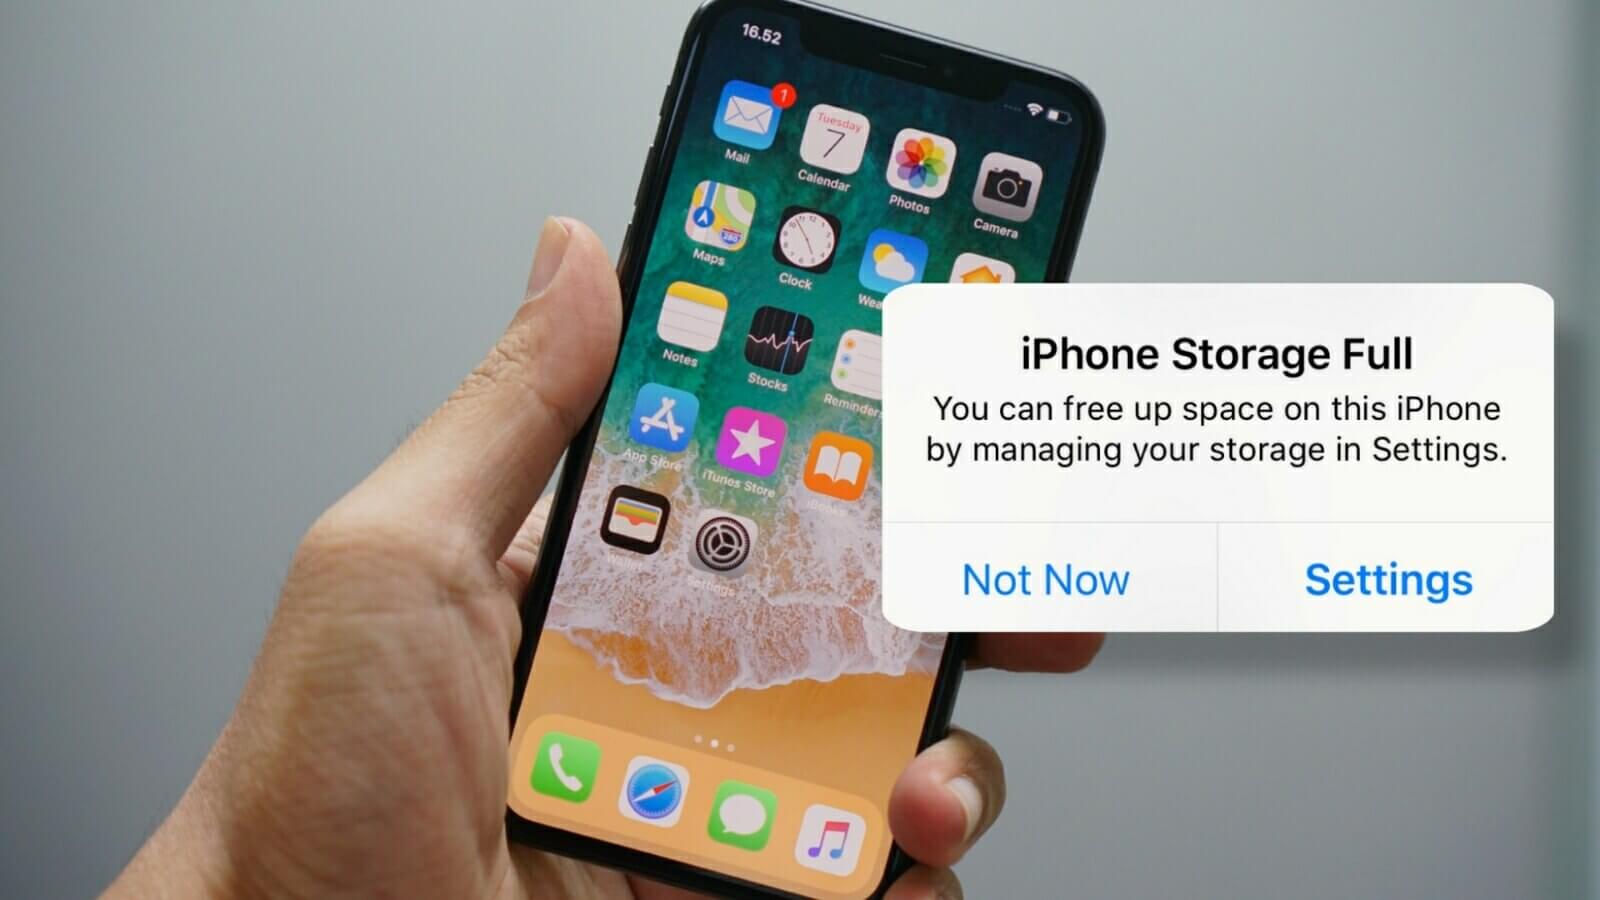
iPhone models come with a wide variety of storage capacities. People mostly choose to go for 128GB and 256GB to save themselves from the pain of low storage problems. But with time, the storage on your iPhone will surely deplete and you will start getting storage full warning on your screen. This is when you have to search for the tips and tricks to free up storage on your iPhone.
The unavailability of micro SD card slots worsens the situation even more. As iPhones are not compatible with micro SD cards, you have to do everything with the limited storage available on your iPhone. The people with 16GB, 32GB, 64GB models will face this issue way before the people with iPhone models having more storage space.
The thing that matters right now and the reason why you are reading this article today is that the space on your iPhone is almost full and you want to free it up without having to sacrifice the things that really matters to you. This article will help you release some unnecessarily used space on your iPhone by giving you the best tips and tricks to achieve this task.
Table of Contents
1. Enabling storage optimization
When this option is enabled, if your iPhone is low on storage, media with high resolution will get replaced with low-resolution photos and videos, saving space on your device. You can download full-resolution media from iCloud at any time. Although this option is enabled by default, you can check it by going to the Photos app settings. Here’s how you can do it –
- Open the Settings app on your iPhone.
- Find and open the Photos app.
- Now make sure that the Optimise iPhone Storage option is selected.

There is another option named Download and Keep Originals. If that option is enabled instead, it will keep the photos and videos in full-resolution which will consume more storage on your iPhone.
2. Empty Recently Deleted on Photos app
When you delete media from the Photos app on iPhone, they are not deleted permanently, instead moved to the Recently Deleted album where they stay for 30 days. This feature helps you recover photos and videos you have deleted accidentally but on the downside, you will end up getting your storage full by unnecessary data.
You might have deleted hundreds of photos and videos in the last 30 days and they are still living on your iPhone rent free. You can delete them to create a huge space instantly. So what you have to do is open the Photos and go to Albums. After that, scroll down to the bottom and click on the Recently Deleted option under Utilities.
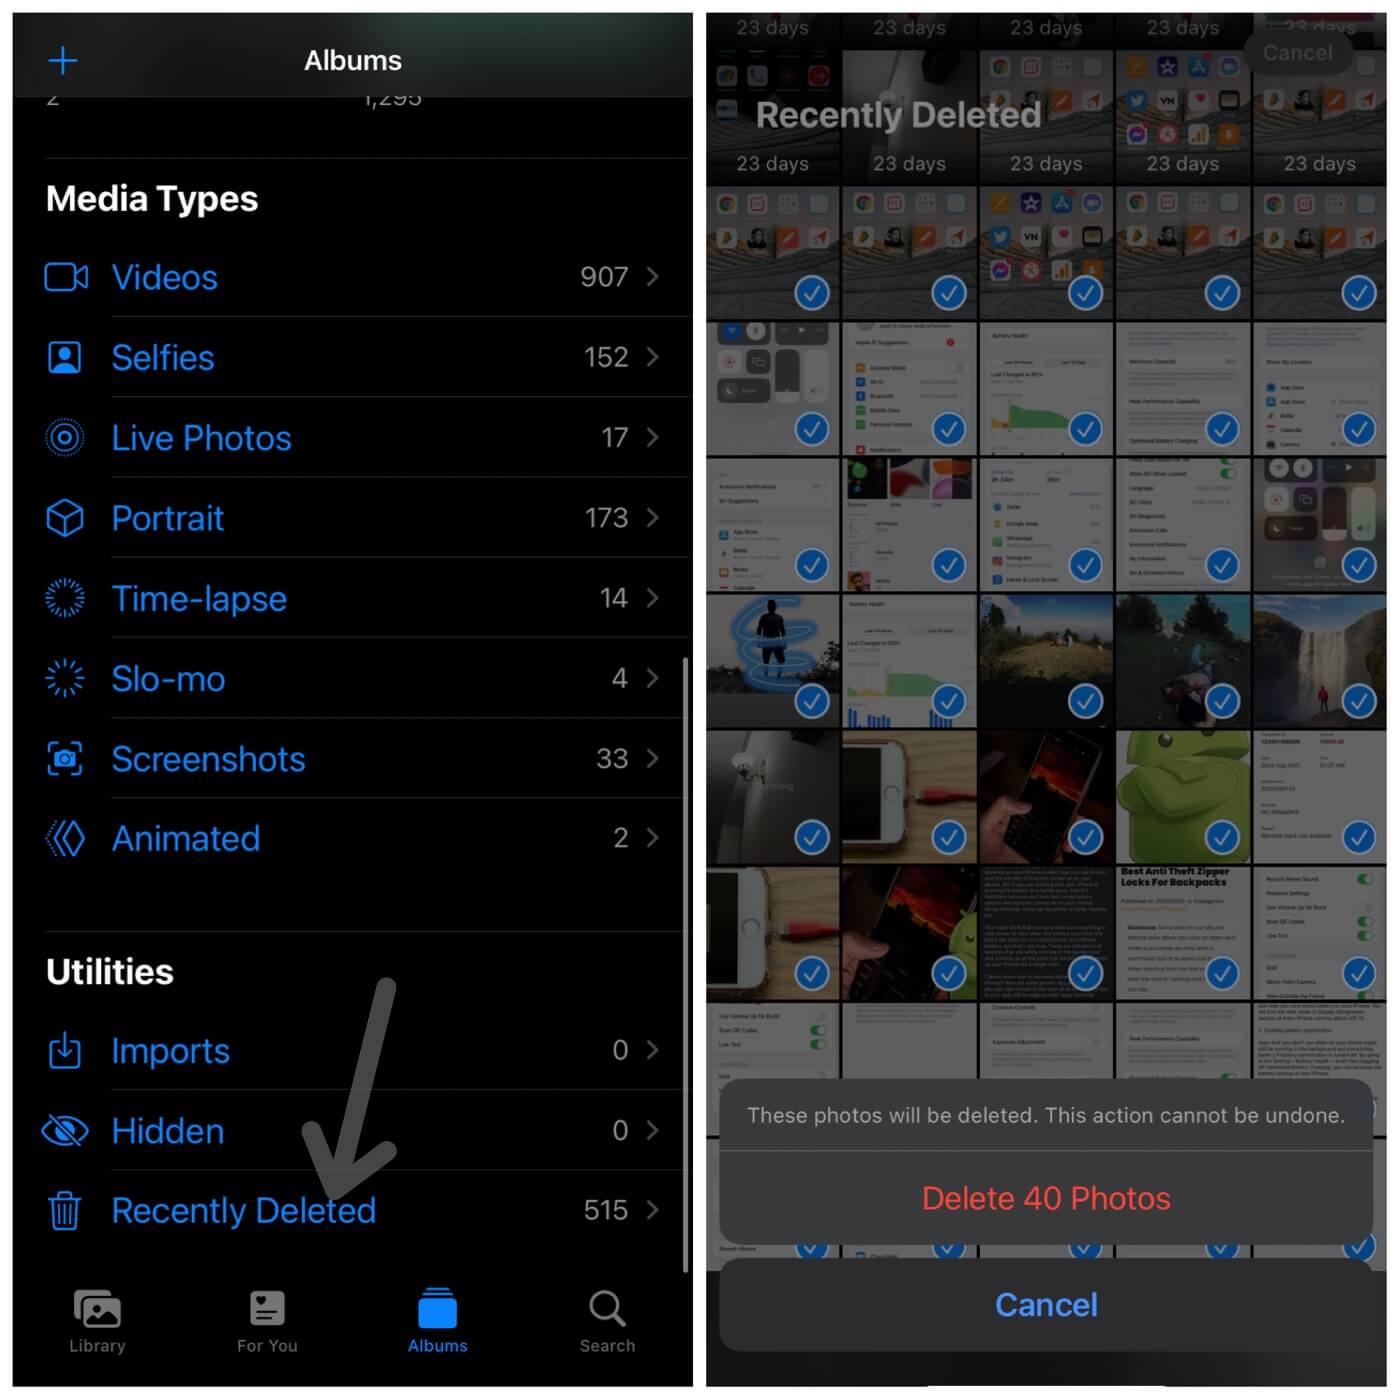
Now either you can delete photos and videos manually or remove all of them at once by tapping on Select option at the top-right corner and then clicking on the Delete All in the bottom-left. Before performing this mass action, make sure to check that you don’t have any important media in the Recently Deleted album.
3. Empty Recently Deleted on Files app
The files you have deleted from your iPhone in the last 30 days are most likely to be there in the Recently Deleted folder on the Files app. This is similar to the recycle bin feature on PC where all your deleted data is stored so you can restore it later in case you need it back.
Something that you have deleted must be useless so there is no point in keeping it on the Recently Deleted folder also. It’s unnecessarily eating your iPhone storage. You can save a lot of space by clearing the Recently Deleted folder on the Files app. Here’s how you can do it –
- Open the Files app on your iPhone.
- By default, you will be on the On My iPhone folder. Click Browser option at the top-left corner on the screen.
- Now expand Location and tap on the Recently Deleted option. This is where you will find all your deleted data in the last 30 days.

- Click three dots at the top-right corner and choose Select All.
- Finally, click on the Delete All option and then confirm it by choosing Delete again.
4. Saving media on iCloud
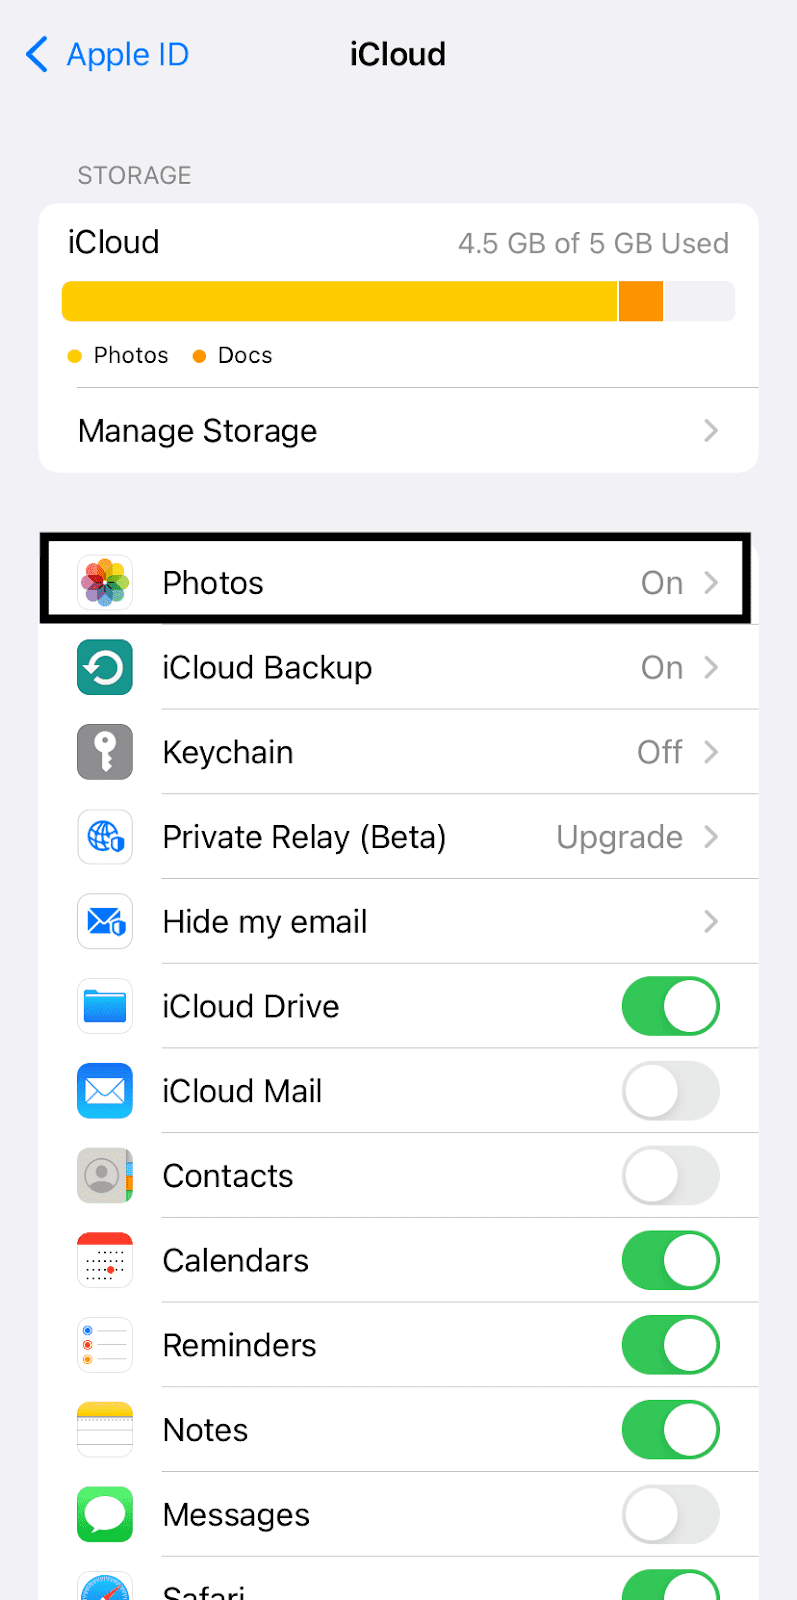
Not using cloud services for better storage optimization would be foolishness. Plus, it helps you keep your media always safe even if your iPhone crashes, gets lost, or simply gets destroyed. If your media is uploaded to the cloud, you don’t need it on your phone anymore. Apple provides 5 GB of free iCloud storage where you back up your photos and videos. You can enable iCloud backup from your Apple ID settings. Here’s a step-by-step guide for that –
- Go to Settings on your iPhone.
- Now click on your Apple ID at the top.
- Select the iCloud option. This is where you can manage all your iCloud storage and enable backup for various apps.
- Click on the Photos and then toggle the iCloud Photos button to turn on the backup. That’s it!
5. Backup photos and videos on Google Photos
Sometimes 5 GB of free storage by iCloud isn’t enough to backup all your data and you don’t want to upgrade to the premium version. If your iCloud is already full, then you can Google Photos app to backup your photos and videos. Google provide 15 GB of free storage with every Google account. You simply need to download and install the Google Photos app on your iPhone from the App Store.
To enable backup, first tap on your profile picture icon in the upper-right corner and then click the Photo settings option from the box that pops up on your screen. Next, go to the Backup & sync and toggle the button to turn it on. Under Upload size, there are two options available: High quality and Original. High quality saves the media at a slightly reduced quality, whereas the original will backup the photos with no change in quality.
6. Clearing up browser cache
While using a browser, the cache gets unnecessarily stored on your iPhone which takes up a lot of space. By clearing this unnecessary cache from time to time, you can save your iPhone from heavy storage usage.
Browser cache can easily be cleaned by going to the Settings app, then select the browser that you use on your iPhone (it can be Safari, Chrome, Opera, or whichever one you use). Now scroll down and tap on the Clear History and Website Data option. If you use multiple browsers, clear the cache by selecting that particular browser.

Please note that clearing up browser cache will delete all history, cookies and other browsing data. As all this data is synced with your iCloud account, so it will be cleared from other devices also where you have signed in to your Apple ID.
7. Recording videos at a lower resolution
iPhones surely have the best camera, no doubts, but using their capabilities at the highest requires a lot of space. You can reduce the resolution of your video recordings for saving a lot of space in the future. There are various resolution and fps settings you can choose from.
When on the Video mode on the iPhone camera, you will see the current video settings at the top-right corner. It allows you to switch between 4K and 1080p HD resolution. You can also set the fps (frames per second) to 30 or 60. To save space and keep the video quality good enough, choose HD at 30 fps. If you want to compromise with the quality and use a lower resolution such as 720p, then you have to set it from the camera settings. For that, follow these simple steps –
- Head to the iPhone Settings.
- Go to Camera.
- Now select Record Video. This is where you will find all resolution and fps settings of your iPhone camera.
- To record videos of lower quality that will take less storage, we recommend you choose 720p at 30fps.

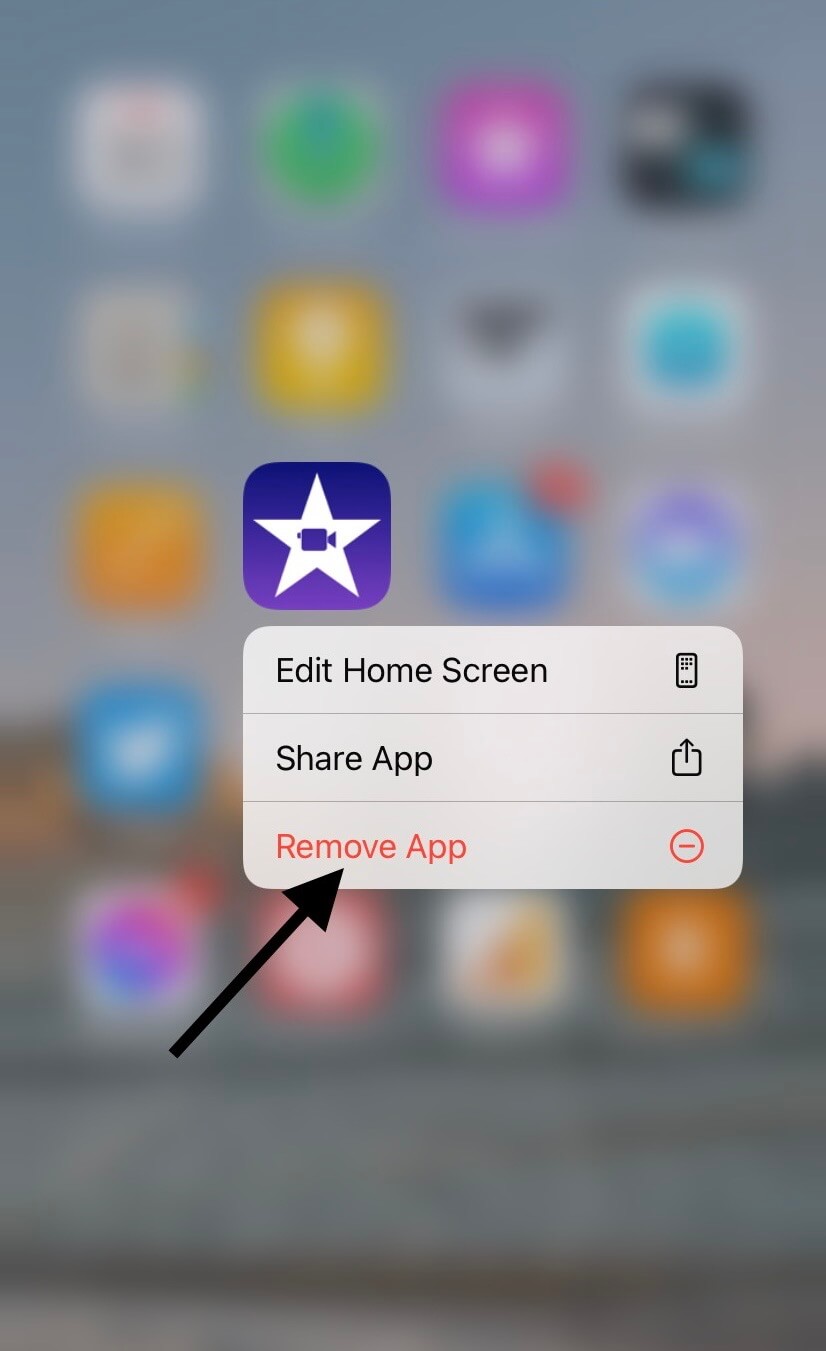
8. Deleting unnecessary apps
You won’t even notice but there might be a lot of apps on your phone that you hardly use or you might not have even opened them ever. These unnecessary apps are taking a lot of space on your phone. And if it’s a game app then the storage utilized will be huge. Just by long pressing on that app, you will see multiple options appearing and you need to press the Remove App at the bottom so you can delete it permanently from your device.
There are some pre-installed apps on iPhone that you might have never used even at least once. You would be amazed to see the storage they are occupying for no reasons. Uninstalling these apps will free up huge space such that you don’t even need to do anything else. Here we have listed some apps that you can consider removing from your iPhone –
- iMovie
- Clips
- Pages
- Weather
- Tips
- TV
- Wallet
- Apple Store
- Game Center
- Garage Band
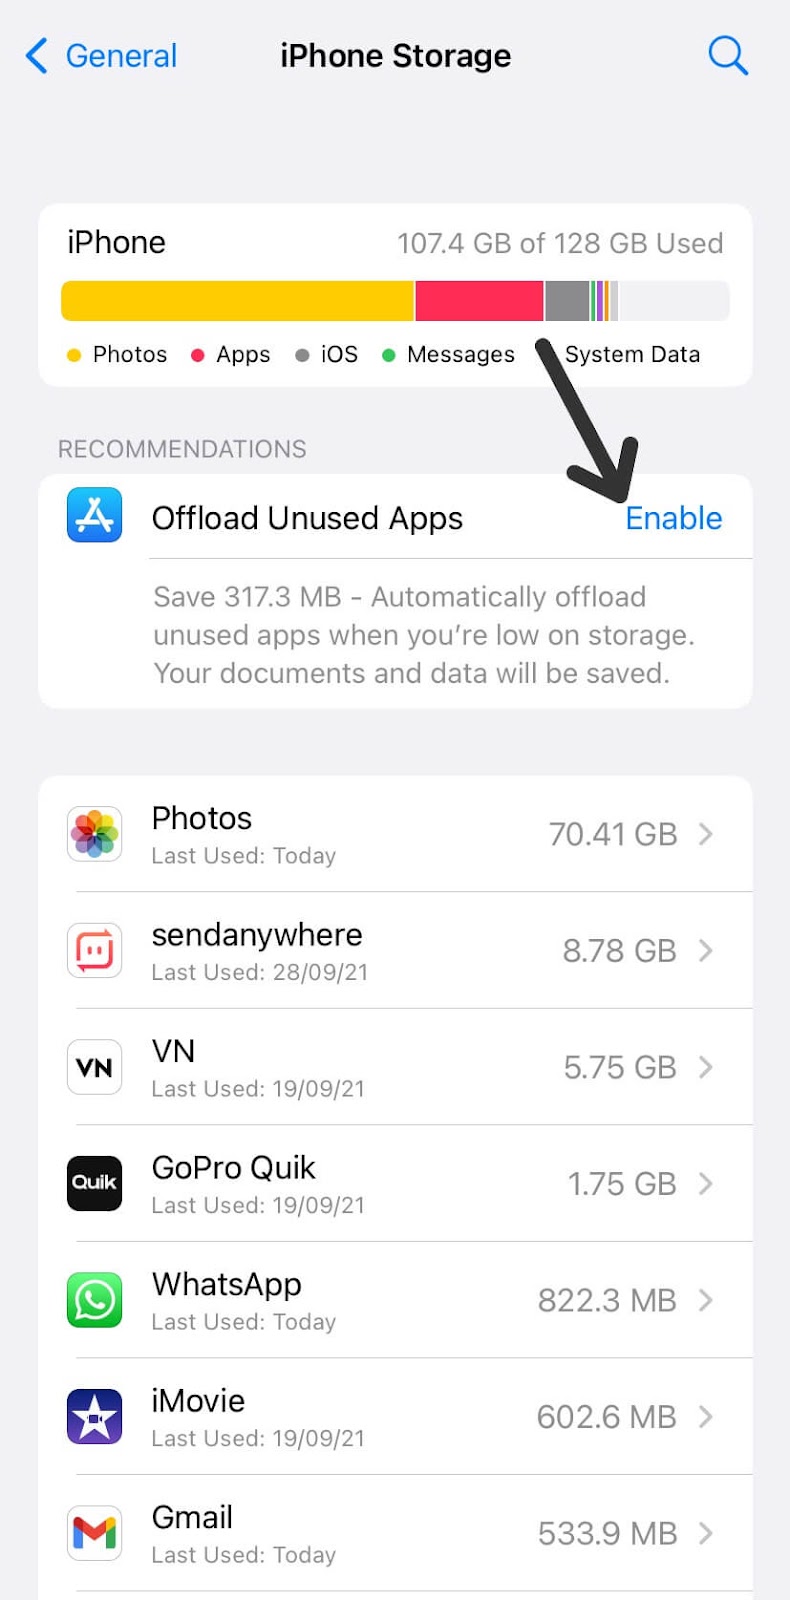
9. Offload unused apps
Offloading is one of the smartest moves that you can take to save some space on your phone whenever your phone is on the verge of getting fully occupied. Offloading simply means that when your phone is about to run out of storage, the apps that are hardly used will automatically get deleted, freeing up some space on the phone.
Now you must be thinking that what about the important data saved in that app? Well, you need not worry about that because when an app is offloaded, just the app is deleted from the phone and its data is still kept safely in your iPhone. So if you install the app again, you won’t lose any data.
To enable the offloading option, simply go to the Settings, tap General, and then click on the iPhone Storage option. Now you will see a recommendation to use Offload Unused Apps feature under the storage information. Just tap on it to enable. Another alternative way to enable the offloading feature is by going to Settings > App Store.
10. Clear app cache
To give you a better user experience, apps save a lot of caches which ultimately takes up huge space on your phone. Simply by clearing the app cache, you can clear up a lot of space on your iPhone. To clear the app cache, you need to go to that particular app for which you want to clear the cache. As some apps give options to clear the cache, you can try to find that option inside that app. If you don’t find any such option, then you have no other option except for deleting that app and installing it again.
But clearing the app cache or deleting the app will delete all your data stored by the app. So make sure you don’t have some important data that you don’t want to lose.
11. Monitor storage usage on your iPhone
One of the important things you should do while freeing up space on your iPhone is to check your storage usage. By doing this, you would know how much storage is being used by photos, apps, iOS, messages, and system data. Then you can find out things which you can delete or transfer to release some space.
iPhone keeps monitoring your storage usage on regular basis and that’s why you get “iPhone storage full” warning when you are running out of space. To check your storage usage, simply, open the Settings app and go to General > iPhone Storage. Now at the top, you will see a bar showing different categories and respective amount of space they are consuming.
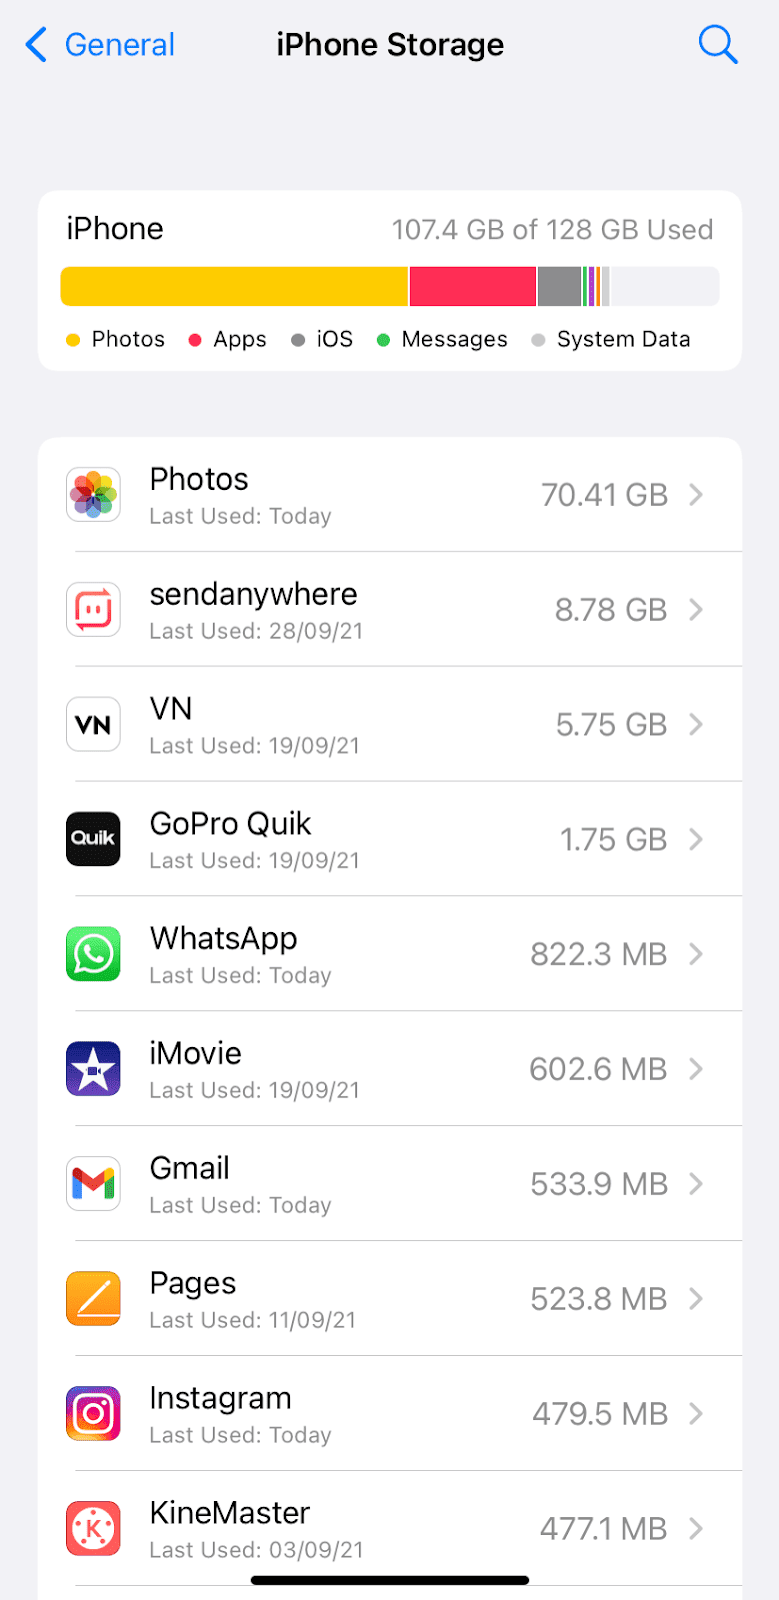
Below you will find a list of apps sorted on the basis of storage from top to bottom. You will also find details like when you used the app last time. Clicking on the app will reveal more information about it such as the app size and documents & data. From this storage usage report, you can shortlist apps which are using unnecessary data and then delete or offload them to free up some space on your iPhone.
12. Transfer files to your PC
Another way to free up space on your iPhone is to transfer all your photos, videos and other files to your PC or laptop. If you consider iCloud option, it only provides limited amount of storage to backup your data. Once you fill that completely, you will need to pay for more storage. Compared to the iCloud, taking backup of your data on PC is more feasible and easy. You simply need to connect your iPhone to PC or laptop with a data cable and then use iTunes app to backup everything.
13. Delete WhatsApp media files
We all use WhatsApp to chats with our friends and family. Hundreds of messages and media files are exchanged on WhatsApp every day. Over time, this data can grow in very large size and go up to several GBs. If you will look at the storage stats, you will find WhatsApp in the top 5 list most probably.
Deleting WhatsApp media files alone can save a huge amount of storage on your iPhone. You can manage storage used by the WhatsApp from within the app. Simply, open the WhatsApp and go to the Settings tab. Next, click on the Storage and Data option followed by tapping on Manage Storage at the top.
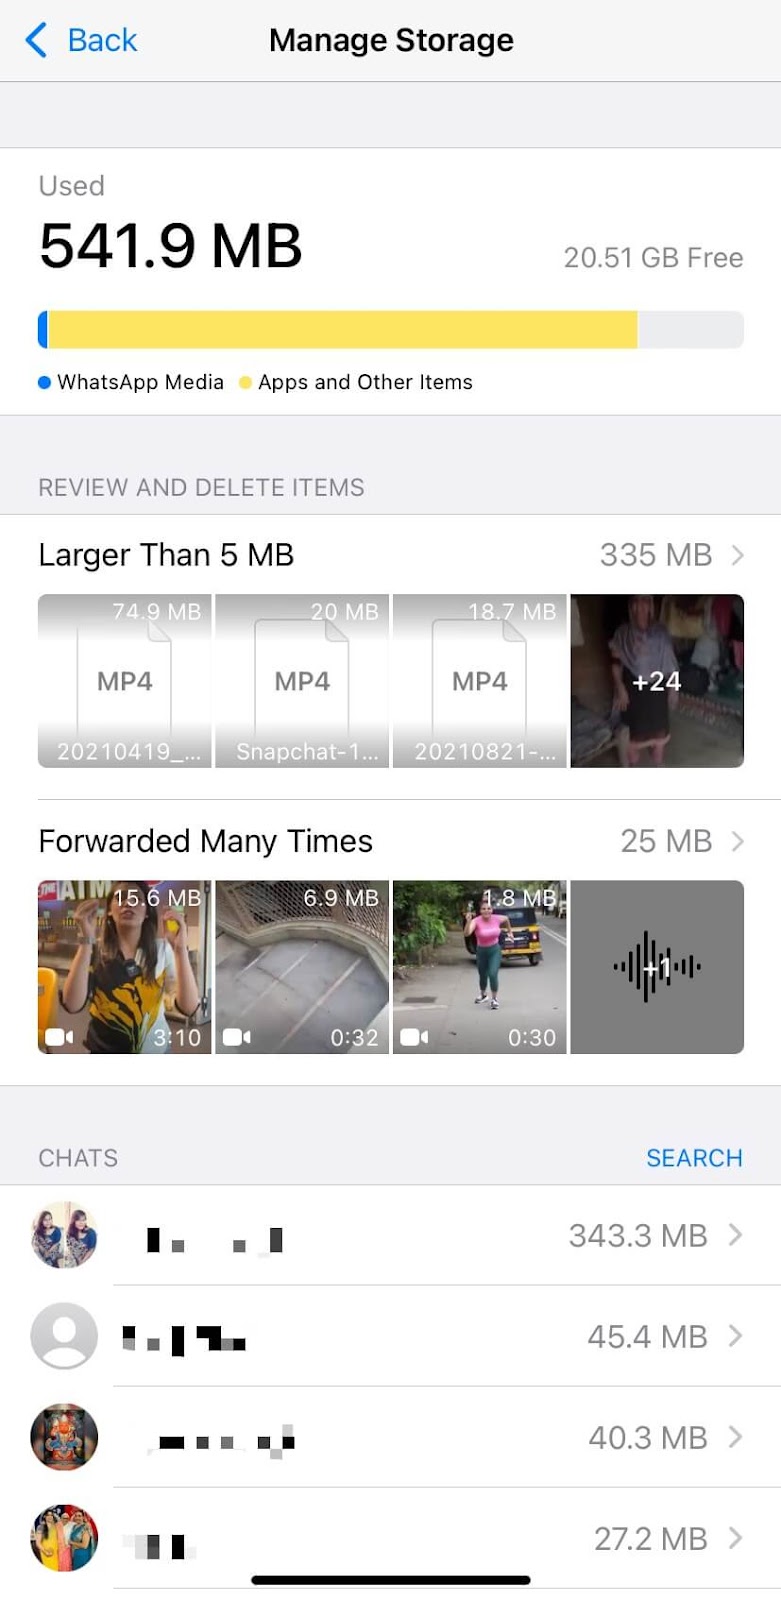
Now WhatsApp will show how much data is being used by its media files. Under Review and Delete Items, you will see files which are larger than 5 MB and media that has been forwarded many times. Below that, you will see a list of chats sorted based on their storage usage. Clicking the chat will show all the photos, videos, and documents you have exchanged.
Delete everything from Forwarded Many Times as it mostly contains junk media files. Apart from that, review the files under Larger Than 5 MB and deleted the items you don’t need.
14. Turn off smart HDR
To give you a perfect photo, your iPhone uses smart HDR technology which captures two or more pictures simultaneously and then makes one perfect photo combining the properties of all of them. But all those photos are definitely high in size and captures a large space on your iPhone. Simply by turning off the smart HDR option, you can save space on your iPhone in future. Follow these simple steps to do this –
- Open the Settings app on your iPhone.
- Find and click Camera.
- Now toggle off the Smart HDR option that you see at the last.
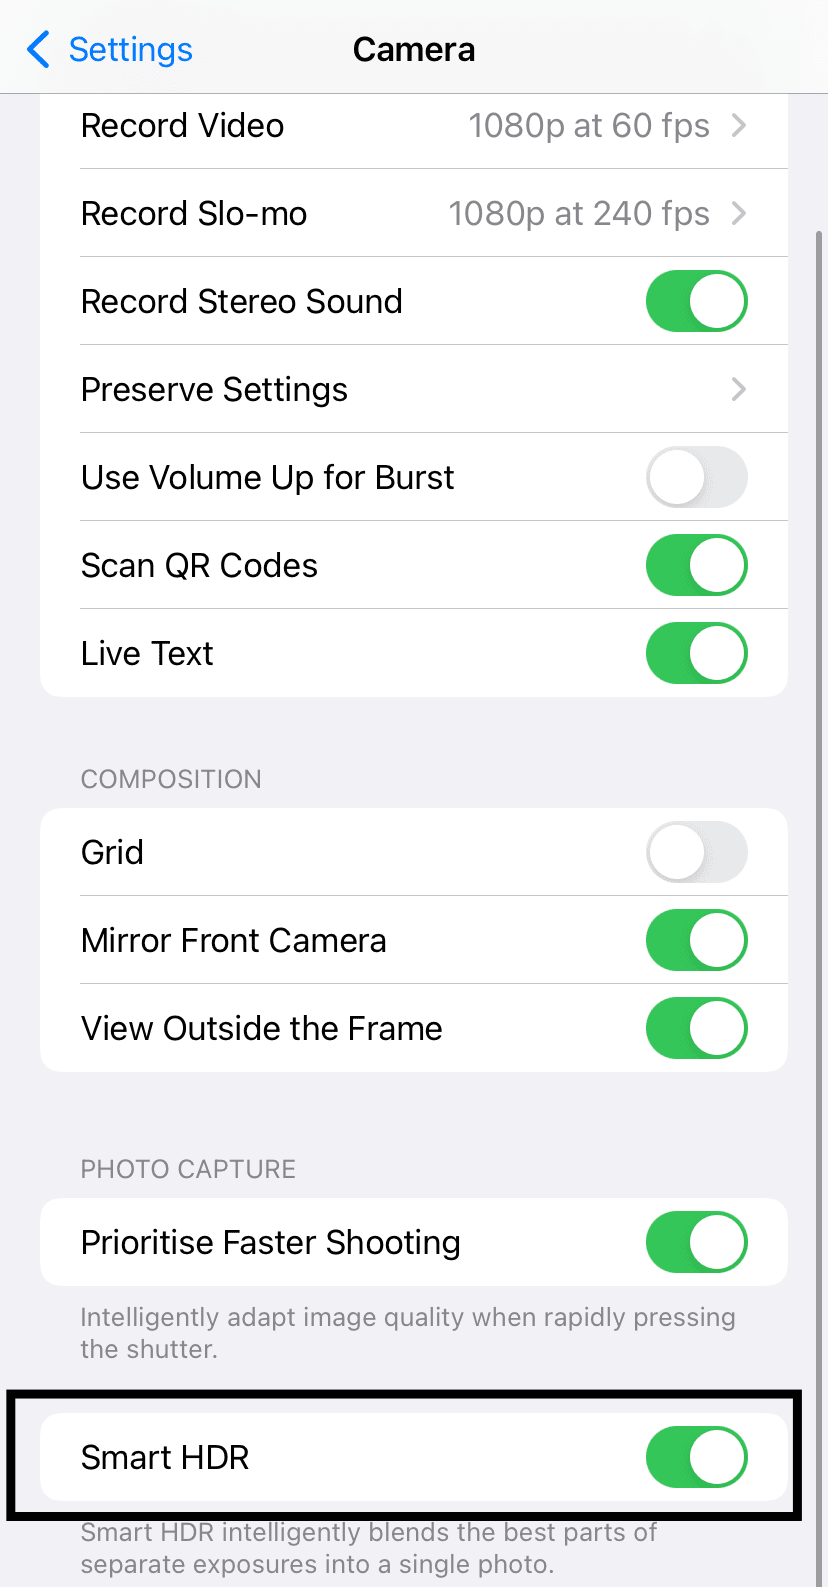
Please note that turning off Smart HDR will affect the overall quality of your pictures. Turn this feature off only if you are running out of storage and want to take some urgent photos.
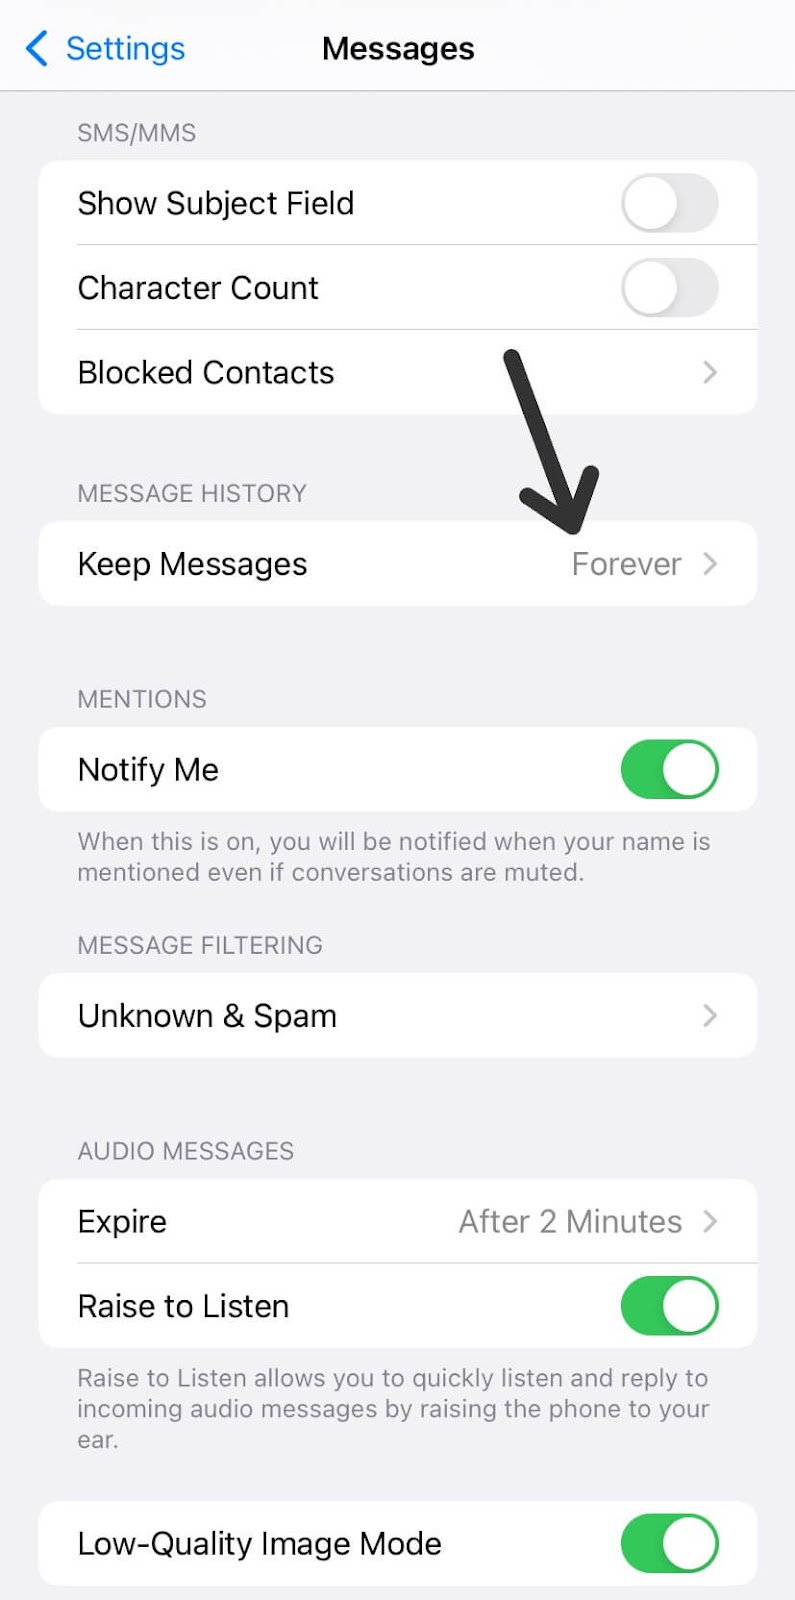
15. Keeping messages for a limited time
Your iPhone is set to store all the messages that you receive for an endless time. Once you receive a message, it never gets deleted unless you do it manually. But the huge list of messages is taking up a tremendous amount of storage of your phone and this space needs to be cleaned up.
You should delete all the unnecessary messages stored on your phone and set the new ones to be deleted permanently after a specific time. To do that, go to the Settings app and then select the Messages option. Now go to Messages History and then select the Keep Messages option. Select the time for which you want to keep the upcoming messages stored to 30 Days.
16. Deleting music and podcasts
Songs and podcasts start to pile up and cover a lot of storage on your phone. You need to get rid of the unnecessary music and podcasts that exist on your iPhone. You can stream them online anytime you want, so deleting them for clearing storage would be a good option. Under your phone Settings, go to General > iPhone Storage and select Apple Music. Here you will find all the music you have downloaded on your phone. Just swipe left on All Songs and tap the Delete button. Similarly for deleting podcasts, select Podcasts instead of Apple music and then delete all podcasts.
17. Removing iBooks
You might have downloaded books on your iPhone if you’re a compulsive reader. But do you still want the books that you read a long time back? If not then it’s best to delete those books. Here are the steps you need to follow:
Go to the Books app on your iPhone and tap on the Library at the bottom. Next, location the book you want to delete and tap on the three-dot option. Select the remove option and remorse that book permanently. You can also stop the automatic download of books if you are reading them on your iPad or Mac.
18. Delete unnecessary notes
Notes do not take much space but by deleting the unnecessary notes, you can save yourself a few MB’s. Simply, go to the Notes app on your iPhone and select the note that you want to delete. After that, tap on the More button and finally tap on Delete. You can also delete the note by swiping to the left and then tap on Delete.
So these are some simple yet very effective tips and tricks that you can apply to free unnecessarily used space on your iPhone. If you are running out of storage, you should mainly focus on targeting photos, videos and apps as they are the main culprit behind this issue. Once you have created enough space, the iPhone storage full warning will also disappear automatically. Do you know any other useful tips to free up storage on iPhone? Don’t forget to share it in the comments below