If you are trying to master the art of photo editing and you own an iPhone, then you will notice that there are a plethora of tools that can make your photos a perfect one. All the tools, filters, and effects, if you learn to use them how they are meant to be, you will notice that iPhone already has everything you need and there’s no need for any third-party app and software.

If you already have great photo capturing skills and know how to take a perfect shot, then you are half a way to make an ideal photo, just a good photo editing skill is what you require now. And the accordance of both will make you the master of photography.
This article will acquaint you with all the tools and features that iPhone provides to ardent photographers and what those tools do. In addition to that, we have some good photo editing tricks that will give a completely new and professional look to your photos. We will give you a complete walkthrough of those photo editing tricks, hacks and presets. So let’s get started now!
Table of Contents
iPhone photo editing tools explained
iPhone provides a number of editing tools in the built-in Photos app such as exposure, highlights, shadows, saturation, black point, and many more. You need to have a basic knowledge of what these tools actually do. After learning them, you will be able to customise your photos as you want. Below we have explained all iPhone photo editing tools in detail –
Auto Enhancement
Auto enhancement tool balances the colors, brightness, and contrast of the photo with just a single touch. Auto Enhance tool depicts a magic wand and the tool actually works like magic. Just by tapping on this feature, the photo completely transforms.
Exposure
The exposure tool is all about the lightness of the photo. The exposure tool brightens up or darkens the photo by proving more or less lightning to your photo. You can increase or decrease the exposure using the dial given.
Brilliance
Brilliance tool is about giving rich and vibrant colours to your photos and bringing out more detailing. By moving the slider right or left, you can enhance or decrease the brilliance feature.
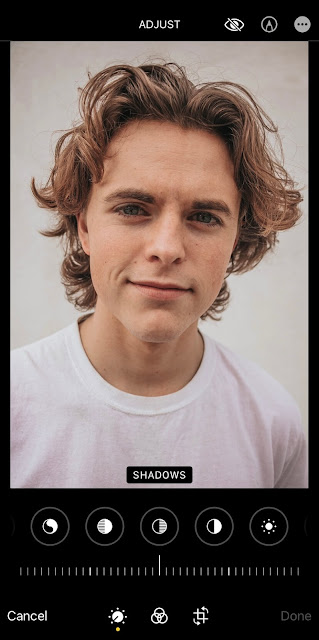
Shadows
People don’t usually give importance to shadows in their photos. But a little editing in the shadows can enhance the looks of your photos. The shadows effect will increase or decrease the brightness of the shadowed area in the photos.
Highlights
Just like the shadow effect works on the brightness of the shadowed area, Highlights effect works on the brightness of the lighted area of the photo. Using the slider at the bottom you can increase or decrease the brightness of the lighted places.
Contrast
The contrast in a photo means the difference in brightness of the dark and lighted areas. By dragging the slider right or left after choosing the contrast effect, you can balance this difference of brightness between the two.
Brightness
Brightness effect will simply help you adjust the overall brightness of the photo. But apparently the darker areas will get more darker if you decrease the brightness, so you need to balance the brightness effectively.
Saturation
The saturation tool makes your photo more living by adding vibrant colors to it. Slider at the bottom can be used to adjust the saturation of a photo.
Warmth
Warmth effect gives a hot or cold looks to your photo by adding a blue color to it or by giving it a sallow look. Warth effect makes your photos a little more cinematic than before. Sliding the slider to the left and and right will adjust the warmth of the photo.
Tint
As the warmth effect works on blue and yellow colors, tint effect works on the green color. So if you are working on a nature photo with trees and grass, this effect can be icing on the cake. Use the slider to increase or decrease the impact of the tint effect.
Noice reduction
Noice of a photos relates to the grains that appear in a photo when it is clicked in a low light surroundings. This tools works on enhancing the quality of the photo by reducing the noice or you can say the grains in a photo.
Vignette
Vignette tool works on the borders of the photo and subconsciously changes the mood and theme of your photo. By making the borders dark, you can give a sad and intense look to the photo and make the photo look happy and living by making the borders bright. If you move it to the right, it will add black borders, on the other hand, if you move the slider to the left side, it will add white color borders.
TikTok’s viral photo editing hack for iPhone
This is one of the most popular iPhone photo editing hacks that got viral on TikTok. With some simple tweak in the editing tools, you can take your photo to the the next level. This editing trick will give a shiny, tanned, and intense look to your photos. Just open the desired picture and start editing these simple steps.
- Select the Exposure effect and set it to 100.
- Similarly set the Brilliance to 100.
- Then select Highlight and set it to -35.
- Shadow effect needs to be set to -28.
- Change the contrast to -30.
- Make changes to the Brightness by setting it to -15.
- Black Point effect needs to be set to 10.
- Change the Saturation to 10.
- Set vibrance to 8.
- After that, select Warmth and set it to 10.
- Tint effect needs to be set to 39.
- Make changes in the Sharpness by setting it to 14.
- Keep Definition to 0.
- Similarly keep noice reduction to 0.
- Set Vignette to -23
- Exposure to be kept at 0.
- Finally bring Brilliance to 0
With this, you have achieved an appealing shiny and tanning look to your photo. This editing hack works better on photos that are taken in bright light.
iPhone golden hour editing hack
This is another popular iPhone photo editing trick which you can use to fake the golden hour look in your photos. For those who don’t know, golden hour is the time of sunset and sunrise when the light is redder and softer than normal. During this period, the light gives a warm feel and stunning look to the photos.
- Exposure: -100
- Brilliance: -100
- Highlights: -35
- Shadows: -28
- Contrast: -30
- Brightness: -15
- Black Point: 10
- Saturation: 10
- Vibrance: 8
- Warmth: 11
- Tint: 39
- Sharpness: 14
- Definition: 5
- Vignette: 23
- Change Exposure and Brilliance to 0 again.
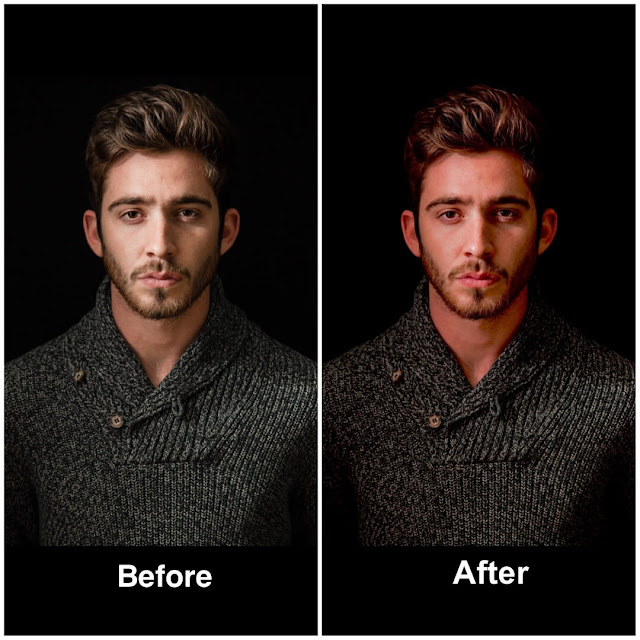
Cinematic iPhone photo editing trick
Give your photo a completely new colourful and cinematic look with this iPhone photo editing preset. Here’s what you need to do –
- Set Exposure to 100.
- Now select Brilliance and set it to 100.
- Choose highlights effect and bring it down to -33.
- Shadow effect should be set -28.
- Now select Contrast and set it to -31.
- Bring down the brightness to -24.
- Time to change Black Point by setting it at 25.
- Saturation should be kept at 19.
- Set the Vibrant to 19.
- Warmth should be kept at 21.
- Select the Tint option now and set it to 15.
- Change the Sharpness to 8.
- Lastly, change Vignette to 18.
Looks pretty cool right? Now use this effect on your new photo before uploading it on Instagram.
Despite clicking a perfect photo it might not look as good as it should be. There is a lot more you can do with the iPhone’s Photos app than just applying a normal filter. By manually adjusting the editing tools, you can give a completely new look to your photos. We have shared some of the best iPhone photo editing tricks, hacks and presets in this tutorial. Hope you liked them. If you have any question in your mind, feel free to share it in the comment below.