BHIM app uses UPI (short for Unified Payment Interface) system that facilitates instant funds transferring between two bank accounts on a mobile platform. When you will register on BHIM app, you will be assigned a UPI ID.
The UPI ID (also known as VPA or Virtual Private Address) was made to simplify the money transfer process. You can directly send and receive money on BHIM app by just using UPI ID only. There is no need to use the bank account number and IFSC code.
The UPI ID is unique for every user just like your email address and it looks something like this – 1234567890@upi. BHIM app will set your phone number as your UPI ID by default, however, you can also change it. This guide shows you how to create custom UPI ID in BHIM app.
Table of Contents
Benefits of creating custom UPI ID
Here are some of the benefits of creating your own custom UPI ID in BHIM app –
- You can create a short and easy-to-remember UPI ID with your name.
- It would be easier for you to share it with others. Apart from this, people will also remember your custom UPI ID easily as compared to your long phone number.
- The custom UPI ID looks more professional.
- It will also help you to keep your phone number confidential if you don’t want to share it with anyone.
How to create custom UPI ID in BHIM app
BHIM app allows you to create your own custom UPI ID and it’s quite simple. Just follow this step-by-step guide –
- Open BHIM app and enter the passcode to login to the app.
- Click Profile option under My Information section.
- Here you will see your current UPI ID and its QR code. You have to click on the “Add UPI ID” button.

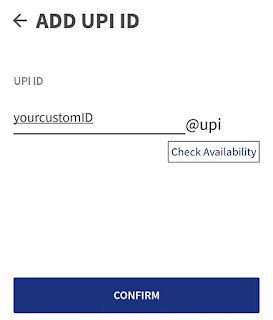
- Now enter your desired UPI ID and check if it is available. Make sure to add your name in it. Finally, tap the “Confirm” button.

- Now you have successfully created a new UPI ID. You can set it as your primary choice by clicking on the “Primary” option next to it. That’s it.

Note: Your old UPI ID will still be active and you can also use it to send and receive payments.
- Also read: How to check bank balance on Android phone
How to change UPI ID on BHIM app again
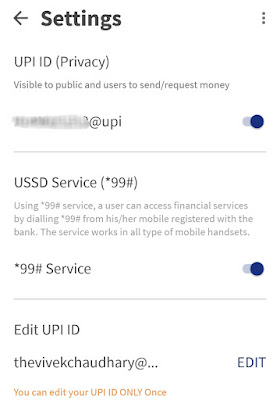
BHIM app allows you to change your UPI ID only once. If you want to change it again, first open BHIM app and go to your Profile. Now tap the menu button (three-dots at the top right corner of the screen) and then click Settings option.

Here you will find an option to edit your UPI ID. Simply, click on the “Edit” option and then you can add your new UPI ID. If it is available, click on the “Confirm” button. You would be asked to confirm it again.

So that’s how you can create and change UPI ID in BHIM app. You might be interested to read another tutorial on how to fix “Registration failed error” in BHIM app. If you want to ask something related to this tutorial, let us know in the comment section below.