Do you want to take a screenshot on your iPhone or iPad? Screenshot allows you to quickly save a snapshot of what is currently visible on the screen.
There are various situations where you will find it necessary to capture a screenshot on your iPhone. For instance, you might want to save a view once photo on WhtatsApp, download a picture from Instagram, share some important information from a web page, and more.
In this guide, we’ll walk you through the step-by-step process of taking a screenshot on your iPhone or iPad. Whether you have the latest iPhone model or an older version, there are multiple methods available for you to use. Let’s discuss each method in detail.
Table of Contents
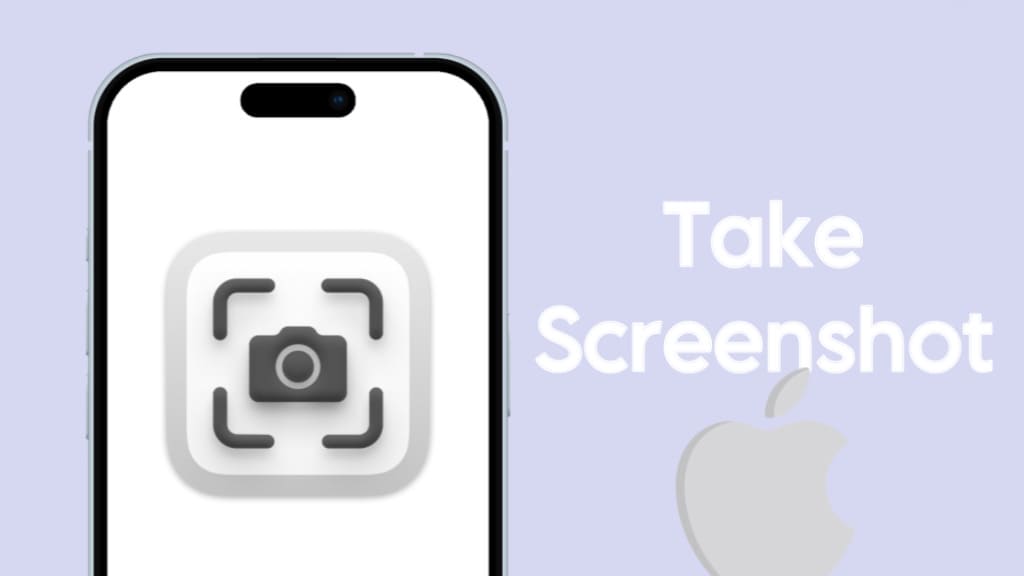
Method 1: Take a screenshot on iPhone with Face ID
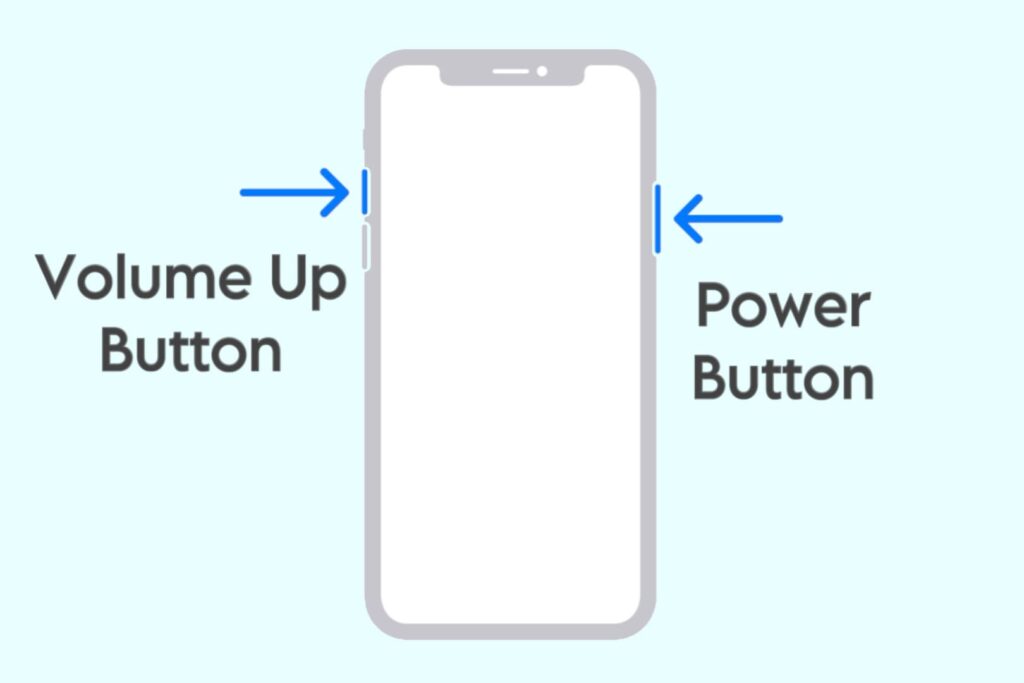
To capture a screenshot on your iPhone, you’ll need to use a combination of physical buttons. Here are the steps you need to follow:
Open the app or navigate to the screen that you want to capture in the screenshot. Make sure everything is set up the way you want it to appear in the image.
Press the Side button and the Volume Up button simultaneously to take a screenshot.
You’ll hear a camera shutter sound and see a brief flash on the screen, indicating that the screenshot has been successfully taken. Note that if your iPhone is in silent mode, the sound will be disabled, but the screen flash will still occur.
Once the screenshot is captured, you will see its preview in the bottom-left corner of the screen. Tap on the preview to open the screenshot or swipe it away to save it to your Photos app directly.
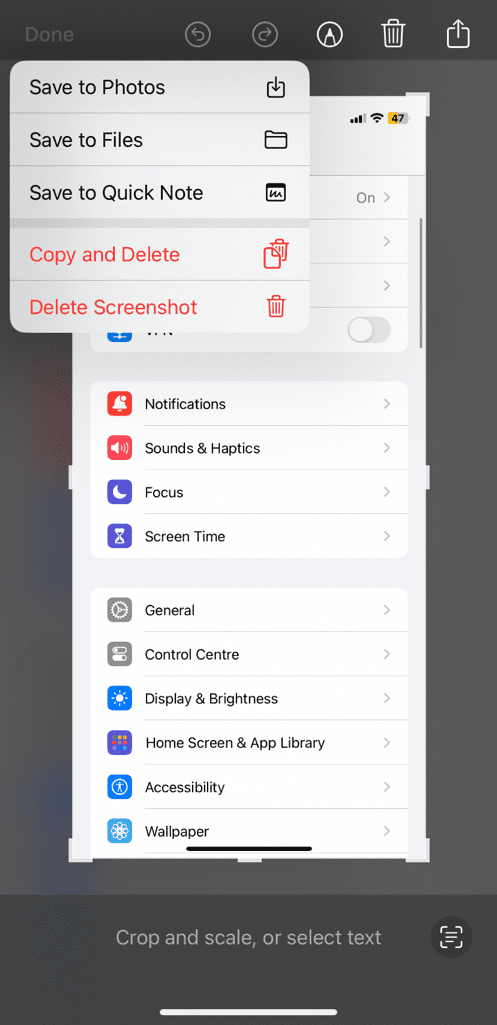
In the Preview screen, you can edit the screenshot before saving it. There are various editing options available that allows you to crop, annotate, or add text to the screenshot. Once you have edited, tap Done in the upper-left corner and then you can choose to save it to Photos, Files, or Quick Note.
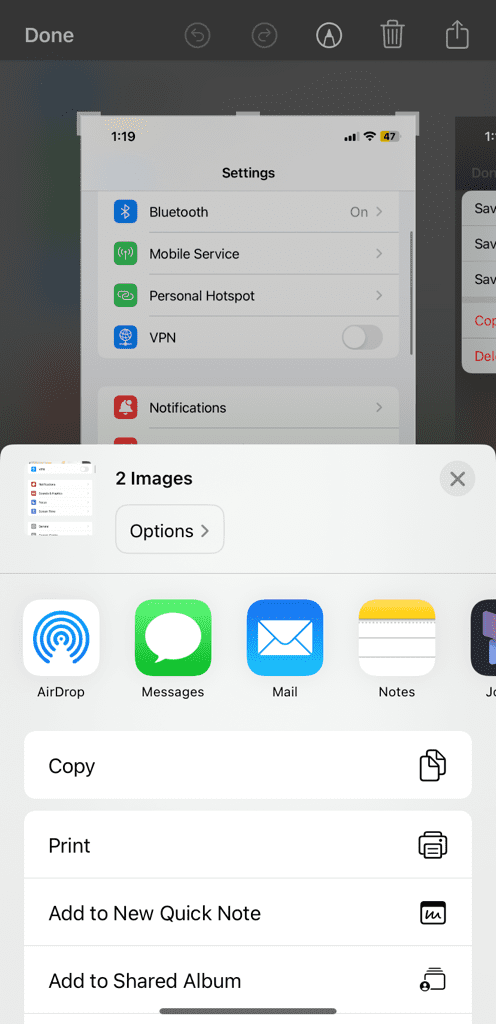
If you want to share the screenshot with somone, tap the share icon (a square with an arrow pointing up) in the top-right corner. This will open up the share sheet on your iPhone where you will find various sharing options. You can share the screenshot with someone via AirDrop, iMessage, WhatsApp, Mail, or any other medium.
If your prefered app is not available in the list, scroll to the right most side in the Apps carousel and tap More option. On the next screen, select Edit in the upper-right corner and then enable the toggle button next to the app you want to add in the Share Sheet. Additionally, you can tap the + (plus) button to add the app to your Favourites.
To save the screenshot as a file on your iPhone, tap “Save to Files” option. After that, select the folder/directory where you want to save it, rename the file (if required) and tap Save option in the top-right corner.
Method 2: Take a screenshot on iPhone with Touch ID
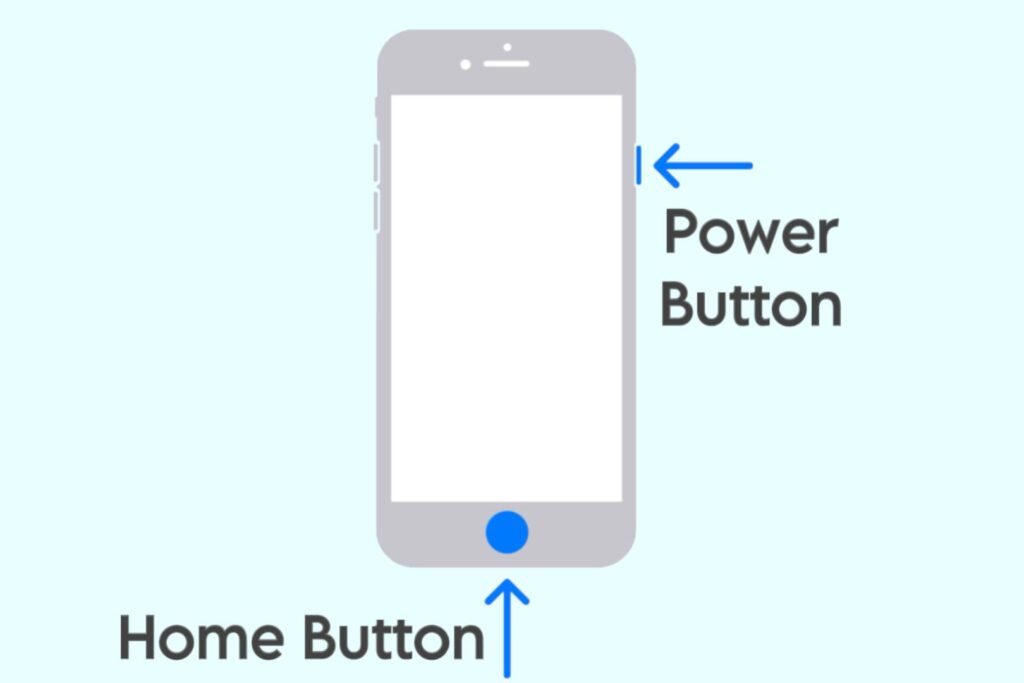
If you have an older model iPhone that has a Touch ID, such as iPhone SE (2022), iPhone SE (2020), iPhone SE (2016), iPhone 8 Plus, iPhone 8, iPhone 7 Plus, iPhone 7, iPhone 6s Plus, iPhone 6s, iPhone 6 Plus, iPhone 6, or iPhone 5s, you need to use a different combination of buttons to take a screenshot.
Before we start, make sure you’re on the screen or have the content you want to capture ready. It could be a message conversation, a webpage, a photo, or any other content displayed on your iPhone.
Simply, press the Power (Side) button and the Home button simultaneously. Upon pressing the buttons simultaneously, you will see a brief flash on the screen, and you may hear a camera shutter sound. This indicates that the screenshot has been captured.
It will be automatically saved to your Photos app. To access your screenshot, open the Photos app on your iPhone and navigate to the “Screenshots” album. There, you’ll find all the screenshots you’ve taken.
Note: Sometimes you might encounter the error “Screenshot blocked” while taking a screenshot on your iPhone. This usually happens when you try to capture some sensitive content, for example, taking a screenshot of WhatsApp view once photos. Luckily, there are some alternative workarounds that you can use to bypass this screenshot restriction.
Method 3: Take screenshots with Back Tap on iPhone
If you’re using a device with iOS 14 or later, you can take advantage of the Back Tap feature to capture screenshots on your iPhone. There is a hidden button on the back side of your iPhone which can be used to trigger specific actions. Here’s how to use this feature to take screenshots:
- Open the Settings app on your iPhone.
- Go to Accessibility.

- Tap on Touch under Physical and Motor.

- Scroll down to the bottom. There you will find Back Tap option. Tap on it.

- Choose either “Double Tap” or “Triple Tap“.

- Find and select Screenshot from the list of actions.

- Now whenever you want to capture a screenshot, simply double or triple tap the back of your iPhone.
Once you’ve taken a screenshot, you can edit it by tapping on the thumbnail that appears in the bottom left corner of the screen immediately after capturing the screenshot. You can also share the screenshot directly from this preview screen.
Method 4: Take a screenshot on iPhone using Siri
Another way to take a screenshot on your iPhone is by using Siri. Siri makes it a hands-free and convenient process. All you need to do is say a simple command and it will do the job.
To begin, activate Siri by either saying “Hey Siri” (if enabled) or pressing and holding the side button (iPhone X and later models) or the Home button (iPhone 8 and earlier models).
Once Siri is activated, simply say, “Take a screenshot“. Siri will immediately execute the command, and you’ll hear the familiar camera shutter sound indicating that the screenshot has been captured.
Note: If Siri is not enabled on your iPhone, go to Settings > Siri & Search. From there, you can enable or disable “Hey Siri” and choose whether to activate Siri by pressing the Side button or Home button.
Method 5: Take screenshots with Assistive Touch
AssistiveTouch is a built-in accessibility feature on iPhone that provides an on-screen touch interface for various functions. You can also use AssistiveTouch to take screenshots. Here are the steps you need to follow:
- Go to Settings on your iPhone.
- Tap on Accessibility.
- Scroll down and select Touch.
- Tap on AssistiveTouch.

- Toggle the switch to turn it on. With AssistiveTouch enabled, a black circle icon will appear on your screen.

- Next, go to Customize Top Level Menu.
- Here you can add or remove functions to your Assistive Touch menu. Tap an icon to change its function.

- Find and select Screenshot. It will now appear in your AssistiveTouch menu.

- Now whenever you need to take a screenshot on your iPhone, tap on the Assistive Touch button to open the menu.

- Next, tap on Screenshot option. That’s it!
Your iPhone will capture a screenshot of the current screen. By using Assistive Touch, you eliminate the need to press physical buttons.
Method 6: Take long scrolling screenshots on iPhone
If you need to take a long scrolling screenshot on your iPhone, you can use the built-in feature called “Full Page“. This works with webpages on Safari browser. With this method, you can capture everything on the web page including what is currently not displayed on your screen. Here’s what you need to do:
- Open Safari and visit the web page you want to capture.
- Take a regular screenshot by pressing the Side Button + Volume Up button simultaneously.
- Immediately tap on the screenshot preview thumbnail that appears at the bottom left corner of the screen.
- In the upper-right corner of the screenshot preview, you’ll see an option called “Full Page“. Tap on it.

- Your iPhone will automatically scroll down and capture the entire web page.
That’s it! Once captured, you can edit or share the long screenshot as needed. Please note that this feature is available on iPhones running iOS 13 and later.
Summary
We have covered several methods to help you take a screenshot on your iPhone. In addition to the traditional method of using the combination of physical buttons, you can also try other methods as per your convenience. These methods are applicable to iPad as well. If you have any questions about this topic, don’t hesitate to share them in the comments section below.
Read other similar articles:
- How to Take a Screenshot on Android Phone
- How to Fix Can’t Take Screenshot Due to Security Policy
- How to Save View Once Photos and Videos on Instagram
- 10 Hidden iPhone Features You Probably Didn’t Know