Capturing a screenshot on your Android phone is a handy feature that can be useful in various situations. Whether you need to share some important information, save view once photos on WhatsApp, download pictures from Instagram, or troubleshoot technical issues, knowing how to take a screenshot is essential.

If you’re an Android user wondering how to take a screenshot on your device, you’re in the right place. There are multiple methods available to suit your preferences and device model. Let’s explore each method in detail.
Table of Contents
Method 1: Take a screenshot using buttons
This method is one of the most common and universally applicable ways to capture a screenshot on Android devices. Here’s what you need to do:
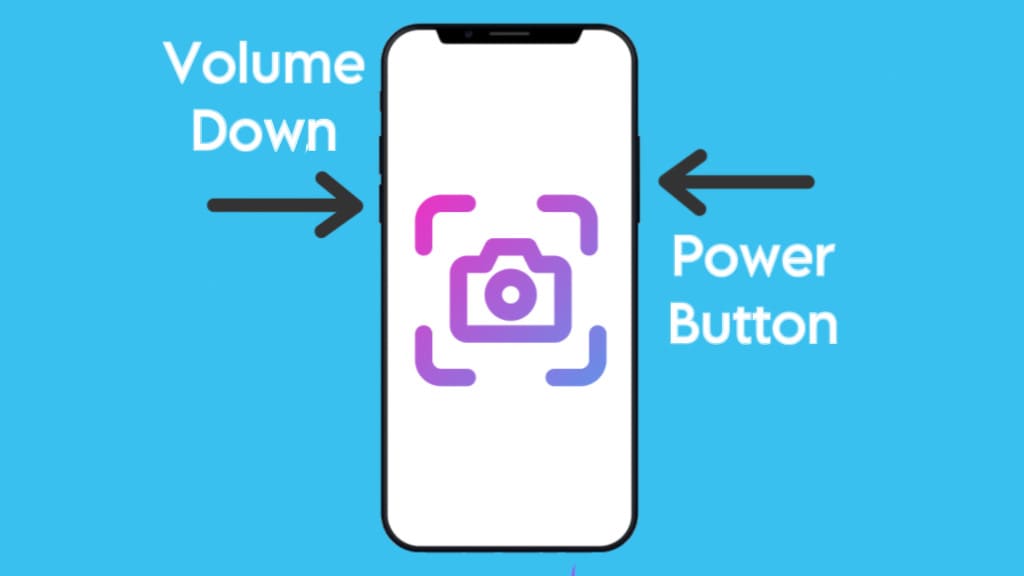
Locate the Power and Volume Down buttons on your Android device. These buttons may be positioned differently depending on your device model.
Press and hold both buttons simultaneously for a few seconds until you see a visual or hear a sound indicating that the screenshot has been captured.
Your device may display a preview of the captured screenshot. This preview allows you to quickly review the screenshot and perform actions such as editing or sharing.
If you miss the preview or wish to access the screenshot later, don’t worry! The captured screenshot will be saved to your device’s internal storage in the Screenshots folder. You can find it in the gallery app too.
Note: Some apps might block your phone’s ability to take a screenshot for certain restricted content. For example, if you try to try to take a screenshot of WhatsApp view once photo, you will encounter the error “Can’t take screenshot due to security policy”.
In such a case, you can use alternative workarounds to get the screenshot on your Android phone. One of the best ways is to use the virtual Android app. This application allows you to run a copy of virtual Android system on your device where you can install apps in parallel space and bypass the screenshot restriction.
Method 2: Take a screenshot using Google Assistant
Google Assistant, the AI-powered virtual assistant developed by Google, offers an easy way to capture screenshots on your Android phone using voice commands. Follow these simple steps:
Activate Google Assistant by saying “Hey Google” or long-pressing the Home button. You’ll typically see a visual indicator or hear a sound (such as a beep) when Google Assistant is activated and ready to assist you.
Once Google Assistant is activated, say “Take a screenshot” or “Capture the screen”. Google Assistant will acknowledge the command and execute the screenshot capture process.

After the screenshot is captured, it is automatically saved to your device. You can access the screenshot through your device’s Gallery app, usually in the “Screenshots” folder.
If you wish to edit the screenshot or share it with others, many Android devices offer built-in editing tools. You can find these options within the Gallery app, allowing you to crop, annotate, or add text to the screenshot before sharing it.
Method 3: Take a screenshot using Quick Settings panel
Many Android devices offer a convenient shortcut in the Quick Settings panel for capturing screenshots without the need for physical buttons.
Swipe down from the top of your screen to access the Quick Settings panel and look for the “Screenshot” icon. It is usually represented by a camera or phone screen icon.
Tap on the “Screenshot” icon and your device will instantly capture the screen. You may receive a notification confirming the successful capture. Additionally, you can access the screenshot directly from the notification panel.
Note: If you could’nt find the Screenshot icon in the Quick Settings panel, it might be hidden. In that case, tap on the pencil icon or the “Edit” option and then check if the Screenshot button is available.
Once you’ve successfully captured the screenshot, you have a plethora of options at your disposal. You can edit the screenshot using built-in editing tools to crop, annotate, or add text before sharing it with others.
Method 4: Take a screenshot using palm swipe geature
Some Android devices (Samsung Galaxy, for example) offer a unique feature called the palm swipe gesture for capturing screenshots.
While many modern Android devices offer this functionality, it may not be available on all models. To check if your device supports the palm swipe gesture, go to Settings > Advanced Features > Motion and gestures.
Enable the Palm swipe to capture option if available. Once enabled, navigate to the screen or content you wish to capture and swipe the edge of your hand across the screen from right to left or left to right to take a screenshot.
Method 5: Use a third-party Screenshot app
While the native methods of taking screenshots on Android devices offer convenience, third-party screenshot apps provide additional features and customization options.
Some apps even have scrolling capture facility, allowing you to take extended screenshots of content that requires scrolling, such as webpages, chat conversations, or social media feeds.
Simply, go to the Play Store on your Android device and search for “Screenshot”. From the search results, find an app with good reviews and ratings that meets your requirements.

Install the chosen app on your Android device. Once installed, launch the app and follow any on-screen prompts to grant the necessary permissions such as access to media files, Display Over Other Apps, and more.
Navigate to the screen or content you wish to capture and trigger the app take a screenshot. This might involve tapping a floating button or performing a specific gesture.
After capturing the screenshot, the app may offer advanced editing tools. Edit the screenshot as desired, adding annotations, highlights, or other enhancements.
Once satisfied with the edits, save the screenshot to your device or directly share it through various platforms such as WhatsApp, Messenger, or Gmail.
Method 6: Take scrolling screenshot on Android
Sometimes you need to capture a scrolling screenshot to cover the entire screen or a web page beyond what is currently displayed on your phone screen. First, take a regular screenshot by pressing the Power button and Volume Down button simultaneously.
After taking the initial screenshot, look for an option named “Capture more” (on stock Android) or two downward arrows in the preview toolbars (on Samsung smartphones). Next, select the portion of the screen you want to include in the screenshot and save it.
If your device doesn’t have a built-in scrolling screenshot feature, you can download a third-party app such as LongShot from the Google Play Store that provides this functionality.
Summary
By following the simple steps outlined in this guide, you’ll be able to capture anything on your Android screen with ease. So go ahead, start snapping those screenshots, and make the most out of your Android experience! If you have any questions in your mind, do let us know in the comments below.
Read other similar articles:
- How to Take Screenshot of WhatsApp View Once Photos
- How to Fix Can’t Take Screenshot Due to Security Policy
- How to Save View Once Photos and Videos on WhatsApp
- How to Save View Once Photos and Videos on Instagram