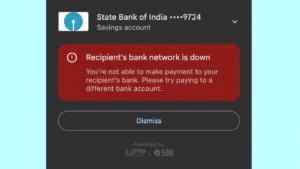
Are you trying to check your account balance on Google Pay and it is showing an error message that says “Couldn’t Check Bank Balance”? You could have re-tried multiple times only to get the same message again and again.

In this article, we will find out the reasons why Google Pay shows this “couldn’t check bank balance” error and what are the steps you can take to fix it. Additionally, we will discuss some alternative ways to check your bank account balance online.
Table of Contents
Common issues leading to “Couldn’t check bank balance” on Google Pay
1. Bank Server Busy
The accessibility of your bank’s server plays a crucial role in retrieving real-time account information. If the server is overloaded or undergoing maintenance, it can lead to a failure in checking your bank balance on Google Pay.
2. Internet Connection Problem
Google Pay relies on a stable internet connection to communicate with your bank’s servers. If you’re in an area with weak or no signal, this could be the root cause. Before diving into complex troubleshooting, it’s essential to check your internet connection.
3. Outdated Google Pay app
You might not have updated the Google Pay app on your phone from a long time. Using an outdated version of the Google Pay app may cause compatibility issues and prevent you from checking your bank balance.
4. Incorrect App Permissions
Google Pay requires specific permissions on your phone to work properly. For example, it needs access to your SIM to make sure that you have the same registered phone number active on your device. If these permissions are not granted, the app may fail to retrieve your bank balance.
5. Phone number verification issue
If you have changed your SIM card recently, it can cause verification issues with Google Pay leading to error messages like “Couldn’t check bank balance“. You must have the same SIM card inserted in your device which is registered with your bank account.
Troubleshooting steps for Google Pay Bank Balance Check
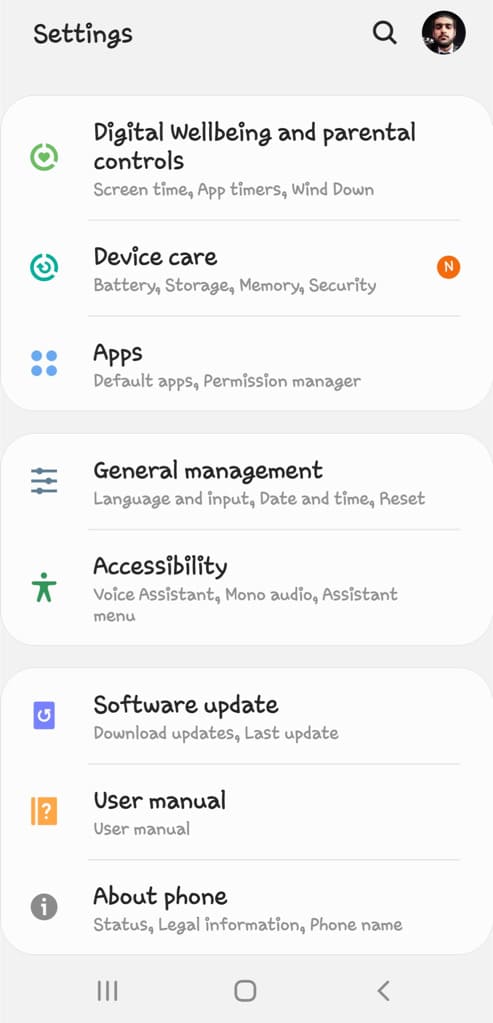
1. Clear Cache and Data
Clearing the cache and data helps in removing any temporary files or corrupted data that might be causing the issue.
Steps:
- Head to the Settings app on your phone.
- Select “Apps” or “Applications“.
 Apps”>
 - Find and select Google Pay.
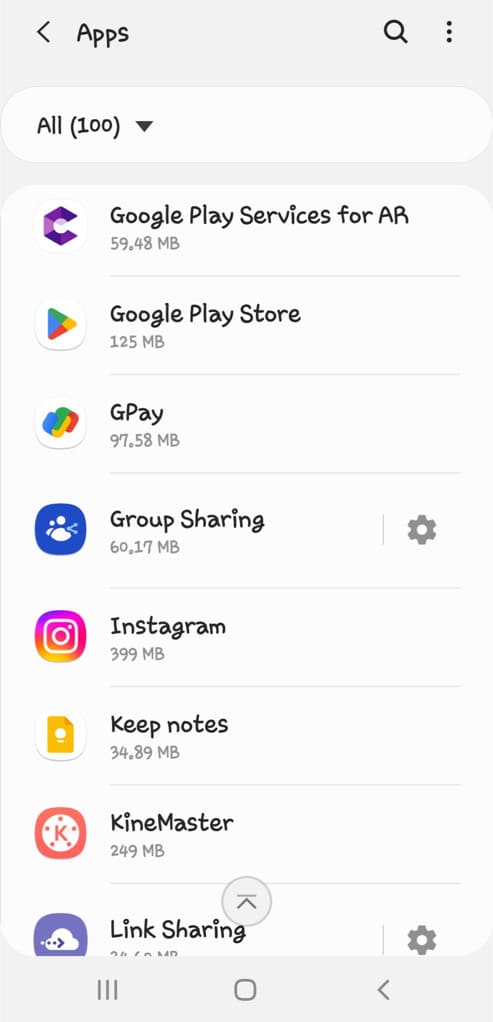
- Select “Storage” option.
- Tap on “Clear Cache” and “Clear Data“.

2. Insert your registered SIM card
Google Pay need you to have the same phone number active on your device which is registered with your bank account. If you have removed your SIM card, it will create issues with Google Pay. To fix this, simply reinsert your SIM card.
3. Retry again after sometime
Close the Google Pay app, wait for a few minutes, and then reopen it to attempt checking your bank balance again. Sometimes, issues may be transient, and waiting for a brief period can resolve them.
4. Re-link your bank account
Sometimes, unlinking and re-linking your bank account can refresh the connection between Google Pay and your bank and resolve any underlying issues.
Solution:
- Open Google Pay.
- Tap on your profile picture in the upper-right corner.
- Tap on “Bank account” option.

- Select the bank account facing issues.
- Tap three vertical dots in the top-right corner.
- Choose “Remove Account” from the menu and then confirm your action.

- Once your account has been removed, re-add your bank account from the Payment methods page.
5. Check for app updates
If you are using an outdated version of Google Pay, update it to the latest version.
Steps:
- Open the Play Store (Android) or the App Store (iOS).
- Search for “Google Pay” and check for any available updates.
- If an update is available, install it.
6. Check your internet connection
If you are having issues with your internet connection, try the following solutions:
- Ensure that you have a stable internet connection.
- Switch between Wi-Fi and mobile data to see if the issue persists.
- Perform a speed test to verify the strength of your internet connection.
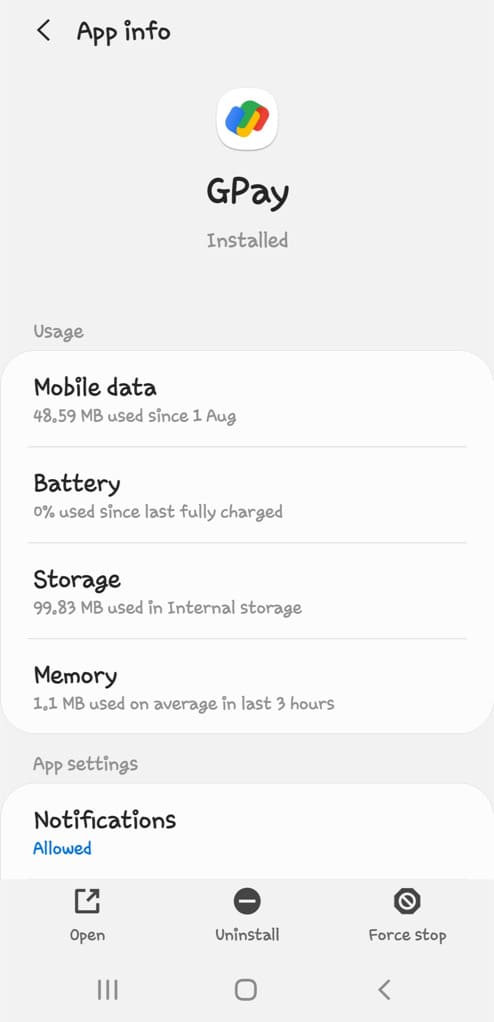
7. Enable app permissions
As we mentioned earlier, Google Pay needs specific permissions to function correctly. Make sure you have allowed all permissions to the Google Pay app on your phone.
- Open the Settings app on your device.
- Navigate to “Apps” or “Applications“.
- Find and open “Google Pay” from the list of apps.
- In the App Info page, tap on “Permissions“.

- Ensure that all required permissions, such as location and storage, are granted.
8. Force Restart Google Pay
Force restarting the app can help resolve any temporary glitches that might be affecting its functionality.
Steps:
- Go to your device settings.
- Head to Apps > Google Pay.
- Tap on “Force Stop” in the App Info page.
- Close the Google Pay app completely.
- Reopen the app and try again to check your bank balance.
9. Enable automatic date and time
Google Pay rely on accurate time information for security reasons during transactions and other activities. If your device’s time is incorrect, it might cause issues when trying to check your bank balance. To fix this issue, all you need to do is enable automatic date and time settings on your phone:
- Launch the Settings app.
- Navigate to “Date & Time” settings.
- Enable the “Automatic date and time” option. That’s it!
10. Contact your bank
If all else fails, and the issue persists, it’s advisable to reach out to your bank’s customer support. Make sure to provide them with details about the problem and any troubleshooting steps you’ve already taken.
Your bank’s support team can provide insights into whether there are any known issues on their end and offer further assistance.
Alternative ways to check your bank balance online
If you’re having issues with Google Pay, you can try the following alternative methods to check your bank balance:
- Bank’s official mobile app: Most banks offer a dedicated app that allows you to check your balance, view transactions, and manage your account.
- Internet Banking: If you have internet banking enabled on your bank account, you can log in to your bank’s official website and check your balance online.
- SMS Banking: Many banks provide SMS banking services. You are required to send a specific code or keyword to your bank’s designated number to receive your account balance via SMS.
- Phone Banking: You can also call your bank’s customer service or phone banking number and follow the automated prompts or speak with a representative to inquire about your bank balance.
- ATM Services: Visit an ATM and use your debit or ATM card to check your account balance. Most ATMs offer a balance inquiry option in their menu.
- Use other UPI apps: There are several other UPI apps such as PhonePe, Paytm, BHIM and more that you can use as an alternative to Google Pay. You can also check your bank balance on WhatsApp Payments.
Frequently asked questions
To check your bank balance on Google Pay, open the Google Pay app on your mobile device. Tap on your profile picture in the upper-right corner. Select the “Bank account” option. Choose the bank account for which you want to check the balance. Next, tap on “Check Balance” option and then enter your UPI PIN. Your bank balance should be displayed on the screen.
There could be various reasons behind this issue, including problems with your internet connection, outdated app version, incorrect app permissions, or issues with the bank’s servers.
Summary
In this guide, we’ve explored the common issues behind the “Couldn’t check bank balance” error on Google Pay and provided practical practical troubleshooting steps. By following these solutions, you should be able to resolve the issue and seamlessly check your bank balance on Google Pay. If problems persist, reaching out to your bank’s customer support is always a reliable option.
Read other similar articles:
- How to Check SBI Account Balance: 9 Ways
- Fix Oops Something Went Wrong on Google Pay
- How to Check Bank Balance on Android Phone
- Fix Payment Failed or Processing on Google Pay
- How to Check Your FASTag Balance