Do you want to upload your Instagram reels in the highest quality? If you don’t want to compromise with the quality of your videos, you can enable high-quality upload feature in your Instagram settings. We will show you how to do that!

You have probably noticed the difference between the quality of your videos before and after you post them on Instagram reels. Even the highest resolution videos such as 4K lose their quality when uploaded to Instagram. It is clear that their resolution changes but why does this happen?
Table of Contents
Why your Instagram reels lose quality after uploading?
Instagram uses some kind of video compression technology to compress your reels. This was done to reduce the size of the videos to provide a better user experience so that reels can load faster even on a slow network. This compression is the reason why the quality of your videos drop after they are uploaded to Instagram reels.
Some people still manage to upload their Instagram reels in full HD quality and you would have seen plenty of those reels popping up in your feed. What makes their videos so crystal-clear? In this article, we will show you what trick they use. You will learn how to upload Instagram reels in the highest quality without compression. Now without further ado, let’s get started!
How to enable high-quality uploads on Instagram Reels
By default, Instagram will automatically adjust the upload quality of your reels according to your network conditions. You can prevent Instagram from compressing your videos by changing the upload quality settings. It’s hidden deep inside Instagram, which is why few people know about it.
These steps will show you how to upload your Instagram reels in highest quality –
- Open the Instagram app on your smartphone.
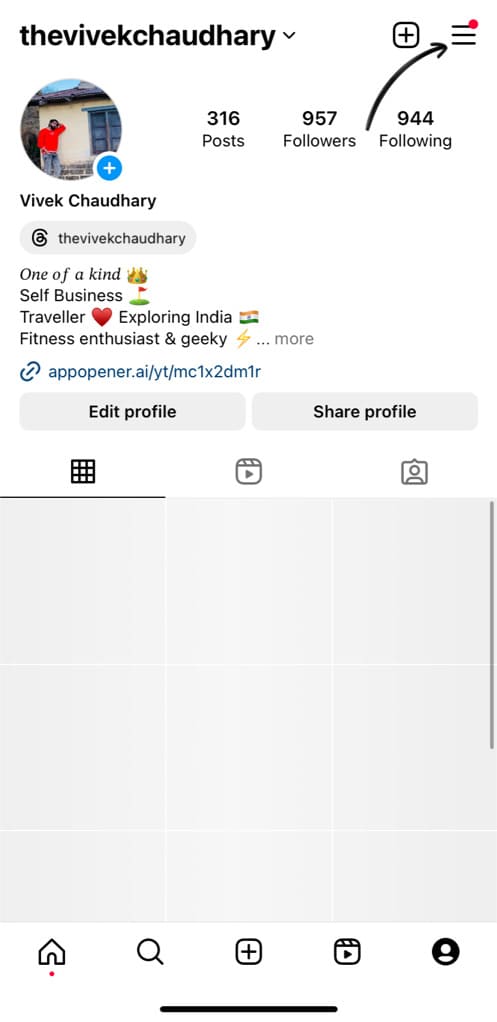
- Go to your profile by tapping over your profile picture icon in the bottom-right corner.
- Tap the menu button (three parallel lines) in the upper-right corner.
- Scroll down and find “Media quality” option under Your app and media. If you are using an older version of the Instagram app, this option might be available by a different name called “Data usage” under Account settings.
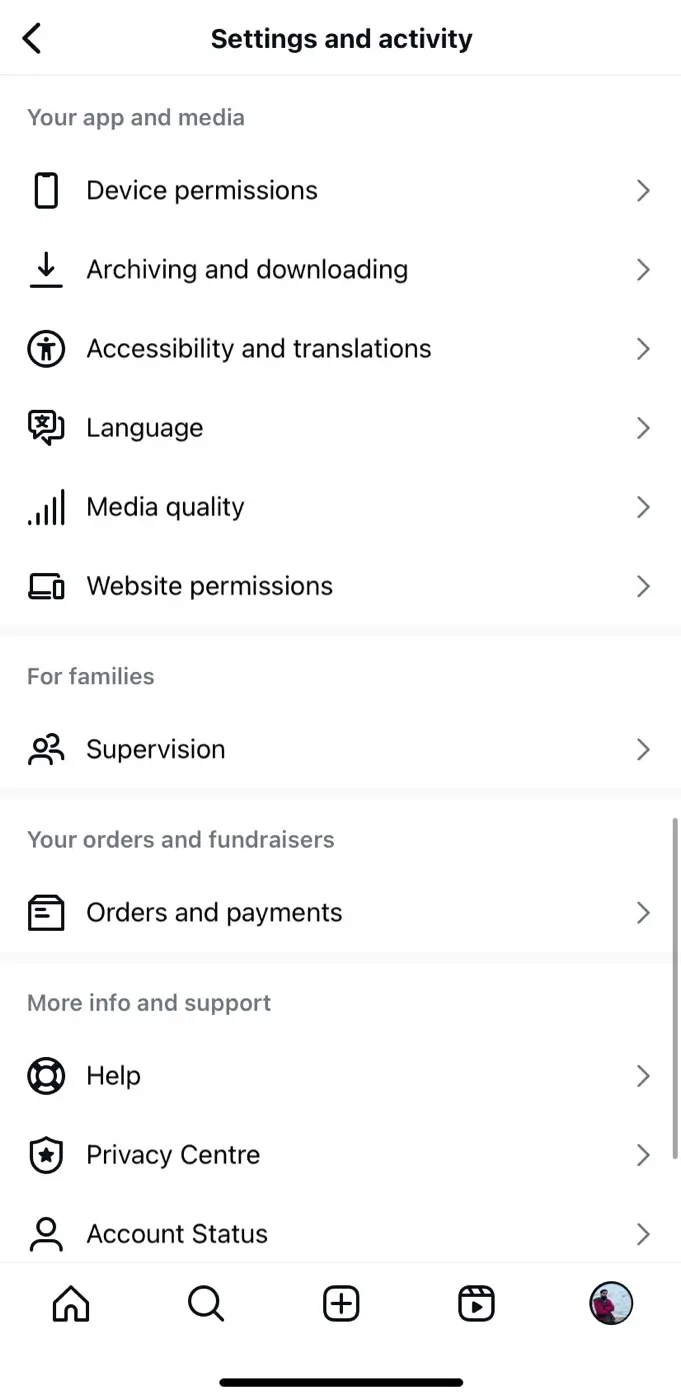
- On the next page, you will find an option named “Upload at highest quality“. Turn on the toggle button next to this option. That’s it!

Now all your future Instagram reels will be uploaded in HD quality without any compression. This setting applies not just to reels but to normal posts also including photos. The above steps will work for both iPhone and Android users.
Note: If you reinstall Instagram, this setting will be turned off automatically. Also, if you upload reels from different phones, you have to enable this high-quality upload setting in each phone separately.
How to change upload video quality while posting Instagram reels
Instagram has embedded the upload quality settings in the share screen also which can be accessed when you are about to post your Instagram reel. Here are the steps you need to follow:
- Launch the Instagram app.
- Tap + (plus) button at the bottom and then select Reels.
- Tap camera icon and then load an existing video from your camera roll that you want to post to your Instagram reels.
- In the next step, you can edit your reel by adding text, music, filters, stickers, GIFs, and other elements. Once the editing is done, tap Next button to continue.
- Now you will be taken to the share screen where you can add a caption for your reel, choose a cover thumbnail, and edit other settings.
- Scroll down and click More options at the bottom.

- Here you will find a section named Media quality. Under that, there is an option called Upload at highest quality. Switch on the button to enable it. This will allow you to upload your Instagram reels in HD quality.

- Go back to the previous screen by clicking < (back) icon in the upper-left corner and then you can share your Instagram reel.
Every time you post a new reel, make sure that this upload quality feature is enabled. Then you will have no issues with the quality of your reel videos even after they are published.
Best export settings for high-quality Instagram Reels
In order to get the best results with the highest quality possible for your Instagram Reels, export your videos in 1080p resolution at 30 frames per second. You can set the bitrate around 35 to 40 Mbps.
If you pick a lower resolution or bitrate, your video quality will be compromised. On the other hand, if you go for a higher resolution and fps (let’s say 4K), Instagram will apply compression on your video before uploading.
Below we have shared the complete details of export settings for high-quality Instagram reels:
| Video Specs | Recommended Settings |
|---|---|
| Resolution | 1080p |
| Frame rate (FPS) | 30 fps |
| Bitrate | 35-40 Mbps |
| HDR | Disabled |
| Aspect ration | 9:16 (Full Portrait) |
| Video coding | H.264 |
| File size | Ideally around 100 MB |
Frequently asked questions
After your videos are uploaded to Instagram reels, their resolution drops to 720p. The frame rate is 30 fps. Instagram also uses H.264 video encoding to compress the videos.
The reason why your reels doesn’t look as good as they were before uploading is because of the compression applied by the Instagram. They are reduced to 720p resolution.
VN is the best video editing app for editing Instagram reels. It’s a free app which is available for both Android and iPhone users. The app doesn’t add any watermark to your videos even with the free version. There are hundreds of unique transitions, filters and editing tools available.
No, Instagram Reels do not support 4K resolution. When you upload videos to Instagram Reels, the platform compresses them, reducing their quality to 720p resolution. So, regardless of the quality of the original video, it will be converted to 720p after uploading.
Instagram Reels may appear to have slightly better quality when uploaded from an iPhone compared to Android devices.
Final words
So now you have learned how to upload your Instagram reels in highest quality. By following this method, you can prevent Instagram from applying any kind of hard compression on your videos.
Make sure to share this article with your friends so they can also know about the secret to uploading high-quality reels. If you want to ask any question, feel free to share it in the comments below.
Read other similar articles:
- Best VN Export Settings for Instagram Reels
- Best CapCut Export Settings to Get Highest Quality
- How to Send High Quality HD Photos & Videos on WhatsApp
- How to Upload High Quality Photos and Videos on Threads
- How to Upload Photos in High Quality on Facebook

![12 Ways to Fix Instagram Reels Not Uploading [2024]](https://www.geekinstructor.com/wp-content/uploads/2023/01/fix-instagram-reels-not-uploading-300x169.jpeg)